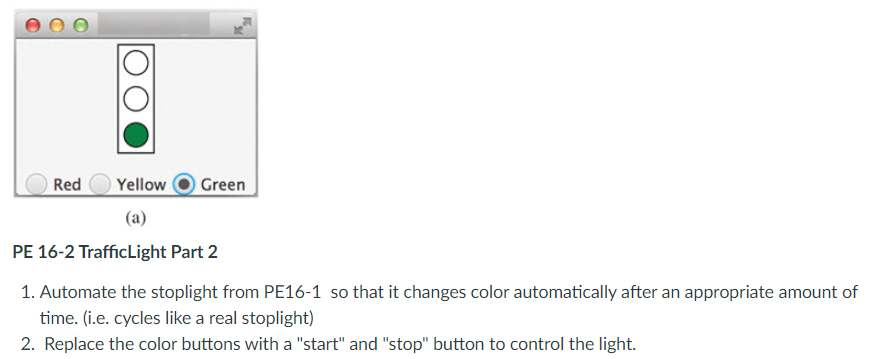
Question
I will attach code from Part 1. I need part two added on and in Java. import javafx.application.Application; import javafx.stage.Stage; import javafx.scene.Scene; import javafx.scene.control.RadioButton; import
I will attach code from Part 1. I need part two added on and in Java.

import javafx.application.Application; import javafx.stage.Stage; import javafx.scene.Scene; import javafx.scene.control.RadioButton; import javafx.scene.control.ToggleGroup; import javafx.scene.layout.StackPane; import javafx.scene.layout.VBox; import javafx.scene.layout.HBox; import javafx.scene.layout.BorderPane; import javafx.scene.paint.Color; import javafx.scene.shape.Circle; import javafx.scene.shape.Rectangle; import javafx.geometry.Pos;
public class TrafficLight extends Application { @Override // Override the start method in the Application calss public void start(Stage primaryStage) { // Create a vbox VBox paneForCircles = new VBox(5); paneForCircles.setAlignment(Pos.CENTER);
// Create three circles Circle c1 = getCircle(); Circle c2 = getCircle(); Circle c3 = getCircle(); c1.setFill(Color.RED);
// Place circles in vbox paneForCircles.getChildren().addAll(c1, c2, c3);
// Create a rectangle Rectangle rectangle = new Rectangle(); rectangle.setFill(Color.WHITE); rectangle.setWidth(30); rectangle.setHeight(100); rectangle.setStroke(Color.BLACK); rectangle.setStrokeWidth(2); StackPane stopSign = new StackPane(rectangle, paneForCircles);
// Create a hbox HBox paneForRadioButtons = new HBox(5); paneForRadioButtons.setAlignment(Pos.CENTER);
// Create radio buttons RadioButton rbRed = new RadioButton("Red"); RadioButton rbYellow = new RadioButton("Yellow"); RadioButton rbGreen = new RadioButton("Green");
// Create a toggle group ToggleGroup group = new ToggleGroup(); rbRed.setToggleGroup(group); rbYellow.setToggleGroup(group); rbGreen.setToggleGroup(group); rbRed.setSelected(true); paneForRadioButtons.getChildren().addAll(rbRed, rbYellow, rbGreen);
// Create a border pane BorderPane pane = new BorderPane(); pane.setCenter(stopSign); pane.setBottom(paneForRadioButtons);
// Create and register handlers rbRed.setOnAction(e -> { if (rbRed.isSelected()) { c1.setFill(Color.RED); c2.setFill(Color.WHITE); c3.setFill(Color.WHITE); } });
rbYellow.setOnAction(e -> { if (rbYellow.isSelected()) { c1.setFill(Color.WHITE); c2.setFill(Color.YELLOW); c3.setFill(Color.WHITE); } });
rbGreen.setOnAction(e -> { if (rbGreen.isSelected()) { c1.setFill(Color.WHITE); c2.setFill(Color.WHITE); c3.setFill(Color.GREEN); } });
// Create a scene and place it in the stage Scene scene = new Scene(pane, 200, 150); primaryStage.setTitle("Exercise_16_03"); // Set the stage title primaryStage.setScene(scene); // Place the scene in the stage primaryStage.show(); // Display the stage }
/** Return a circle */ private Circle getCircle() { Circle c = new Circle(10); c.setFill(Color.WHITE); c.setStroke(Color.BLACK); return c; } }
1. Automate the stoplight from PE16-1 so that it changes color automatically after an appropriate amount of time. (i.e. cycles like a real stoplight) 2. Replace the color buttons with a "start" and "stop" button to control the lightStep by Step Solution
There are 3 Steps involved in it
Step: 1

Get Instant Access to Expert-Tailored Solutions
See step-by-step solutions with expert insights and AI powered tools for academic success
Step: 2

Step: 3

Ace Your Homework with AI
Get the answers you need in no time with our AI-driven, step-by-step assistance
Get Started


