

Answered step by step
Verified Expert Solution
Question
1 Approved Answer
In Particle c + + for a photon device Part II: Board Assembly Add a yellow, green and blue LED to the circuit, connected to
In Particle c for a photon device
Part II: Board Assembly
Add a yellow, green and blue LED to the circuit, connected to pins D D and D respectively.
Consider the LEDs to represent a bit unsigned type, where a lit LED represents a an unlit LED a Assume that the least significant bit is at right blue the most significant bit at left red
Part III: Projects
These will be done as separate projects.
Write and flash the firmware to count up from to and then down from to ad infinitum. The count will be displayed, in base by lighting up the appropriate LEDs. For example, when count is all LEDs are off; when count is b the red and orange LEDs should be lit; the green and blue LEDs should be unlit. Also print out the count to the console as it is being displayed, one number per line.
Write and flash the firmware to continuously scan for a hex digit input at the command line dots Display the binary equivalent of that digit, in the LEDs, for second and then turn off all leds while you continue scanning Otherwise, display an error message flash all LEDs on simultaneously for second and then turn them off.
The second project requires that you retrieve serial input from the keyboard, which can be done by using Serial.read which returns a byte. See the docs for a fully working example. However, the serial monitor command is just for monitoring. To read input, do the following:
macOS: Launch terminal and execute this command: screen devttyusbmodem
the number may vary look at the ttyusbmodem files in dev and pick the most recent one when your Photon is connected
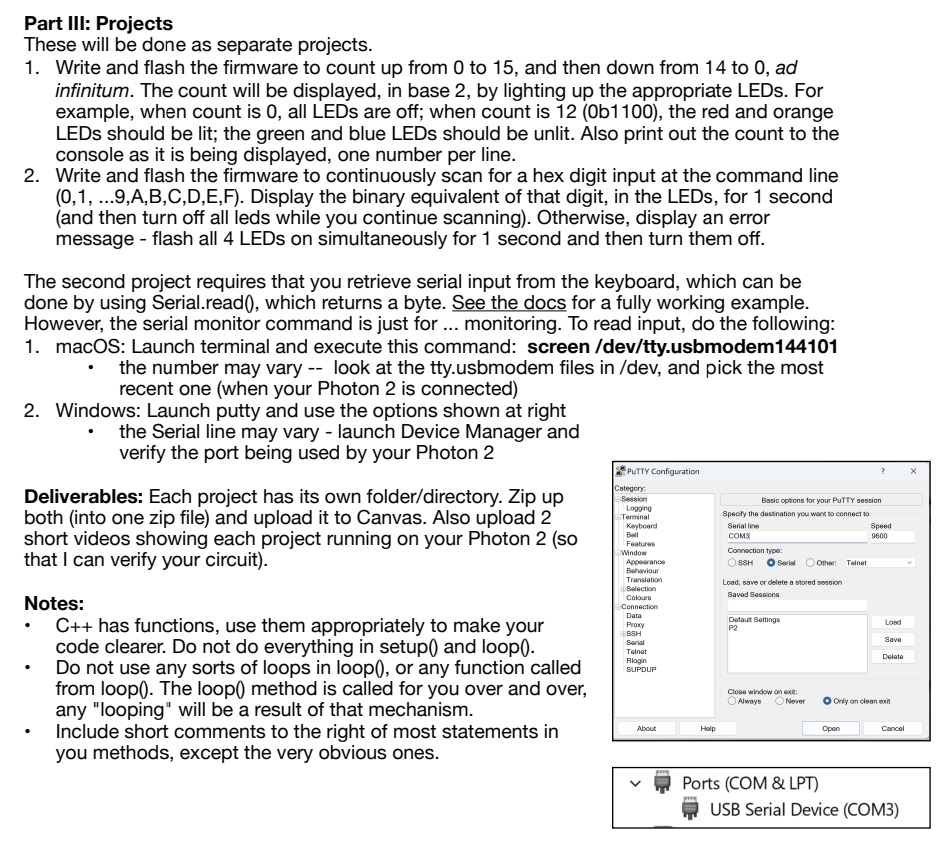
Windows: Launch putty and use the options shown at right
the Serial line may vary launch Device Manager and verify the port being used by your Photon
Deliverables: Each project has its own folderdirectory Zip up both into one zip file and upload it to Canvas. Also upload short videos showing each project running on your Photon so that I can verify your circuit
Notes:
C has functions, use them appropriately to make your code clearer. Do not do everything in setup and loop
Do not use any sorts of loops in loop or any function called from loop The loop method is called for you over and over, any "looping" will be a result of that mechanism.
Include short comments to the right of most statements in you methods, except the very obvious ones.
Ports COM & LPT
USB Serial Device COM
Step by Step Solution
There are 3 Steps involved in it
Step: 1

Get Instant Access to Expert-Tailored Solutions
See step-by-step solutions with expert insights and AI powered tools for academic success
Step: 2

Step: 3
Ace Your Homework with AI
Get the answers you need in no time with our AI-driven, step-by-step assistance
Get Started
Beginning Microsoft SQL Server 2012 Programming
Authors: Paul Atkinson, Robert Vieira
1st Edition
1118102282, 9781118102282