In this exercise, you will use your implementation of graph.h to implement an operation similar to the magic wand tool and use it to select parts of an image and recolor it. Images as Graphs


"floodfill.cpp"
#include
#include
#include "graph.h"
#include "png/png.hpp"
#include
#include
using namespace png;
using namespace std;
typedef image Image;
double distance(const rgb_pixel &p1, const rgb_pixel &p2) {
// ADD YOUR IMPLEMENTATION HERE return 0;
}
void add_edges(Graph &graph, const Image& image, int threshold) {
// ADD YOUR IMPLEMENTATION HERE
}
// FILL IN THE BLANKS BELOW TO MAKE THE PROGRAM RUNNABLE!
int main() {
string filename; cout
cin >> filename; Image image(filename);
int threshold;
cout
cin >> threshold;
// 1. DEFINE A Graph OBJECT. WHAT IS THE NUMBER OF VERTICES? // __ // 2. CALL THE add_edges() FUNCTION // __
int row, col;
cout
cin >> row >> col; // 3. GET AND STORE ALL THE VERTICES RECHABLE FROM THE VERTEX //
CORRESPONDING TO THE CELL AT THE GIVEN ROW AND COLUMN. //
vector reachable = __ // For every reachable vertex
for (int v : reachable) {
// 4. COMPUTE AND STORE THE ROW & COLUMN OF v // row = __ // col = __ // change the color of the pixel to white. image[row][col] = rgb_pixel(255, 255, 255); }
cout
image.write("result.png"); return 0; }
"min_pq.h"
#include #include #include using namespace std;
template class MinPQ { public: MinPQ(int maxN); // maxN is the maximum number of elements in the PQ ~MinPQ();
bool isEmpty() const; // checks if no elements are currently in the PQ int size() const; // number of elements currently in the PQ
void insert(int i, T key); // Associates key with index i. int delMin(); // Removes a minimum key and returns its associated index. void remove(int i); // Remove the key associated with index i.
int minIndex() const; // Returns an index associated with a minimum key. T minKey() const; // Returns a minimum key.
bool contains(int i) const; // Is i an index on this priority queue? T keyOf(int i) const; // Returns the key associated with index i.
void changeKey(int i, T key); // Change the key associated with index i // to the specified value. void decreaseKey(int i, T key); // Decrease the key associated with index i // to the specified value. void increaseKey(int i, T key); // Increase the key associated with index i // to the specified value.
private: int maxN; // maximum number of elements on PQ int n; // number of elements on PQ int* pq; // binary heap using 1-based indexing int* qp; // inverse of pq - qp[pq[i]] = pq[qp[i]] = i T* keys; // keys[i] = priority of i
// Helper functions void validateIndex(int i) const; bool greater(int i, int j) const; void exch(int i, int j); void swim(int k); void sink(int k); };
template MinPQ::MinPQ(int maxN) { if (maxN maxN = maxN; n = 0;
keys = new T[maxN + 1]; pq = new int[maxN + 1]; qp = new int[maxN + 1]; for (int i = 0; i
template MinPQ::~MinPQ() { delete [] pq; delete [] qp; delete [] keys; }
template bool MinPQ::isEmpty() const { return n == 0; }
template int MinPQ::size() const { return n; }
// Is i an index on this priority queue? template bool MinPQ::contains(int i) const { validateIndex(i); return qp[i] != -1; }
// Associates key with index i. template void MinPQ::insert(int i, T key) { validateIndex(i); if (contains(i)) throw string("index is already in the priority queue"); n++; qp[i] = n; pq[n] = i; keys[i] = key; swim(n); }
// Returns an index associated with a minimum key. template int MinPQ::minIndex() const { if (n == 0) throw string("Priority queue underflow"); return pq[1]; }
// Returns a minimum key. template T MinPQ::minKey() const { if (n == 0) throw string("Priority queue underflow"); return keys[pq[1]]; }
// Removes a minimum key and returns its associated index. template int MinPQ::delMin() { if (n == 0) throw string("Priority queue underflow"); int min = pq[1]; exch(1, n--); sink(1); assert(min == pq[n+1]); qp[min] = -1; // delete pq[n+1] = -1; // not needed return min; }
// Returns the key associated with index i. template T MinPQ::keyOf(int i) const { validateIndex(i); if (!contains(i)) throw string("index is not in the priority queue"); else return keys[i]; }
// Change the key associated with index i to the specified value. template void MinPQ::changeKey(int i, T key) { validateIndex(i); if (!contains(i)) throw string("index is not in the priority queue"); keys[i] = key; swim(qp[i]); sink(qp[i]); }
// Decrease the key associated with index i to the specified value. template void MinPQ::decreaseKey(int i, T key) { validateIndex(i); if (!contains(i)) throw string("index is not in the priority queue"); if (keys[i] == key) throw string("Calling decreaseKey() with a key equal to the key in the priority queue"); if (keys[i] the key in the priority queue"); keys[i] = key; swim(qp[i]); }
// Increase the key associated with index i to the specified value. template void MinPQ::increaseKey(int i, T key) { validateIndex(i); if (!contains(i)) throw string("index is not in the priority queue"); if (keys[i] == key) throw string("Calling increaseKey() with a key equal to the key in the priority queue"); if (keys[i] > key) throw string("Calling increaseKey() with a key // Remove the key associated with index i. template void MinPQ::remove(int i) { validateIndex(i); if (!contains(i)) throw string("index is not in the priority queue"); int index = qp[i]; exch(index, n--); swim(index); sink(index); qp[i] = -1; }
// throw an IllegalArgumentException if i is an invalid index template void MinPQ::validateIndex(int i) const { if (i = maxN) throw string("index >= capacity: " + i); }
template bool MinPQ::greater(int i, int j) const { return keys[pq[i]] > keys[pq[j]]; }
template void MinPQ::exch(int i, int j) { int swap = pq[i]; pq[i] = pq[j]; pq[j] = swap; qp[pq[i]] = i; qp[pq[j]] = j; }
template void MinPQ::swim(int k) { while (k > 1 && greater(k/2, k)) { exch(k, k/2); k = k/2; } }
template void MinPQ::sink(int k) { while (2*k
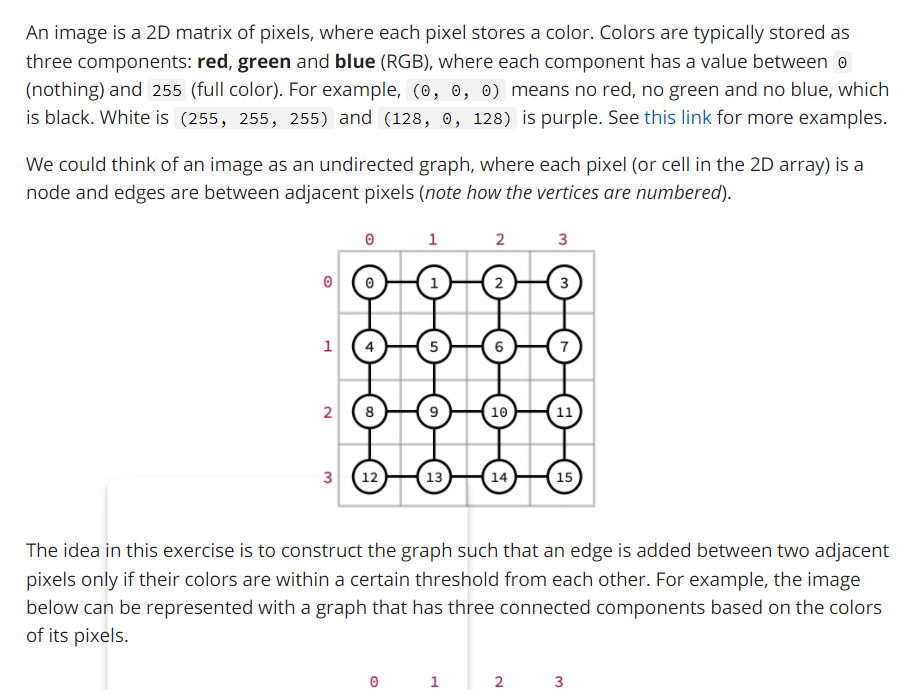
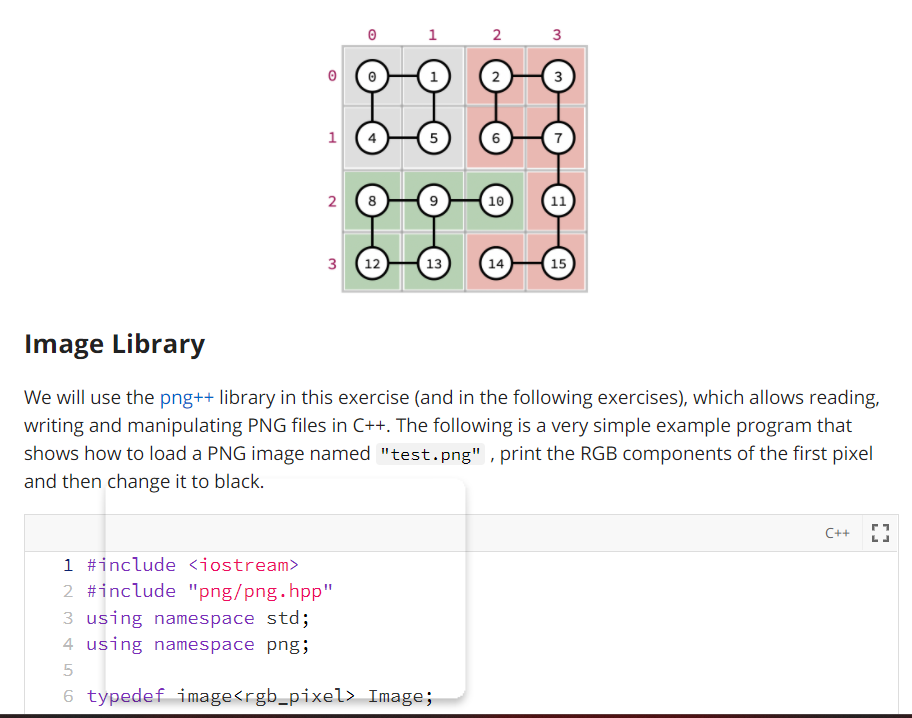
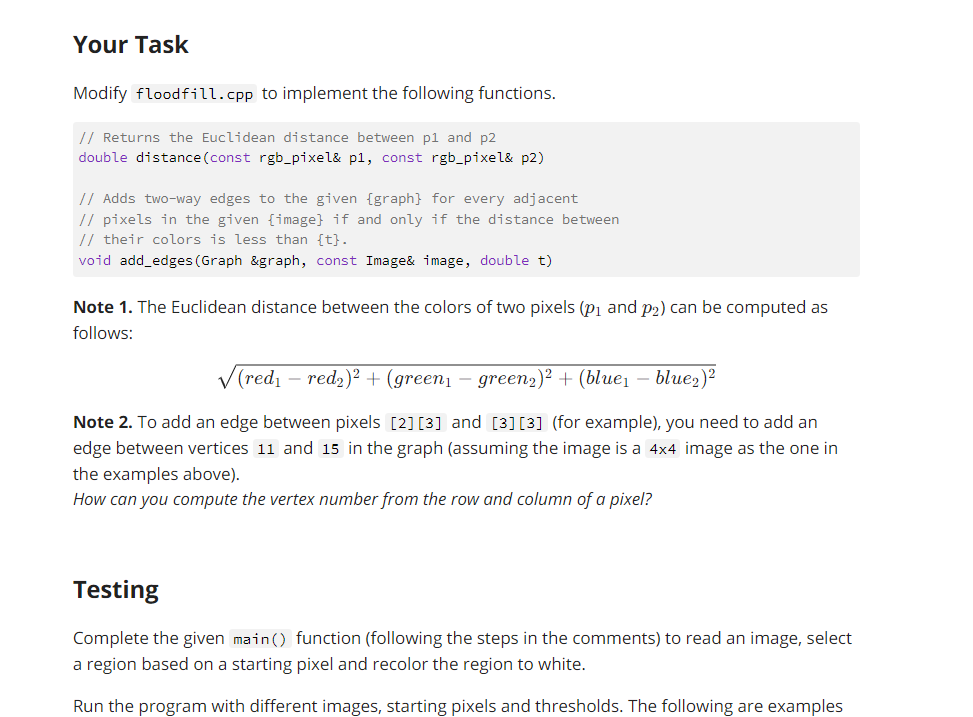
An image is a 2D matrix of pixels, where each pixel stores a color. Colors are typically stored as three components: red, green and blue (RGB), where each component has a value between o (nothing) and 255 (full color). For example, (0, 0, 0) means no red, no green and no blue, which is black. White is (255, 255, 255) and (128, 0, 128) is purple. See this link for more examples. We could think of an image as an undirected graph, where each pixel (or cell in the 2D array) is a node and edges are between adjacent pixels (note how the vertices are numbered). 0 1 2 3 1 2 3 1 5 2. 8 10 11 3 (12) 13 14 15 The idea in this exercise is to construct the graph such that an edge is added between two adjacent pixels only if their colors are within a certain threshold from each other. For example, the image below can be represented with a graph that has three connected components based on the colors of its pixels. 0 1 3 N O 1 2. 3 1 2 3 1 5 6 7 2 8 10 11 3 (12 13 14 15 Image Library We will use the png++ library in this exercise (and in the following exercises), which allows reading, writing and manipulating PNG files in C++. The following is a very simple example program that shows how to load a PNG image named "test.png" , print the RGB components of the first pixel and then change it to black. C++ r1 LJ 1 #include 2 #include "png/png.hpp" 3 using namespace std; 4 using namespace png; 5 6 typedef image Image; Your Task Modify floodfill.cpp to implement the following functions. // Returns the Euclidean distance between pl and p2 double distance (const rgb_pixel& pl, const rgb_pixel& p2) // Adds two-way edges to the given [graph} for every adjacent // pixels in the given [image] if and only if the distance between // their colors is less than {t}. void add_edges (Graph &graph, const Image& image, double t) Note 1. The Euclidean distance between the colors of two pixels (p and p2) can be computed as follows: (red - red2)2 + (greeni - green2)2 + (blue1 blue2)2 Note 2. To add an edge between pixels [2] [3] and [3][3] (for example), you need to add an edge between vertices 11 and 15 in the graph (assuming the image is a 4x4 image as the one in the examples above). How can you compute the vertex number from the row and column of a pixel? Testing Complete the given main() function (following the steps in the comments) to read an image, select a region based on a starting pixel and recolor the region to white. Run the program with different images, starting pixels and thresholds. The following are examples


