

Question: in xml xsl 1 . you need to use your text editor, open the file itemstxt.xml . Review the contents to familiarize yourself with the
in xml xsl you need to use your text editor, open the file itemstxt.xml Review the contents to familiarize yourself with the structure of the XML file.
Enter your name and the date in the comment section at the top of the file, and save the file as items.xml
Add a processing instruction after the comment section that attaches the library.xsl style sheet to this XML document. Close the file, saving your changes.
Using your text editor, open the file librarytxt.xsl
Enter your name and the date in the comment section of the file, and save it as library.xsl
In the opening stylesheet tag below the comment section, change the version from to Save your changes to the file.
If you are using Saxon in Java command line mode, go to the folder containing your data files, and run the following command to generate the checkouts.html result document:
javanet.sfsaxon.Transform items.xml library.xsl o:checkouts.html Otherwise, use the commands appropriate to your XSLT processor to run the transformation.
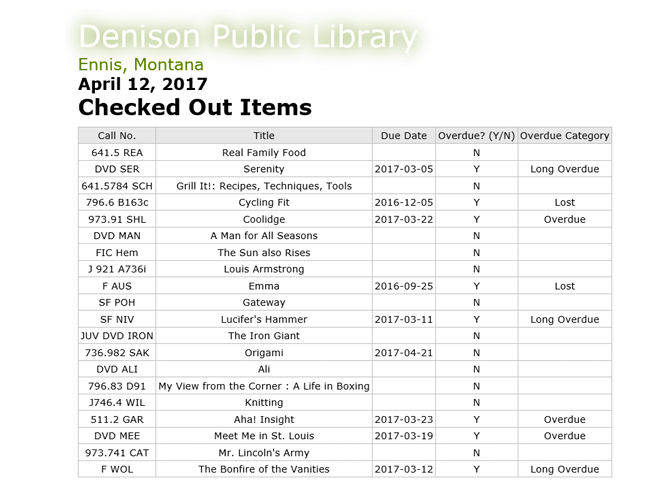
Use your web browser to open the checkouts.html file. The figure below shows the current appearance of the report.
The first feature Maria would like to add is to display the date above the table. The date April will be used for testing the application. Later, Maria will replace this hard coded date with a variable representing the current date. Below the xsl:output tag, insert code to create a global variable named thisDate with the data type xs:date, containing the value
Within the root template, above the Checked Out Items
tag, insert an
tag containing a valueof element to display the value of the thisDate variable. Use a date picture to format the date as "April
The Overdue column of the report should contain Y if the item is overdue the due date is before the date the report is run or N if it is not overdue. Within the "overdueCell" tag, declare a variable named overdue. Use a conditional if statement to test whether the value of the thisDate value is greater than the value of the return attribute of the status element. If so set the variable's value to Y else set the value to N On the next line, insert a valueof element to display the value of the overdue variable.
Save your changes to the style sheet and then regenerate the result document into the checkouts.html file using your XSLT processor.
View the checkouts.html file in your web browser. Confirm that items are labeled appropriately in the Overdue column.
The Overdue Category column should contain "Long Overdue" if the item's due date is more than days before the date the report is run. The column should contain "Lost" if the item's due date is more than days before the date the report is run. Within the categoryCell tag, declare two variables of data type date: longoverdueDate and lostDate. The longoverdueDate variable should be set to a value days earlier than the thisDate variable. Hint: Subtract a dayTimeDuration element of days from the thisDate variable. The lostDate variable should be set to a value days earlier than the thisDate variable.
Next, declare a variable named category. Use an else if conditional statement to determine the category value to display in the cell. If the return attribute of the status element is less than the value of the lostDate variable, set the category variable to 'Lost'. Else, if the return attribute is less than the longoverdueDate, set the category variable to 'Long Overdue'. Else, if the value of the thisDate variable is less than the return attribute, set the category variable to 'Overdue'. Else, set the category variable to an empty string, On the next line, insert a valueof element to display the value of the category variable.
Save your changes to the style sheet and then regenerate the result document into the checkouts.html file using your XSLT processor.
Step by Step Solution
There are 3 Steps involved in it
1 Expert Approved Answer
Step: 1 Unlock

Question Has Been Solved by an Expert!
Get step-by-step solutions from verified subject matter experts
Step: 2 Unlock
Step: 3 Unlock