Answered step by step
Verified Expert Solution
Question
1 Approved Answer
INSTRUCTIONS Use the information below to correctly connect and configure the devices in the existing topology. All specified values must be entered exactly and is
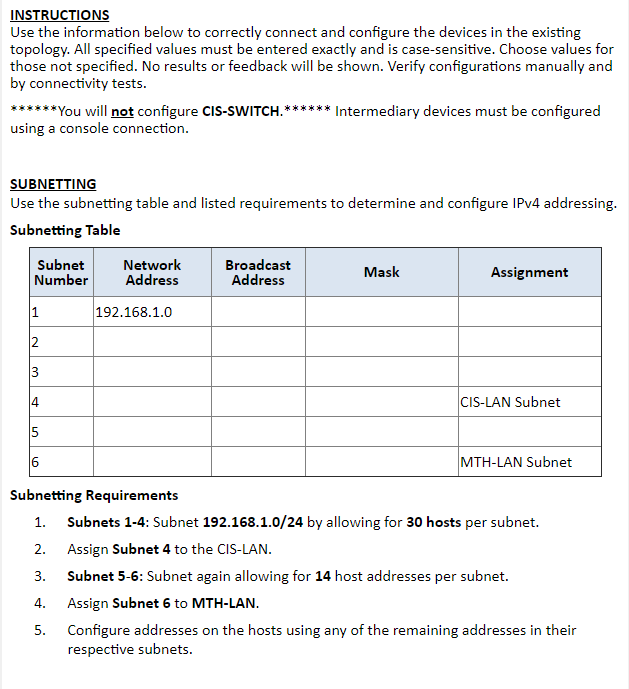
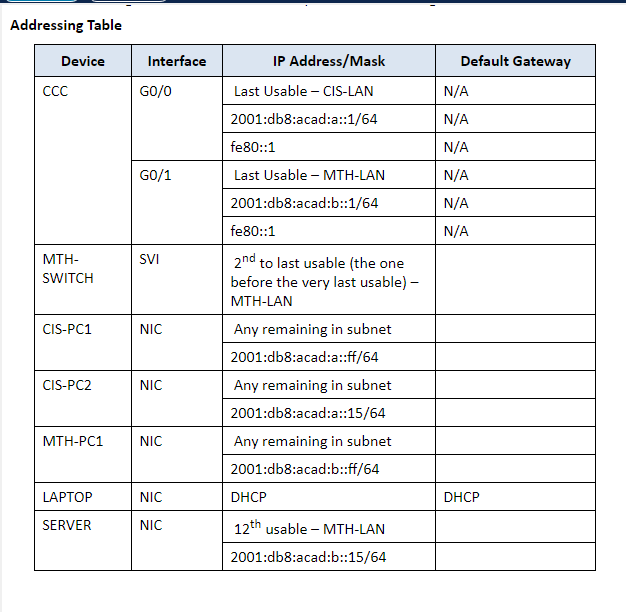
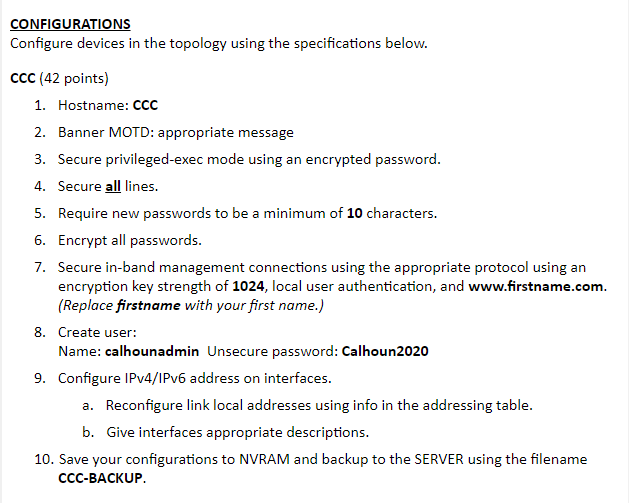
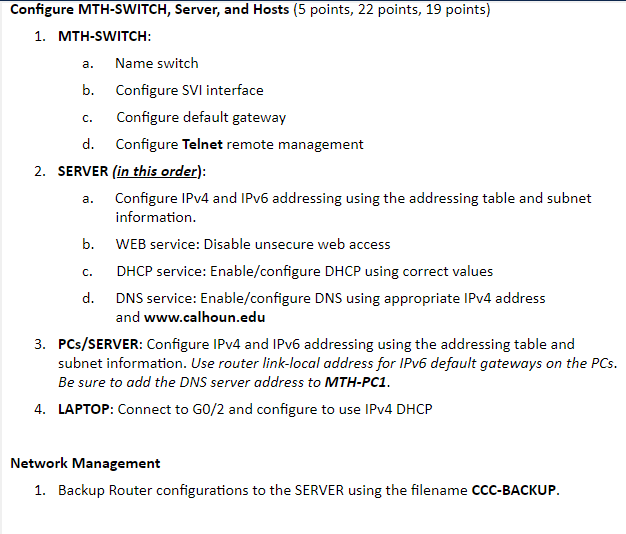
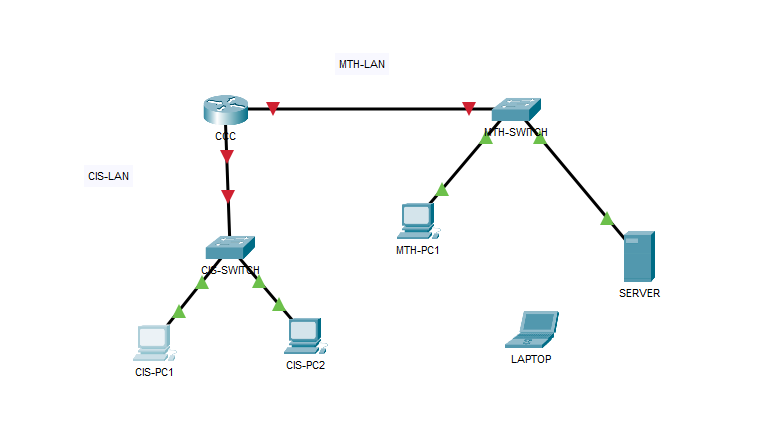 INSTRUCTIONS Use the information below to correctly connect and configure the devices in the existing topology. All specified values must be entered exactly and is case-sensitive. Choose values for those not specified. No results or feedback will be shown. Verify configurations manually and by connectivity tests. ******You will not configure CIS-SWITCH.****** Intermediary devices must be configured using a console connection. SUBNETTING Use the subnetting table and listed requirements to determine and configure IPv4 addressing. Subnetting Table Subnetting Requirements 1. Subnets 1-4: Subnet 192.168.1.0/24 by allowing for 30 hosts per subnet. 2. Assign Subnet 4 to the CIS-LAN. 3. Subnet 5-6: Subnet again allowing for 14 host addresses per subnet. 4. Assign Subnet 6 to MTH-LAN. 5. Configure addresses on the hosts using any of the remaining addresses in their respective subnets. Addressing Table \begin{tabular}{|c|c|c|c|} \hline Device & Interface & IP Address/Mask & Default Gateway \\ \hline \multirow[t]{6}{*}{CCC} & \multirow[t]{3}{*}{GO/0} & Last Usable - CIS-LAN & N/A \\ \hline & & 2001:db8:acad:a::1/64 & N/A \\ \hline & & fe80::1 & N/A \\ \hline & \multirow[t]{3}{*}{GO/1} & Last Usable - MTH-LAN & N/A \\ \hline & & 2001:db8:acad:b::1/64 & N/A \\ \hline & & fe80::1 & N/A \\ \hline \begin{tabular}{l} MTH- \\ SWITCH \end{tabular} & SVI & \begin{tabular}{l} 2nd to last usable (the one \\ before the very last usable)- \\ MTH-LAN \end{tabular} & \\ \hline \multirow[t]{2}{*}{ CIS-PC1 } & \multirow[t]{2}{*}{ NIC } & Any remaining in subnet & \\ \hline & & 2001:db8:acad:a::ff/64 & \\ \hline \multirow[t]{2}{*}{ CIS-PC2 } & \multirow[t]{2}{*}{NIC} & Any remaining in subnet & \\ \hline & & 2001:db8:acad:a::15/64 & \\ \hline \multirow[t]{2}{*}{ MTH-PC1 } & \multirow[t]{2}{*}{NIC} & Any remaining in subnet & \\ \hline & & 2001:db8:acad:b::ff/64 & \\ \hline LAPTOP & NIC & DHCP & DHCP \\ \hline \multirow[t]{2}{*}{ SERVER } & \multirow[t]{2}{*}{NIC} & 12th usable - MTH-LAN & \\ \hline & & 2001:db8:acad:b::15/64 & \\ \hline \end{tabular} CONFIGURATIONS Configure devices in the topology using the specifications below. cCC (42 points) 1. Hostname: CCC 2. Banner MOTD: appropriate message 3. Secure privileged-exec mode using an encrypted password. 4. Secure all lines. 5. Require new passwords to be a minimum of 10 characters. 6. Encrypt all passwords. 7. Secure in-band management connections using the appropriate protocol using an encryption key strength of 1024, local user authentication, and www.firstname.com. (Replace firstname with your first name.) 8. Create user: Name: calhounadmin Unsecure password: Calhoun2020 9. Configure IPv4/IPv6 address on interfaces. a. Reconfigure link local addresses using info in the addressing table. b. Give interfaces appropriate descriptions. 10. Save your configurations to NVRAM and backup to the SERVER using the filename CCC-BACKUP. Configure MTH-SWITCH, Server, and Hosts ( 5 points, 22 points, 19 points) 1. MTH-SWITCH: a. Name switch b. Configure SVI interface c. Configure default gateway d. Configure Telnet remote management 2. SERVER (in this order): a. Configure IPv4 and IPv6 addressing using the addressing table and subnet information. b. WEB service: Disable unsecure web access c. DHCP service: Enable/configure DHCP using correct values d. DNS service: Enable/configure DNS using appropriate IPv4 address and www.calhoun.edu 3. PCs/SERVER: Configure IPv4 and IPv6 addressing using the addressing table and subnet information. Use router link-local address for IPv6 default gateways on the PCs. Be sure to add the DNS server address to MTH-PC1. 4. LAPTOP: Connect to GO/2 and configure to use IPv4 DHCP Network Management 1. Backup Router configurations to the SERVER using the filename CCC-BACKUP
 Step by Step Solution
There are 3 Steps involved in it
Step: 1

Get Instant Access to Expert-Tailored Solutions
See step-by-step solutions with expert insights and AI powered tools for academic success
Step: 2

Step: 3

Ace Your Homework with AI
Get the answers you need in no time with our AI-driven, step-by-step assistance
Get Started


