

Question: Java Program CritterMain code Critter code Food code FlyTrap code 1. You should upload the 4 new classes that you have created. 2. Remove package
Java Program

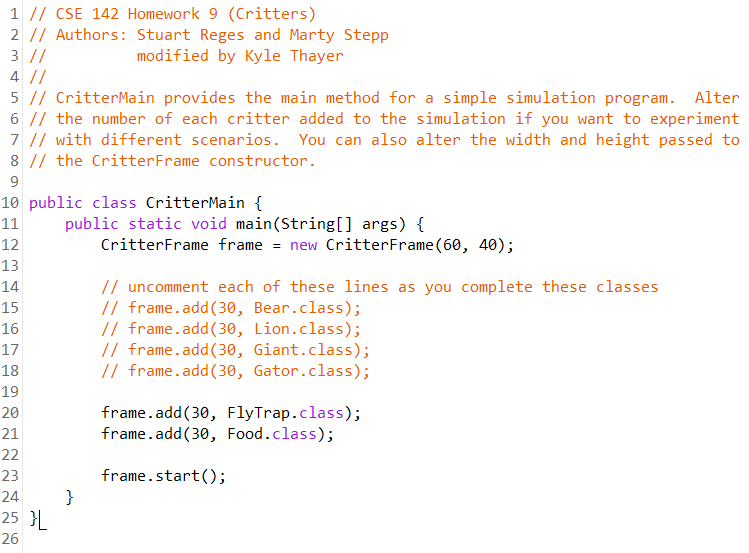
CritterMain code
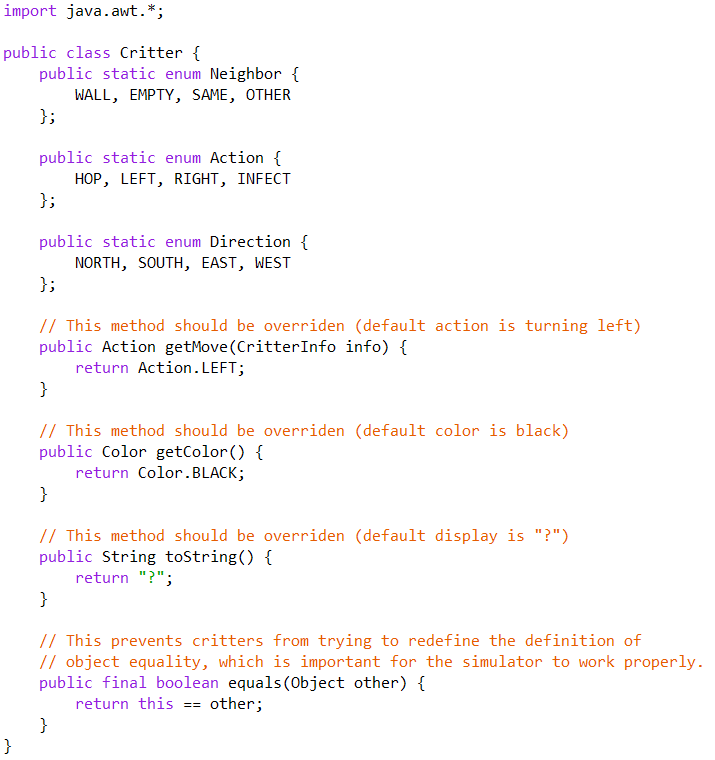
Critter code
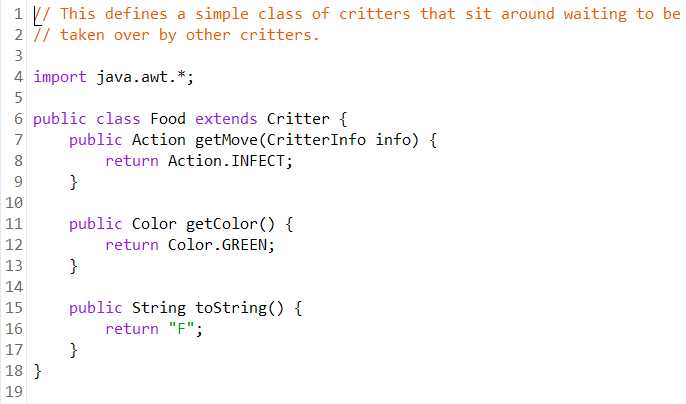
Food code
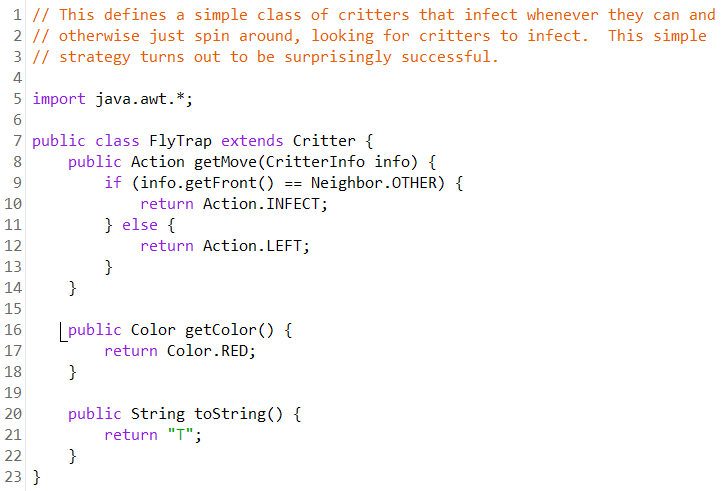
FlyTrap code
1. You should upload the 4 new classes that you have created.
2. Remove package names, use class names suggested: Bear.java, Lion.java, Giant.java, Gator.java
Solve both question plz
also I dont understand the the last statement "Remove package names, use class names suggested: Bear.java, Lion.java, Giant.java, Gator.java"
Plz help me
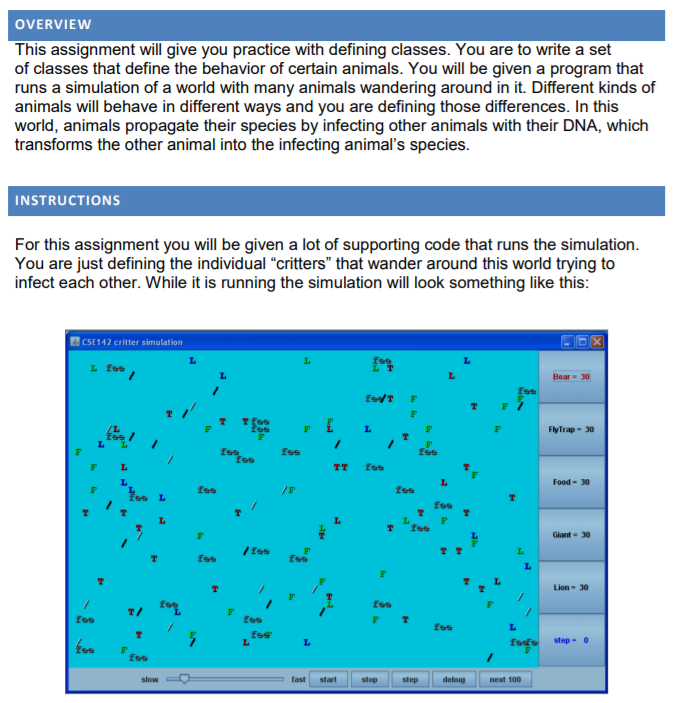
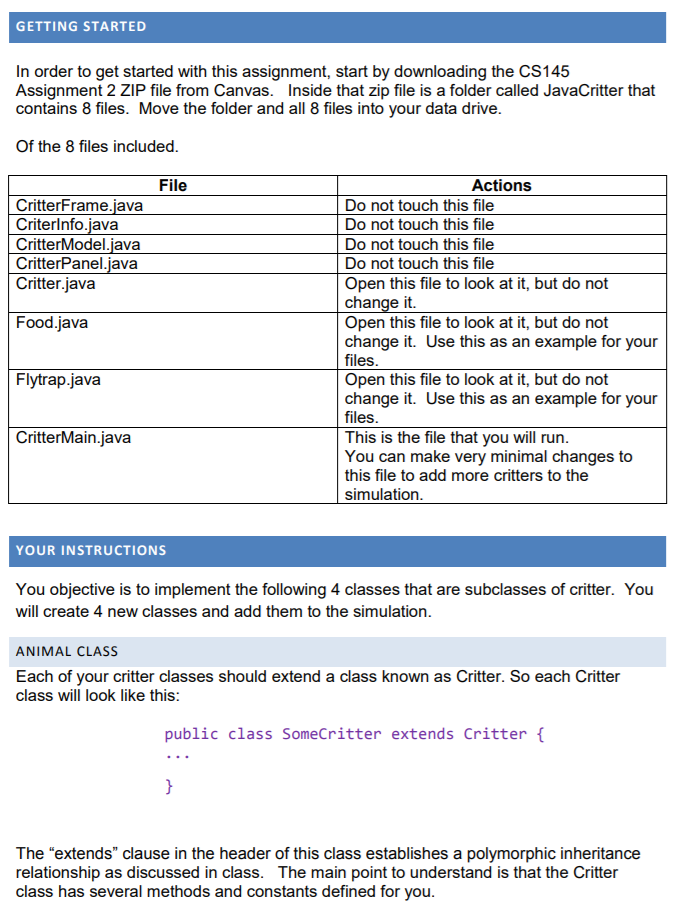
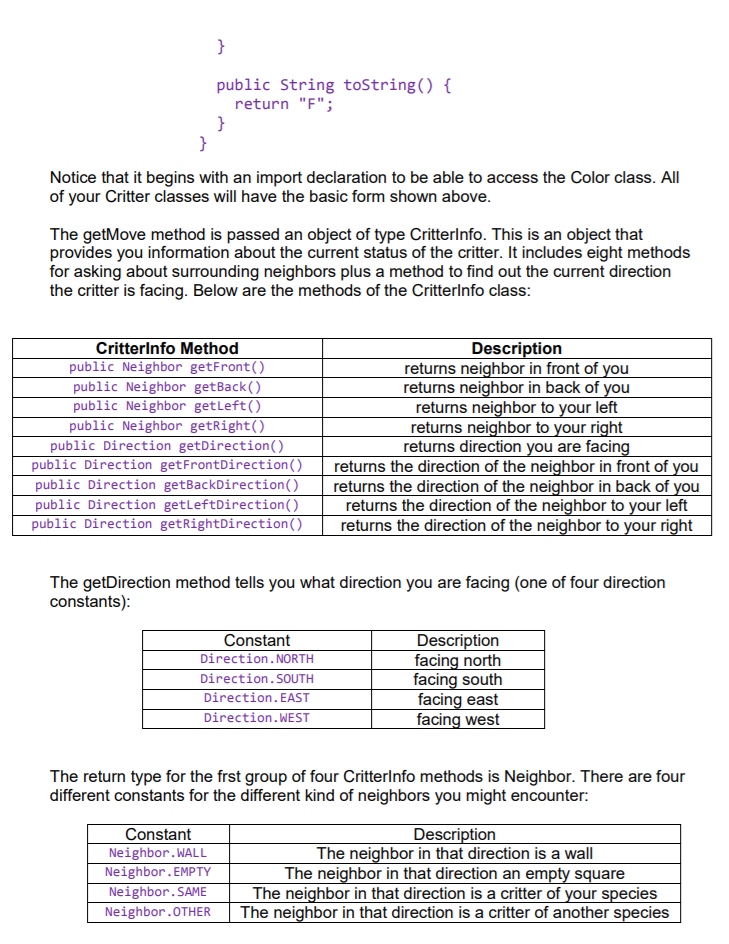
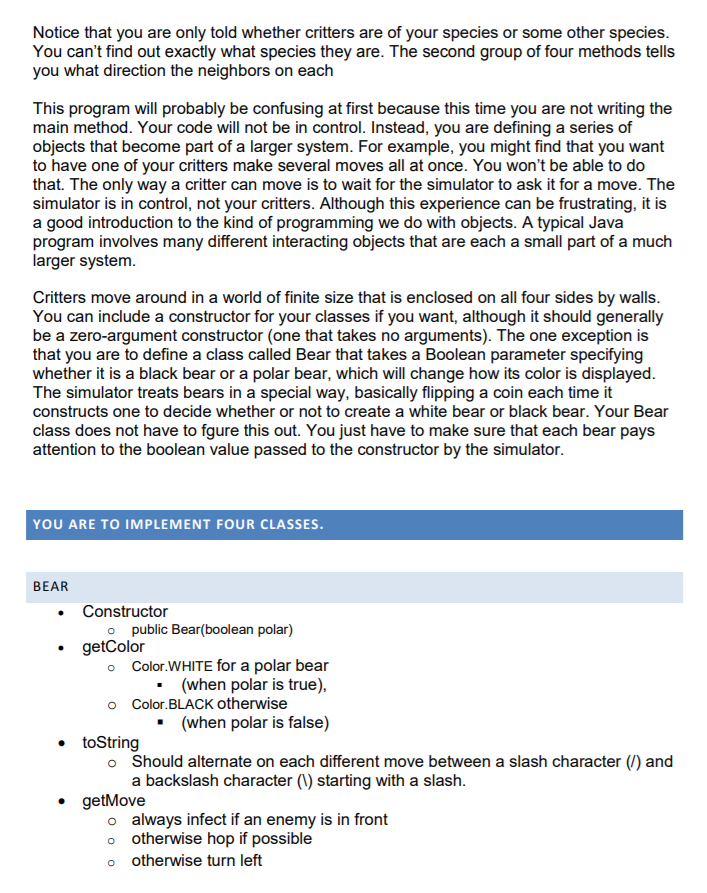
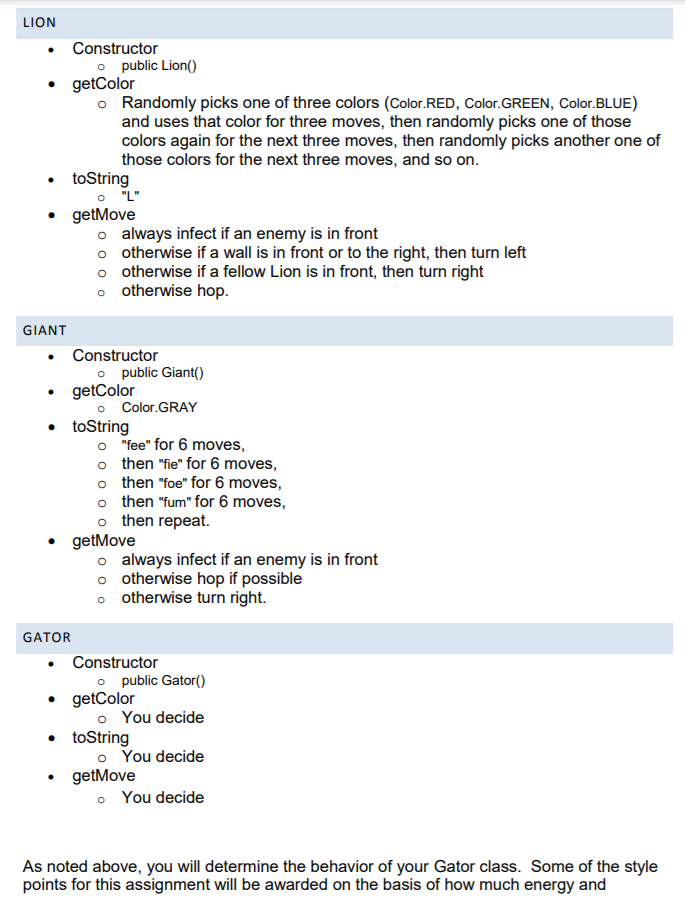
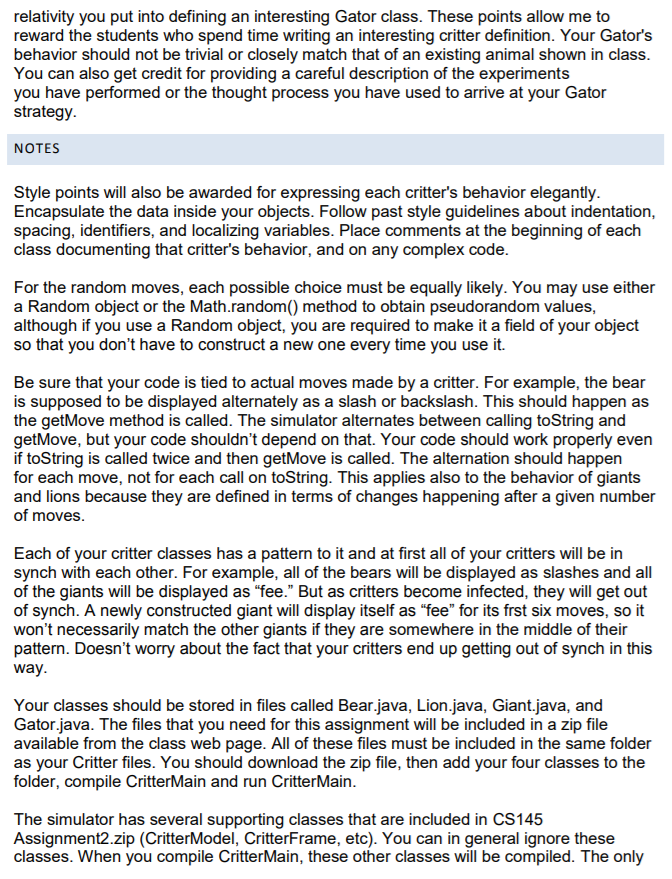
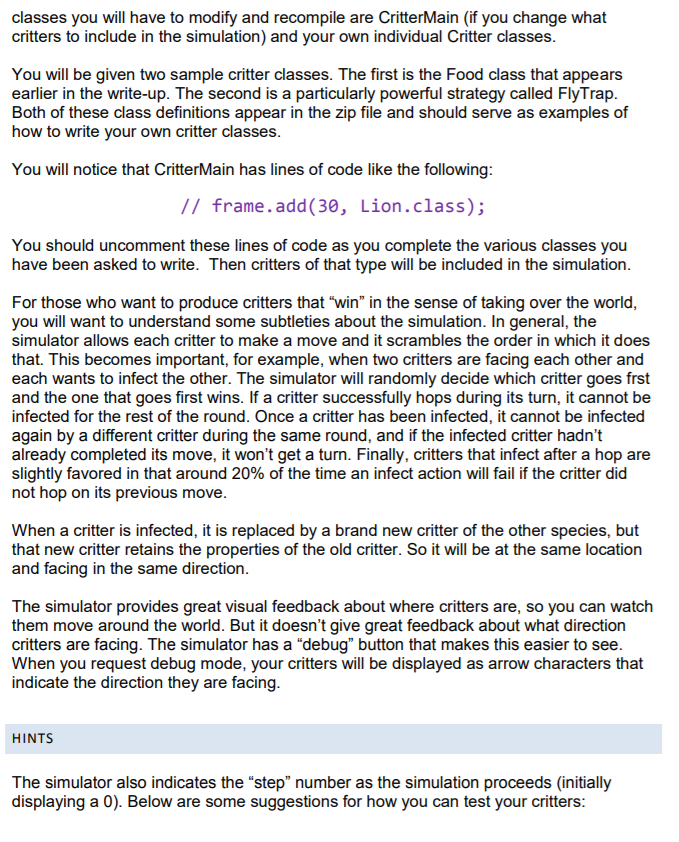
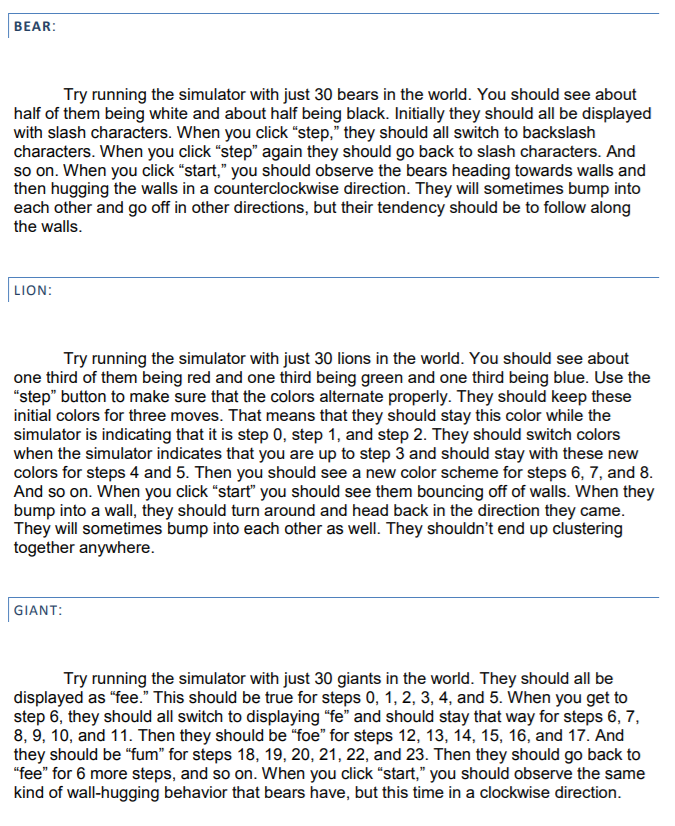
OVERVIEW This assignment will give you practice with defining classes. You are to write a set of classes that define the behavior of certain animals. You will be given a program that runs a simulation of a world with many animals wandering around in it. Different kinds of animals will behave in different ways and you are defining those differences. In this world, animals propagate their species by infecting other animals with their DNA, which transforms the other animal into the infecting animal's species. INSTRUCTIONS For this assignment you will be given a lot of supporting code that runs the simulation. You are just defining the individual critters that wander around this world trying to infect each other. While it is running the simulation will look something like this: CSE142 critter simulation I tot, L Bear 30 foT F T Lee L Fly Trap - 30 T 1 F L TT fes Food - 30 fes L T fos F L T L fo F Giant 30 Iss T T fos L L F T Lion - 30 F T/ fos F fos T fo fog L fes T L for L step- Ess foo slow start stop step debug next 100 GETTING STARTED In order to get started with this assignment, start by downloading the CS145 Assignment 2 ZIP file from Canvas. Inside that zip file is a folder called JavaCritter that contains 8 files. Move the folder and all 8 files into your data drive. Of the 8 files included. File CritterFrame.java Criterinfo.java Critter Model.java CritterPanel.java Critter.java Food.java Actions Do not touch this file Do not touch this file Do not touch this file Do not touch this file Open this file to look at it, but do not change it. Open this file to look at it, but do not change it. Use this as an example for your files. Open this file to look at it, but do not change it. Use this as an example for your files. This is the file that you will run. You can make very minimal changes to this file to add more critters to the simulation. Flytrap.java CritterMain.java YOUR INSTRUCTIONS You objective is to implement the following 4 classes that are subclasses of critter. You will create 4 new classes and add them to the simulation. ANIMAL CLASS Each of your critter classes should extend a class known as Critter. So each Critter class will look like this: public class SomeCritter extends Critter { } The "extends clause in the header of this class establishes a polymorphic inheritance relationship as discussed in class. The main point to understand is that the Critter class has several methods and constants defined for you. On each round of the simulation, each critter is asked what action it wants to perform. There are four possible responses each with a constant associated with it. Constant Description Action.HOP Move forward one square in its current direction Action.LEFT Turn left (rotate 90 degrees counter-clockwise) Action.RIGHT Turn right (rotate 90 degrees clockwise) Action.INFECT Infect the critter in front of you There are three key methods in the Critter class that you will override in your own classes. When you override these methods, you must use exactly the same method header as what you see below. The three methods to override for each Critter class are: public Action getMove (CritterInfo info) { } public Color getColor() { } public String toString() { } There are three key methods in the Critter class that you will override in your own classes, however you may want to implement additional methods to implement your own class actions. For the getMove method you should return one of the four Action constants described earlier in the writeup. For the getColor method, you should return whatever color you want the simulator to use when drawing your critter. And for the toString method, you should return whatever text you want the simulator to use when displaying your critter (normally a single character). For example, below is a defnition for a critter that always infects and that displays itself as a green letter F: import java.awt.*; public class Food extends Critter { public Action getMove (CritterInfo info) { return Action.INFECT; } public Color getColor() { return Color.GREEN; } public String toString() { return "F"; } } Notice that it begins with an import declaration to be able to access the Color class. All of your Critter classes will have the basic form shown above. The getMove method is passed an object of type CritterInfo. This is an object that provides you information about the current status of the critter. It includes eight methods for asking about surrounding neighbors plus a method to find out the current direction the critter is facing. Below are the methods of the CritterInfo class: CritterInfo Method public Neighbor getFront() public Neighbor getBack() public Neighbor getLeft() public Neighbor getRight() public Direction getDirection() public Direction getFrontDirection() public Direction getBackDirection() public Direction getLeftDirection() public Direction getRightDirection() Description returns neighbor in front of you returns neighbor in back of you returns neighbor to your left returns neighbor to your right returns direction you are facing returns the direction of the neighbor in front of you returns the direction of the neighbor in back of you returns the direction of the neighbor to your left returns the direction of the neighbor to your right The getDirection method tells you what direction you are facing (one of four direction constants): Constant Direction. NORTH Direction. SOUTH Direction. EAST Direction.WEST Description facing north facing south facing east facing west The return type for the frst group of four CritterInfo methods is Neighbor. There are four different constants for the different kind of neighbors you might encounter: Constant Description Neighbor.WALL The neighbor in that direction is a wall Neighbor.EMPTY The neighbor in that direction an empty square Neighbor. SAME The neighbor in that direction is a critter of your species Neighbor.OTHER The neighbor in that direction is a critter of another species Notice that you are only told whether critters are of your species or some other species. You can't find out exactly what species they are. The second group of four methods tells you what direction the neighbors on each This program will probably be confusing at first because this time you are not writing the main method. Your code will not be in control. Instead, you are defining a series of objects that become part of a larger system. For example, you might find that you want to have one of your critters make several moves all at once. You won't be able to do that. The only way a critter can move is to wait for the simulator to ask it for a move. The simulator is in control, not your critters. Although this experience can be frustrating, it is a good introduction to the kind of programming we do with objects. A typical Java program involves many different interacting objects that are each a small part of a much larger system. Critters move around in a world of finite size that is enclosed on all four sides by walls. You can include a constructor for your classes if you want, although it should generally be a zero-argument constructor (one that takes no arguments). The one exception is that you are to define a class called Bear that takes a Boolean parameter specifying whether it is a black bear or a polar bear, which will change how its color is displayed. The simulator treats bears in a special way, basically flipping a coin each time it constructs one to decide whether or not to create a white bear or black bear. Your Bear class does not have to fgure this out. You just have to make sure that each bear pays attention to the boolean value passed to the constructor by the simulator. YOU ARE TO IMPLEMENT FOUR CLASSES. BEAR Constructor o public Bear(boolean polar) getColor o Color.WHITE for a polar bear (when polar is true), o Color.BLACK otherwise (when polar is false) toString o Should alternate on each different move between a slash character (1) and a backslash character (1) starting with a slash. getMove o always infect if an enemy is in front o otherwise hop if possible otherwise turn left 0 . LION Constructor o public Lion() getColor o Randomly picks one of three colors (Color.RED, Color. GREEN, Color.BLUE) and uses that color for three moves, then randomly picks one of those colors again for the next three moves, then randomly picks another one of those colors for the next three moves, and so on. toString getMove o always infect if an enemy is in front o otherwise if a wall is in front or to the right, then turn left o otherwise if a fellow Lion is in front, then turn right o otherwise hop. GIANT Constructor o public Giant() getColor o Color. GRAY toString o "fee" for 6 moves, o then "fie" for 6 moves, o then "foe" for 6 moves, o then "fum" for 6 moves, o then repeat. getMove o always infect if an enemy is in front o otherwise hop if possible o otherwise turn right. GATOR Constructor o public Gator() getColor o You decide to String o You decide getMove o You decide As noted above, you will determine the behavior of your Gator class. Some of the style points for this assignment will be awarded on the basis of how much energy and relativity you put into defining an interesting Gator class. These points allow me to reward the students who spend time writing an interesting critter definition. Your Gator's behavior should not be trivial or closely match that of an existing animal shown in class. You can also get credit for providing a careful description of the experiments you have performed or the thought process you have used to arrive at your Gator strategy. NOTES Style points will also be awarded for expressing each critter's behavior elegantly. Encapsulate the data inside your objects. Follow past style guidelines about indentation, spacing, identifiers, and localizing variables. Place comments at the beginning of each class documenting that critter's behavior, and on any complex code. For the random moves, each possible choice must be equally likely. You may use either a Random object or the Math.random() method to obtain pseudorandom values, although if you use a Random object, you are required to make it a field of your object so that you don't have to construct a new one every time you use it. Be sure that your code is tied to actual moves made by a critter. For example, the bear is supposed to be displayed alternately as a slash or backslash. This should happen as the getMove method is called. The simulator alternates between calling toString and getMove, but your code shouldn't depend on that. Your code should work properly even if toString is called twice and then getMove is called. The alternation should happen for each move, not for each call on toString. This applies also to the behavior of giants and lions because they are defined in terms of changes happening after a given number of moves. Each of your critter classes has a pattern to it and at first all of your critters will be in synch with each other. For example, all of the bears will be displayed as slashes and all of the giants will be displayed as "fee." But as critters become infected, they will get out of synch. A newly constructed giant will display itself as "fee" for its frst six moves, so it won't necessarily match the other giants if they are somewhere in the middle of their pattern. Doesn't worry about the fact that your critters end up getting out of synch in this way. Your classes should be stored in files called Bear.java, Lion.java, Giant.java, and Gator.java. The files that you need for this assignment will be included in a zip file available from the class web page. All of these files must be included in the same folder as your Critter files. You should download the zip file, then add your four classes to the folder, compile CritterMain and run CritterMain. The simulator has several supporting classes that are included in CS145 Assignment2.zip (Critter Model, CritterFrame, etc). You can in general ignore these classes. When you compile Critter Main, these other classes will be compiled. The only classes you will have to modify and recompile are CritterMain (if you change what critters to include in the simulation) and your own individual Critter classes. You will be given two sample critter classes. The first is the Food class that appears earlier in the write-up. The second is a particularly powerful strategy called FlyTrap. Both of these class definitions appear in the zip file and should serve as examples of how to write your own critter classes. You will notice that Critter Main has lines of code like the following: // frame.add(30, Lion.class); You should uncomment these lines of code as you complete the various classes you have been asked to write. Then critters of that type will be included in the simulation. For those who want to produce critters that "win" in the sense of taking over the world, you will want to understand some subtleties about the simulation. In general, the simulator allows each critter to make a move and it scrambles the order in which it does that. This becomes important, for example, when two critters are facing each other and each wants to infect the other. The simulator will randomly decide which critter goes frst and the one that goes first wins. If a critter successfully hops during its turn, it cannot be infected for the rest of the round. Once a critter has been infected, it cannot be infected again by a different critter during the same round, and if the infected critter hadn't already completed its move, it won't get a turn. Finally, critters that infect after a hop are slightly favored in that around 20% of the time an infect action will fail if the critter did not hop on its previous move. When a critter is infected, it is replaced by a brand new critter of the other species, but that new critter retains the properties of the old critter. So it will be at the same location and facing in the same direction. The simulator provides great visual feedback about where critters are, so you can watch them move around the world. But it doesn't give great feedback about what direction critters are facing. The simulator has a "debug" button that makes this easier to see. When you request debug mode, your critters will be displayed as arrow characters that indicate the direction they are facing. HINTS The simulator also indicates the "step" number as the simulation proceeds (initially displaying a 0). Below are some suggestions for how you can test your critters: BEAR: Try running the simulator with just 30 bears in the world. You should see about half of them being white and about half being black. Initially they should all be displayed with slash characters. When you click "step," they should all switch to backslash characters. When you click "step" again they should go back to slash characters. And so on. When you click start," you should observe the bears heading towards walls and then hugging the walls in a counterclockwise direction. They will sometimes bump into each other and go off in other directions, but their tendency should be to follow along the walls. LION: Try running the simulator with just 30 lions in the world. You should see about one third of them being red and one third being green and one third being blue. Use the "step" button to make sure that the colors alternate properly. They should keep these initial colors for three moves. That means that they should stay this color while the simulator is indicating that it is step 0, step 1, and step 2. They should switch colors when the simulator indicates that you are up to step 3 and should stay with these new colors for steps 4 and 5. Then you should see a new color scheme for steps 6, 7, and 8. And so on. When you click "start" you should see them bouncing off of walls. When they bump into a wall, they should turn around and head back in the direction they came. They will sometimes bump into each other as well. They shouldn't end up clustering together anywhere. GIANT: Try running the simulator with just 30 giants in the world. They should all be displayed as "fee." This should be true for steps 0, 1, 2, 3, 4, and 5. When you get to step 6, they should all switch to displaying "fe" and should stay that way for steps 6, 7, 8, 9, 10, and 11. Then they should be "foe" for steps 12, 13, 14, 15, 16, and 17. And they should be fum for steps 18, 19, 20, 21, 22, and 23. Then they should go back to "fee" for 6 more steps, and so on. When you click "start," you should observe the same kind of wall-hugging behavior that bears have, but this time in a clockwise direction. 1 // CSE 142 Homework 9 (Critters) 2 // Authors: Stuart Reges and Marty Stepp 3 // modified by Kyle Thayer 4 // 5 // CritterMain provides the main method for a simple simulation program. Alter 6 // the number of each critter added to the simulation if you want to experiment 7 // with different scenarios. You can also alter the width and height passed to 8 // the CritterFrame constructor. 9 10 public class CritterMain { 11 public static void main(String[] args) { 12 CritterFrame frame = new CritterFrame(60, 40); NA 13 14 15 16 // uncomment each of these lines as you complete these classes // frame.add(30, Bear.class); // frame.add(30, Lion.class); // frame.add(30, Giant.class); // frame.add(30, Gator.class); 17 18 19 20 21 22 frame.add(30, FlyTrap.class); frame.add(30, Food.class); 23 frame.start(); 24 } 25 } 26 import java.awt.*; public class Critter { public static enum Neighbor { WALL, EMPTY, SAME, OTHER }; public static enum Action { HOP, LEFT, RIGHT, INFECT }; public static enum Direction { NORTH, SOUTH, EAST, WEST }; // This method should be overriden (default action is turning left) public Action getMove (CritterInfo info) { return Action.LEFT; } // This method should be overriden (default color is black) public Color getColor() { return Color.BLACK; } // This method should be overriden (default display is "?") public String toString() { return "?"; } // This prevents critters from trying to redefine the definition of // object equality, which is important for the simulator to work properly. public final boolean equals(Object other) { return this == other; } } 1 // This defines a simple class of critters that sit around waiting to be 27/ taken over by other critters. 3 4 import java.awt.*; 5 6 public class Food extends Critter { 7 public Action getMove (CritterInfo info) { 8 return Action.INFECT; 9 } 10 11 public Color getColor() { 12 return Color.GREEN; } 14 15 public String toString() { 16 return "F"; 17 } 13 18 } 19 1 // This defines a simple class of critters that infect whenever they can and 2 // otherwise just spin around, looking for critters to infect. This simple 3 // strategy turns out to be surprisingly successful. 4 5 import java.awt.*; 6 7 public class FlyTrap extends Critter { 8 public Action getMove (CritterInfo info) { 9 if (info.getFront() == Neighbor.OTHER) { 10 return Action.INFECT; 11 } else { 12 return Action.LEFT; 13 } 14 } 15 public Color getColor() { 17 return Color.RED; 18 } 19 public String toString() { 21 return "T"; } 16 20 22 23 } OVERVIEW This assignment will give you practice with defining classes. You are to write a set of classes that define the behavior of certain animals. You will be given a program that runs a simulation of a world with many animals wandering around in it. Different kinds of animals will behave in different ways and you are defining those differences. In this world, animals propagate their species by infecting other animals with their DNA, which transforms the other animal into the infecting animal's species. INSTRUCTIONS For this assignment you will be given a lot of supporting code that runs the simulation. You are just defining the individual critters that wander around this world trying to infect each other. While it is running the simulation will look something like this: CSE142 critter simulation I tot, L Bear 30 foT F T Lee L Fly Trap - 30 T 1 F L TT fes Food - 30 fes L T fos F L T L fo F Giant 30 Iss T T fos L L F T Lion - 30 F T/ fos F fos T fo fog L fes T L for L step- Ess foo slow start stop step debug next 100 GETTING STARTED In order to get started with this assignment, start by downloading the CS145 Assignment 2 ZIP file from Canvas. Inside that zip file is a folder called JavaCritter that contains 8 files. Move the folder and all 8 files into your data drive. Of the 8 files included. File CritterFrame.java Criterinfo.java Critter Model.java CritterPanel.java Critter.java Food.java Actions Do not touch this file Do not touch this file Do not touch this file Do not touch this file Open this file to look at it, but do not change it. Open this file to look at it, but do not change it. Use this as an example for your files. Open this file to look at it, but do not change it. Use this as an example for your files. This is the file that you will run. You can make very minimal changes to this file to add more critters to the simulation. Flytrap.java CritterMain.java YOUR INSTRUCTIONS You objective is to implement the following 4 classes that are subclasses of critter. You will create 4 new classes and add them to the simulation. ANIMAL CLASS Each of your critter classes should extend a class known as Critter. So each Critter class will look like this: public class SomeCritter extends Critter { } The "extends clause in the header of this class establishes a polymorphic inheritance relationship as discussed in class. The main point to understand is that the Critter class has several methods and constants defined for you. On each round of the simulation, each critter is asked what action it wants to perform. There are four possible responses each with a constant associated with it. Constant Description Action.HOP Move forward one square in its current direction Action.LEFT Turn left (rotate 90 degrees counter-clockwise) Action.RIGHT Turn right (rotate 90 degrees clockwise) Action.INFECT Infect the critter in front of you There are three key methods in the Critter class that you will override in your own classes. When you override these methods, you must use exactly the same method header as what you see below. The three methods to override for each Critter class are: public Action getMove (CritterInfo info) { } public Color getColor() { } public String toString() { } There are three key methods in the Critter class that you will override in your own classes, however you may want to implement additional methods to implement your own class actions. For the getMove method you should return one of the four Action constants described earlier in the writeup. For the getColor method, you should return whatever color you want the simulator to use when drawing your critter. And for the toString method, you should return whatever text you want the simulator to use when displaying your critter (normally a single character). For example, below is a defnition for a critter that always infects and that displays itself as a green letter F: import java.awt.*; public class Food extends Critter { public Action getMove (CritterInfo info) { return Action.INFECT; } public Color getColor() { return Color.GREEN; } public String toString() { return "F"; } } Notice that it begins with an import declaration to be able to access the Color class. All of your Critter classes will have the basic form shown above. The getMove method is passed an object of type CritterInfo. This is an object that provides you information about the current status of the critter. It includes eight methods for asking about surrounding neighbors plus a method to find out the current direction the critter is facing. Below are the methods of the CritterInfo class: CritterInfo Method public Neighbor getFront() public Neighbor getBack() public Neighbor getLeft() public Neighbor getRight() public Direction getDirection() public Direction getFrontDirection() public Direction getBackDirection() public Direction getLeftDirection() public Direction getRightDirection() Description returns neighbor in front of you returns neighbor in back of you returns neighbor to your left returns neighbor to your right returns direction you are facing returns the direction of the neighbor in front of you returns the direction of the neighbor in back of you returns the direction of the neighbor to your left returns the direction of the neighbor to your right The getDirection method tells you what direction you are facing (one of four direction constants): Constant Direction. NORTH Direction. SOUTH Direction. EAST Direction.WEST Description facing north facing south facing east facing west The return type for the frst group of four CritterInfo methods is Neighbor. There are four different constants for the different kind of neighbors you might encounter: Constant Description Neighbor.WALL The neighbor in that direction is a wall Neighbor.EMPTY The neighbor in that direction an empty square Neighbor. SAME The neighbor in that direction is a critter of your species Neighbor.OTHER The neighbor in that direction is a critter of another species Notice that you are only told whether critters are of your species or some other species. You can't find out exactly what species they are. The second group of four methods tells you what direction the neighbors on each This program will probably be confusing at first because this time you are not writing the main method. Your code will not be in control. Instead, you are defining a series of objects that become part of a larger system. For example, you might find that you want to have one of your critters make several moves all at once. You won't be able to do that. The only way a critter can move is to wait for the simulator to ask it for a move. The simulator is in control, not your critters. Although this experience can be frustrating, it is a good introduction to the kind of programming we do with objects. A typical Java program involves many different interacting objects that are each a small part of a much larger system. Critters move around in a world of finite size that is enclosed on all four sides by walls. You can include a constructor for your classes if you want, although it should generally be a zero-argument constructor (one that takes no arguments). The one exception is that you are to define a class called Bear that takes a Boolean parameter specifying whether it is a black bear or a polar bear, which will change how its color is displayed. The simulator treats bears in a special way, basically flipping a coin each time it constructs one to decide whether or not to create a white bear or black bear. Your Bear class does not have to fgure this out. You just have to make sure that each bear pays attention to the boolean value passed to the constructor by the simulator. YOU ARE TO IMPLEMENT FOUR CLASSES. BEAR Constructor o public Bear(boolean polar) getColor o Color.WHITE for a polar bear (when polar is true), o Color.BLACK otherwise (when polar is false) toString o Should alternate on each different move between a slash character (1) and a backslash character (1) starting with a slash. getMove o always infect if an enemy is in front o otherwise hop if possible otherwise turn left 0 . LION Constructor o public Lion() getColor o Randomly picks one of three colors (Color.RED, Color. GREEN, Color.BLUE) and uses that color for three moves, then randomly picks one of those colors again for the next three moves, then randomly picks another one of those colors for the next three moves, and so on. toString getMove o always infect if an enemy is in front o otherwise if a wall is in front or to the right, then turn left o otherwise if a fellow Lion is in front, then turn right o otherwise hop. GIANT Constructor o public Giant() getColor o Color. GRAY toString o "fee" for 6 moves, o then "fie" for 6 moves, o then "foe" for 6 moves, o then "fum" for 6 moves, o then repeat. getMove o always infect if an enemy is in front o otherwise hop if possible o otherwise turn right. GATOR Constructor o public Gator() getColor o You decide to String o You decide getMove o You decide As noted above, you will determine the behavior of your Gator class. Some of the style points for this assignment will be awarded on the basis of how much energy and relativity you put into defining an interesting Gator class. These points allow me to reward the students who spend time writing an interesting critter definition. Your Gator's behavior should not be trivial or closely match that of an existing animal shown in class. You can also get credit for providing a careful description of the experiments you have performed or the thought process you have used to arrive at your Gator strategy. NOTES Style points will also be awarded for expressing each critter's behavior elegantly. Encapsulate the data inside your objects. Follow past style guidelines about indentation, spacing, identifiers, and localizing variables. Place comments at the beginning of each class documenting that critter's behavior, and on any complex code. For the random moves, each possible choice must be equally likely. You may use either a Random object or the Math.random() method to obtain pseudorandom values, although if you use a Random object, you are required to make it a field of your object so that you don't have to construct a new one every time you use it. Be sure that your code is tied to actual moves made by a critter. For example, the bear is supposed to be displayed alternately as a slash or backslash. This should happen as the getMove method is called. The simulator alternates between calling toString and getMove, but your code shouldn't depend on that. Your code should work properly even if toString is called twice and then getMove is called. The alternation should happen for each move, not for each call on toString. This applies also to the behavior of giants and lions because they are defined in terms of changes happening after a given number of moves. Each of your critter classes has a pattern to it and at first all of your critters will be in synch with each other. For example, all of the bears will be displayed as slashes and all of the giants will be displayed as "fee." But as critters become infected, they will get out of synch. A newly constructed giant will display itself as "fee" for its frst six moves, so it won't necessarily match the other giants if they are somewhere in the middle of their pattern. Doesn't worry about the fact that your critters end up getting out of synch in this way. Your classes should be stored in files called Bear.java, Lion.java, Giant.java, and Gator.java. The files that you need for this assignment will be included in a zip file available from the class web page. All of these files must be included in the same folder as your Critter files. You should download the zip file, then add your four classes to the folder, compile CritterMain and run CritterMain. The simulator has several supporting classes that are included in CS145 Assignment2.zip (Critter Model, CritterFrame, etc). You can in general ignore these classes. When you compile Critter Main, these other classes will be compiled. The only classes you will have to modify and recompile are CritterMain (if you change what critters to include in the simulation) and your own individual Critter classes. You will be given two sample critter classes. The first is the Food class that appears earlier in the write-up. The second is a particularly powerful strategy called FlyTrap. Both of these class definitions appear in the zip file and should serve as examples of how to write your own critter classes. You will notice that Critter Main has lines of code like the following: // frame.add(30, Lion.class); You should uncomment these lines of code as you complete the various classes you have been asked to write. Then critters of that type will be included in the simulation. For those who want to produce critters that "win" in the sense of taking over the world, you will want to understand some subtleties about the simulation. In general, the simulator allows each critter to make a move and it scrambles the order in which it does that. This becomes important, for example, when two critters are facing each other and each wants to infect the other. The simulator will randomly decide which critter goes frst and the one that goes first wins. If a critter successfully hops during its turn, it cannot be infected for the rest of the round. Once a critter has been infected, it cannot be infected again by a different critter during the same round, and if the infected critter hadn't already completed its move, it won't get a turn. Finally, critters that infect after a hop are slightly favored in that around 20% of the time an infect action will fail if the critter did not hop on its previous move. When a critter is infected, it is replaced by a brand new critter of the other species, but that new critter retains the properties of the old critter. So it will be at the same location and facing in the same direction. The simulator provides great visual feedback about where critters are, so you can watch them move around the world. But it doesn't give great feedback about what direction critters are facing. The simulator has a "debug" button that makes this easier to see. When you request debug mode, your critters will be displayed as arrow characters that indicate the direction they are facing. HINTS The simulator also indicates the "step" number as the simulation proceeds (initially displaying a 0). Below are some suggestions for how you can test your critters: BEAR: Try running the simulator with just 30 bears in the world. You should see about half of them being white and about half being black. Initially they should all be displayed with slash characters. When you click "step," they should all switch to backslash characters. When you click "step" again they should go back to slash characters. And so on. When you click start," you should observe the bears heading towards walls and then hugging the walls in a counterclockwise direction. They will sometimes bump into each other and go off in other directions, but their tendency should be to follow along the walls. LION: Try running the simulator with just 30 lions in the world. You should see about one third of them being red and one third being green and one third being blue. Use the "step" button to make sure that the colors alternate properly. They should keep these initial colors for three moves. That means that they should stay this color while the simulator is indicating that it is step 0, step 1, and step 2. They should switch colors when the simulator indicates that you are up to step 3 and should stay with these new colors for steps 4 and 5. Then you should see a new color scheme for steps 6, 7, and 8. And so on. When you click "start" you should see them bouncing off of walls. When they bump into a wall, they should turn around and head back in the direction they came. They will sometimes bump into each other as well. They shouldn't end up clustering together anywhere. GIANT: Try running the simulator with just 30 giants in the world. They should all be displayed as "fee." This should be true for steps 0, 1, 2, 3, 4, and 5. When you get to step 6, they should all switch to displaying "fe" and should stay that way for steps 6, 7, 8, 9, 10, and 11. Then they should be "foe" for steps 12, 13, 14, 15, 16, and 17. And they should be fum for steps 18, 19, 20, 21, 22, and 23. Then they should go back to "fee" for 6 more steps, and so on. When you click "start," you should observe the same kind of wall-hugging behavior that bears have, but this time in a clockwise direction. 1 // CSE 142 Homework 9 (Critters) 2 // Authors: Stuart Reges and Marty Stepp 3 // modified by Kyle Thayer 4 // 5 // CritterMain provides the main method for a simple simulation program. Alter 6 // the number of each critter added to the simulation if you want to experiment 7 // with different scenarios. You can also alter the width and height passed to 8 // the CritterFrame constructor. 9 10 public class CritterMain { 11 public static void main(String[] args) { 12 CritterFrame frame = new CritterFrame(60, 40); NA 13 14 15 16 // uncomment each of these lines as you complete these classes // frame.add(30, Bear.class); // frame.add(30, Lion.class); // frame.add(30, Giant.class); // frame.add(30, Gator.class); 17 18 19 20 21 22 frame.add(30, FlyTrap.class); frame.add(30, Food.class); 23 frame.start(); 24 } 25 } 26 import java.awt.*; public class Critter { public static enum Neighbor { WALL, EMPTY, SAME, OTHER }; public static enum Action { HOP, LEFT, RIGHT, INFECT }; public static enum Direction { NORTH, SOUTH, EAST, WEST }; // This method should be overriden (default action is turning left) public Action getMove (CritterInfo info) { return Action.LEFT; } // This method should be overriden (default color is black) public Color getColor() { return Color.BLACK; } // This method should be overriden (default display is "?") public String toString() { return "?"; } // This prevents critters from trying to redefine the definition of // object equality, which is important for the simulator to work properly. public final boolean equals(Object other) { return this == other; } } 1 // This defines a simple class of critters that sit around waiting to be 27/ taken over by other critters. 3 4 import java.awt.*; 5 6 public class Food extends Critter { 7 public Action getMove (CritterInfo info) { 8 return Action.INFECT; 9 } 10 11 public Color getColor() { 12 return Color.GREEN; } 14 15 public String toString() { 16 return "F"; 17 } 13 18 } 19 1 // This defines a simple class of critters that infect whenever they can and 2 // otherwise just spin around, looking for critters to infect. This simple 3 // strategy turns out to be surprisingly successful. 4 5 import java.awt.*; 6 7 public class FlyTrap extends Critter { 8 public Action getMove (CritterInfo info) { 9 if (info.getFront() == Neighbor.OTHER) { 10 return Action.INFECT; 11 } else { 12 return Action.LEFT; 13 } 14 } 15 public Color getColor() { 17 return Color.RED; 18 } 19 public String toString() { 21 return "T"; } 16 20 22 23 }
Step by Step Solution
There are 3 Steps involved in it

Get step-by-step solutions from verified subject matter experts