just weite the codes and add any information that need!
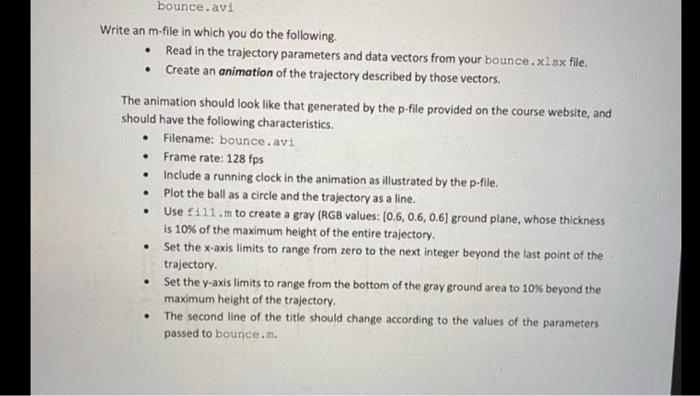
bounce.avi Write an m-file in which you do the following. Read in the trajectory parameters and data vectors from your bounce.xlsx file. Create an animation of the trajectory described by those vectors. The animation should look like that generated by the p-file provided on the course website, and should have the following characteristics. Filename: bounce.avi Frame rate: 128 fps Include a running clock in the animation as illustrated by the p-file. Plot the ball as a circle and the trajectory as a line. Use fill.m to create a gray (RGB values: (0.5, 0.6, 0.6) ground plane, whose thickness is 10% of the maximum height of the entire trajectory. Set the x-axis limits to range from zero to the next integer beyond the last point of the trajectory Set the y-axis limits to range from the bottom of the gray ground area to 10% beyond the maximum height of the trajectory The second line of the title should change according to the values of the parameters passed to bounce.m. . . . bounce.avi Write an m-file in which you do the following. Read in the trajectory parameters and data vectors from your bounce.xlsx file. Create an animation of the trajectory described by those vectors. The animation should look like that generated by the p-file provided on the course website, and should have the following characteristics. Filename: bounce.avi Frame rate: 128 fps Include a running clock in the animation as illustrated by the p-file. Plot the ball as a circle and the trajectory as a line. Use fill.m to create a gray (RGB values: (0.5, 0.6, 0.6) ground plane, whose thickness is 10% of the maximum height of the entire trajectory. Set the x-axis limits to range from zero to the next integer beyond the last point of the trajectory Set the y-axis limits to range from the bottom of the gray ground area to 10% beyond the maximum height of the trajectory The second line of the title should change according to the values of the parameters passed to bounce.m