Answered step by step
Verified Expert Solution
Question
1 Approved Answer
Lab 14.8 Windows 10 Basic Usage: Working with Control Panel Utilities To work effectively with the Windows 10 traditional desktop, including accessing Control Panel
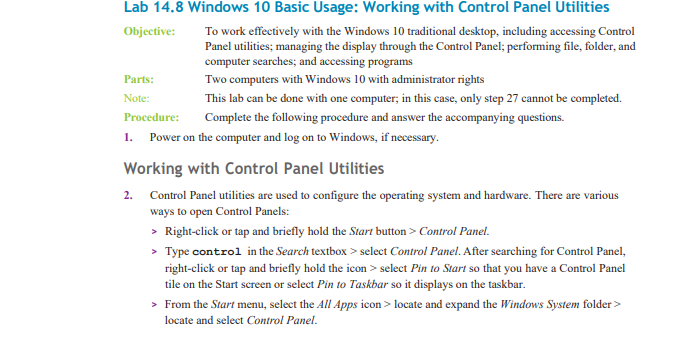
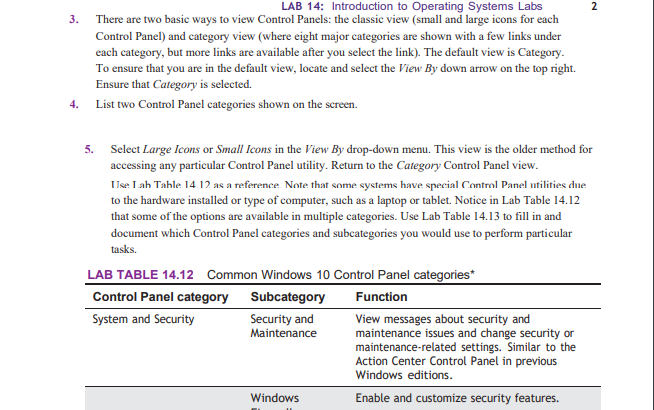
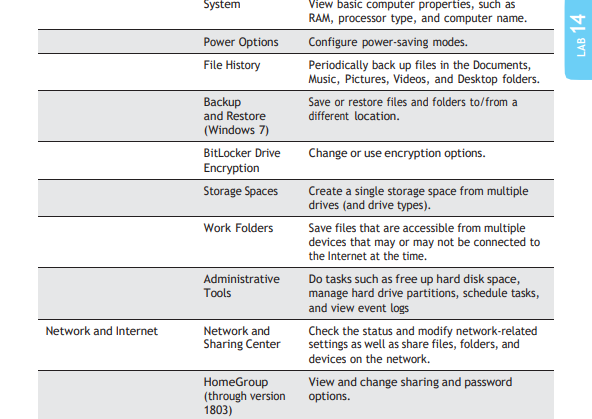
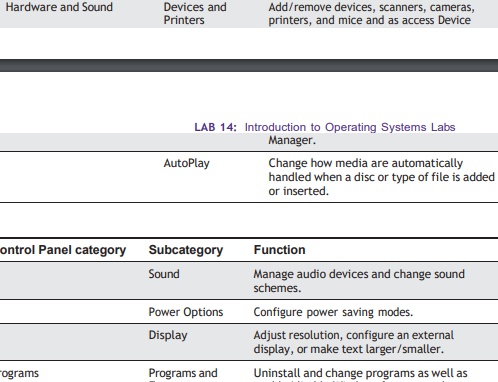
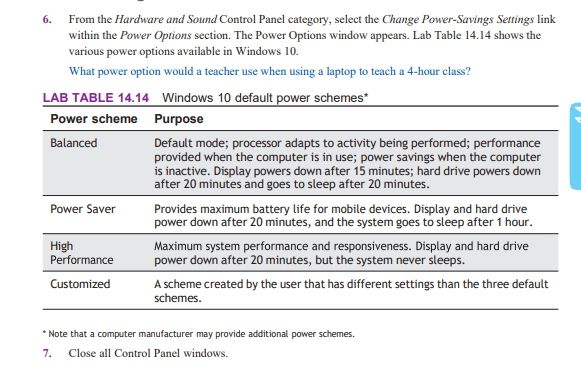
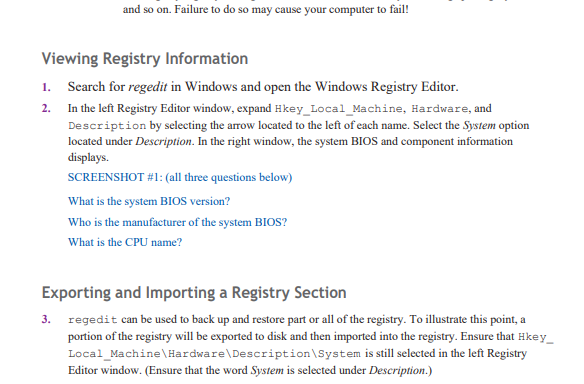
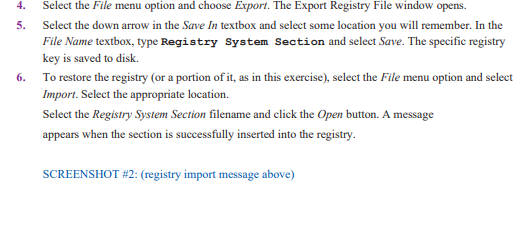
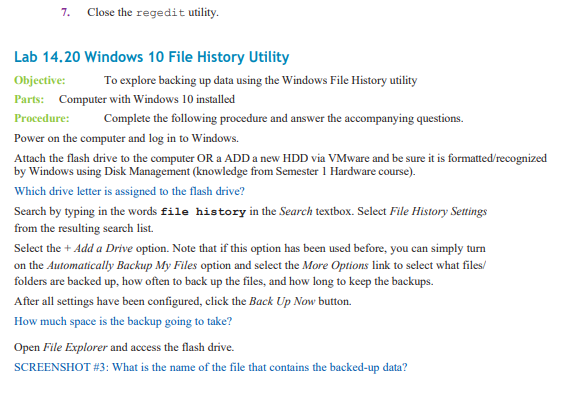
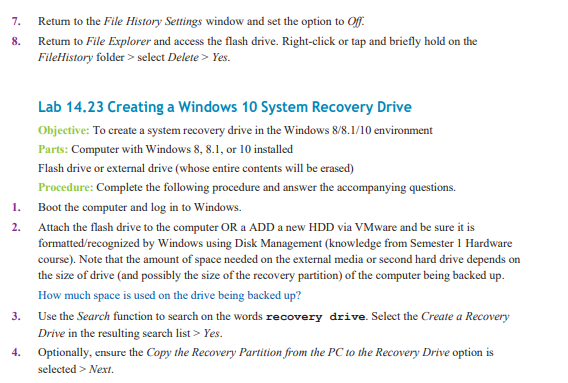
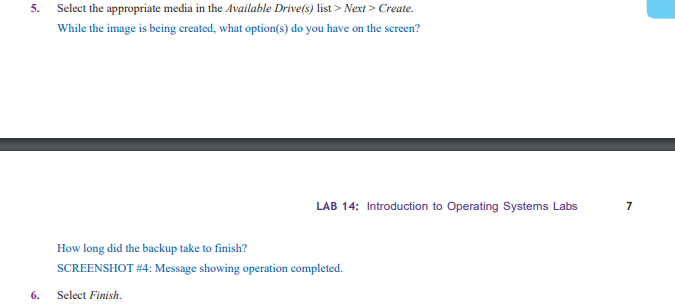
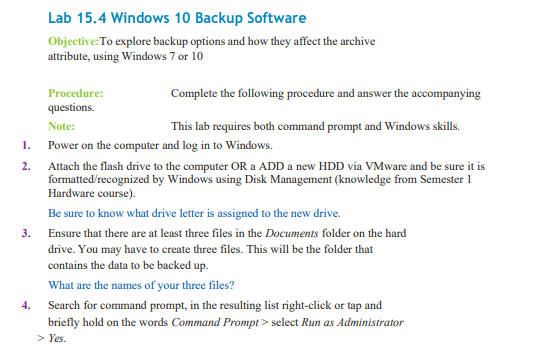
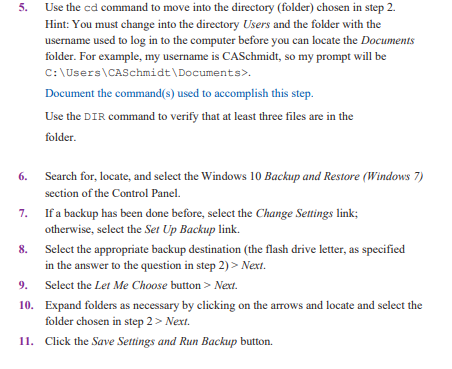
Lab 14.8 Windows 10 Basic Usage: Working with Control Panel Utilities To work effectively with the Windows 10 traditional desktop, including accessing Control Panel utilities; managing the display through the Control Panel; performing file, folder, and computer searches; and accessing programs Objective: Parts: Note: Procedure: 1. Power on the computer and log on to Windows, if necessary. Two computers with Windows 10 with administrator rights This lab can be done with one computer; in this case, only step 27 cannot be completed. Complete the following procedure and answer the accompanying questions. Working with Control Panel Utilities 2. Control Panel utilities are used to configure the operating system and hardware. There are various ways to open Control Panels: > Right-click or tap and briefly hold the Start button>Control Panel. > Type control in the Search textbox> select Control Panel. After searching for Control Panel, right-click or tap and briefly hold the icon> select Pin to Start so that you have a Control Panel tile on the Start screen or select Pin to Taskbar so it displays on the taskbar. > From the Start menu, select the All Apps icon> locate and expand the Windows System folder> locate and select Control Panel. 3. 4. LAB 14: Introduction to Operating Systems Labs There are two basic ways to view Control Panels: the classic view (small and large icons for each Control Panel) and category view (where eight major categories are shown with a few links under each category, but more links are available after you select the link). The default view is Category. To ensure that you are in the default view, locate and select the View By down arrow on the top right. Ensure that Category is selected. List two Control Panel categories shown on the screen. 5. Select Large Icons or Small Icons in the View By drop-down menu. This view is the older method for accessing any particular Control Panel utility. Return to the Category Control Panel view. Use Lab Table 14.12. as a reference. Note that some systems have special Control Panel utilities due to the hardware installed or type of computer, such as a laptop or tablet. Notice in Lab Table 14.12 that some of the options are available in multiple categories. Use Lab Table 14.13 to fill in and document which Control Panel categories and subcategories you would use to perform particular tasks. LAB TABLE 14.12 Common Windows 10 Control Panel categories* Subcategory Function View messages about security and maintenance issues and change security or maintenance-related settings. Similar to the Action Center Control Panel in previous Windows editions. Enable and customize security features. Control Panel category System and Security Security and Maintenance 2 Windows Network and Internet System Power Options File History Backup and Restore (Windows 7) BitLocker Drive Encryption Storage Spaces Work Folders Administrative Tools Network and Sharing Center HomeGroup (through version 1803) View basic computer properties, such as RAM, processor type, and computer name. Configure power-saving modes. Periodically back up files in the Documents, Music, Pictures, videos, and Desktop folders. Save or restore files and folders to/from a different location. Change or use encryption options. Create a single storage space from multiple drives (and drive types). Save files that are accessible from multiple devices that may or may not be connected to the Internet at the time. Do tasks such as free up hard disk space, manage hard drive partitions, schedule tasks, and view event logs Check the status and modify network-related settings as well as share files, folders, and devices on the network. View and change sharing and password options. LAB 14 Hardware and Sound ontrol Panel category ograms Devices and Printers LAB 14: Introduction to Operating Systems Labs Manager. AutoPlay Subcategory Sound Power Options Display Add/remove devices, scanners, cameras, printers, and mice and as access Device Programs and Change how media are automatically handled when a disc or type of file is added or inserted. Function Manage audio devices and change sound schemes. Configure power saving modes. Adjust resolution, configure an external display, or make text larger/smaller. Uninstall and change programs as well as 6. From the Hardware and Sound Control Panel category, select the Change Power-Savings Settings link within the Power Options section. The Power Options window appears. Lab Table 14.14 shows the various power options available in Windows 10. What power option would a teacher use when using a laptop to teach a 4-hour class? LAB TABLE 14.14 Windows 10 default power schemes* Power scheme Purpose Balanced Default mode; processor adapts to activity being performed; performance provided when the computer is in use; power savings when the computer is inactive. Display powers down after 15 minutes; hard drive powers down after 20 minutes and goes to sleep after 20 minutes. Power Saver High Performance Customized Provides maximum battery life for mobile devices. Display and hard drive power down after 20 minutes, and the system goes to sleep after 1 hour. Maximum system performance and responsiveness. Display and hard drive power down after 20 minutes, but the system never sleeps. A scheme created by the user that has different settings than the three default schemes. *Note that a computer manufacturer may provide additional power schemes. 7. Close all Control Panel windows. Viewing Registry Information Search for regedit in Windows and open the Windows Registry Editor. In the left Registry Editor window, expand Hkey_Local_Machine, Hardware, and Description by selecting the arrow located to the left of each name. Select the System option located under Description. In the right window, the system BIOS and component information displays. SCREENSHOT #1: (all three questions below) What is the system BIOS version? Who is the manufacturer of the system BIOS? What is the CPU name? 1. 2. and so on. Failure to do so may cause your computer to fail! Exporting and Importing a Registry Section regedit can be used to back up and restore part or all of the registry. To illustrate this point, a portion of the registry will be exported to disk and then imported into the registry. Ensure that Hkey_ Local Machine\Hardware\Description\System is still selected in the left Registry Editor window. (Ensure that the word System is selected under Description.) 3. 4. 5. 6. Select the File menu option and choose Export. The Export Registry File window opens. Select the down arrow in the Save In textbox and select some location you will remember. In the File Name textbox, type Registry System Section and select Save. The specific registry key is saved to disk. To restore the registry (or a portion of it, as in this exercise), select the File menu option and select Import. Select the appropriate location. Select the Registry System Section filename and click the Open button. A message appears when the section is successfully inserted into the registry. SCREENSHOT #2: (registry import message above) 7. Close the regedit utility. Lab 14.20 Windows 10 File History Utility Objective: Parts: Computer with Windows 10 installed Procedure: To explore backing up data using the Windows File History utility Complete the following procedure and answer the accompanying questions. Power on the computer and log in to Windows. Attach the flash drive to the computer OR a ADD a new HDD via VMware and be sure it is formatted/recognized by Windows using Disk Management (knowledge from Semester 1 Hardware course). Which drive letter is assigned to the flash drive? Search by typing in the words file history in the Search textbox. Select File History Settings from the resulting search list. Select the + Add a Drive option. Note that if this option has been used before, you can simply turn on the Automatically Backup My Files option and select the More Options link to select what files/ folders are backed up, how often to back up the files, and how long to keep the backups. After all settings have been configured, click the Back Up Now button. How much space is the backup going to take? Open File Explorer and access the flash drive. SCREENSHOT #3: What is the name of the file that contains the backed-up data? 7. 8. 1. 2. Return to the File History Settings window and set the option to Off: Return to File Explorer and access the flash drive. Right-click or tap and briefly hold on the FileHistory folder > select Delete > Yes. 4. Lab 14.23 Creating a Windows 10 System Recovery Drive Objective: To create a system recovery drive in the Windows 8/8.1/10 environment Parts: Computer with Windows 8, 8.1, or 10 installed Flash drive or external drive (whose entire contents will be erased) Procedure: Complete the following procedure and answer the accompanying questions. Boot the computer and log in to Windows. Attach the flash drive to the computer OR a ADD a new HDD via VMware and be sure it is formatted/recognized by Windows using Disk Management (knowledge from Semester 1 Hardware course). Note that the amount of space needed on the external media or second hard drive depends on the size of drive (and possibly the size of the recovery partition) of the computer being backed up. How much space is used on the drive being backed up? 3. Use the Search function to search on the words recovery drive. Select the Create a Recovery Drive in the resulting search list > Yes. Optionally, ensure the Copy the Recovery Partition from the PC to the Recovery Drive option is selected > Next. 5. 6. Select the appropriate media in the Available Drive(s) list> Next > Create. While the image is being created, what option(s) do you have on the screen? LAB 14: Introduction to Operating Systems Labs How long did the backup take to finish? SCREENSHOT #4: Message showing operation completed. Select Finish. 7 1. 2. 3. 4. Lab 15.4 Windows 10 Backup Software Objective: To explore backup options and how they affect the archive attribute, using Windows 7 or 10 Complete the following procedure and answer the accompanying Note: This lab requires both command prompt and Windows skills. Power on the computer and log in to Windows. Procedure: questions. Attach the flash drive to the computer OR a ADD a new HDD via VMware and be sure it is formatted/recognized by Windows using Disk Management (knowledge from Semester 1 Hardware course). Be sure to know what drive letter is assigned to the new drive. Ensure that there are at least three files in the Documents folder on the hard drive. You may have to create three files. This will be the folder that contains the data to be backed up. What are the names of your three files? Search for command prompt, in the resulting list right-click or tap and briefly hold on the words Command Prompt> select Run as Administrator > Yes. 5. 6. 7. 8. Use the cd command to move into the directory (folder) chosen in step 2. Hint: You must change into the directory Users and the folder with the username used to log in to the computer before you can locate the Documents folder. For example, my username is CASchmidt, so my prompt will be C:\Users\CASchmidt\Documents>. Document the command(s) used to accomplish this step. Use the DIR command to verify that at least three files are in the folder. 9. 10. Search for, locate, and select the Windows 10 Backup and Restore (Windows 7) section of the Control Panel. Select the appropriate backup destination (the flash drive letter, as specified in the answer to the question in step 2)> Next. Select the Let Me Choose button > Next. Expand folders as necessary by clicking on the arrows and locate and select the folder chosen in step 2> Next. 11. Click the Save Settings and Run Backup button. If a backup has been done before, select the Change Settings link; otherwise, select the Set Up Backup link.
Step by Step Solution
There are 3 Steps involved in it
Step: 1

Get Instant Access to Expert-Tailored Solutions
See step-by-step solutions with expert insights and AI powered tools for academic success
Step: 2

Step: 3

Ace Your Homework with AI
Get the answers you need in no time with our AI-driven, step-by-step assistance
Get Started


