Question: Lab Objectives: a. Get the student related with a Programmable Logic Controller (PLC). b. Get the student related with the programming software for PLC. c.


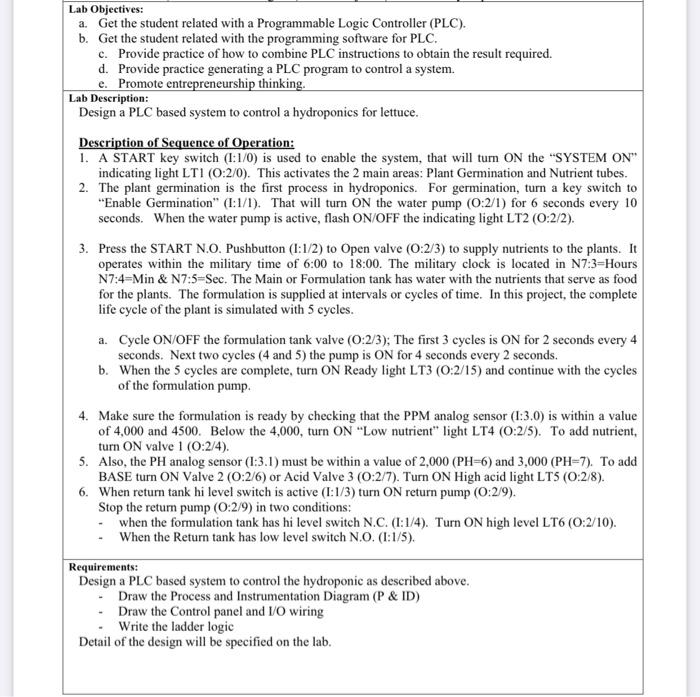
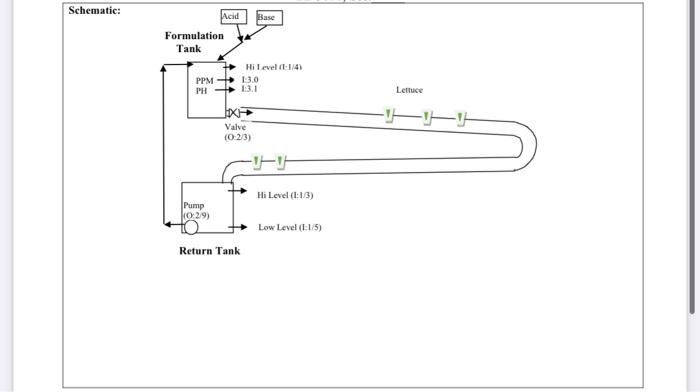
Lab Objectives: a. Get the student related with a Programmable Logic Controller (PLC). b. Get the student related with the programming software for PLC. c. Provide practice of how to combine PLC instructions to obtain the result required. d. Provide practice generating a PLC program to control a system. e. Promote entrepreneurship thinking. Lab Description: Design a PLC based system to control a hydroponics for lettuce. Description of Sequence of Operation: 1. A START key switch (1:1/0) is used to enable the system, that will turn ON the "SYSTEM ON indicating light LTI (0:2/0). This activates the 2 main areas: Plant Germination and Nutrient tubes. 2. The plant germination is the first process in hydroponics. For germination, turn a key switch to "Enable Germination" (1:1/1). That will turn ON the water pump (0:2/1) for 6 seconds every 10 seconds. When the water pump is active, flash ON/OFF the indicating light LT2 (0:2/2). 3. Press the START N.O. Pushbutton (1:1/2) to Open valve (0:2/3) to supply nutrients to the plants. It operates within the military time of 6:00 to 18:00. The military clock is located in N7:3=Hours N7:4=Min & N7:5=Sec. The Main or Formulation tank has water with the nutrients that serve as food for the plants. The formulation is supplied at intervals or cycles of time. In this project, the complete life cycle of the plant is simulated with 5 cycles. a. Cycle ON/OFF the formulation tank valve (0:2/3); The first 3 cycles is ON for 2 seconds every 4 seconds. Next two cycles (4 and 5) the pump is ON for 4 seconds every 2 seconds. b. When the 5 cycles are complete, turn ON Ready light LT3 (0:2/15) and continue with the cycles of the formulation pump. 4. Make sure the formulation is ready by checking that the PPM analog sensor (1:3.0) is within a value of 4,000 and 4500. Below the 4,000, turn ON "Low nutrient" light LT4 (0:2/5). To add nutrient, turn ON valve 1 (0:2/4). 5. Also, the PH analog sensor (1:3.1) must be within a value of 2,000 (PH=6) and 3,000 (PH=7). To add BASE turn ON Valve 2 (0:26) or Acid Valve 3 (0:2/7). Turn ON High acid light LTS (0:28). 6. When return tank hi level switch is active (1:1/3) turn ON return pump (0:29). Stop the return pump (0:279) in two conditions: when the formulation tank has hi level switch N.C. (1:1/4). Turn ON high level LT6 (0:2/10). When the Return tank has low level switch N.O. (1:1/5). Requirements: Design a PLC based system to control the hydroponic as described above. Draw the Process and Instrumentation Diagram (P& ID) Draw the Control panel and I/O wiring Write the ladder logic Detail of the design will be specified on the lab. Schematic: Base Acid Formulation Tank Hi level (1/4 13.0 PPM PH Lettuce HXH Valve (0-23) ! Hi Level (I:1/3) Pump 029) Low Level (1/5) Return Tank Lab Objectives: a. Get the student related with a Programmable Logic Controller (PLC). b. Get the student related with the programming software for PLC. c. Provide practice of how to combine PLC instructions to obtain the result required. d. Provide practice generating a PLC program to control a system. e. Promote entrepreneurship thinking. Lab Description: Design a PLC based system to control a hydroponics for lettuce. Description of Sequence of Operation: 1. A START key switch (1:1/0) is used to enable the system, that will turn ON the "SYSTEM ON indicating light LTI (0:2/0). This activates the 2 main areas: Plant Germination and Nutrient tubes. 2. The plant germination is the first process in hydroponics. For germination, turn a key switch to "Enable Germination" (1:1/1). That will turn ON the water pump (0:2/1) for 6 seconds every 10 seconds. When the water pump is active, flash ON/OFF the indicating light LT2 (0:2/2). 3. Press the START N.O. Pushbutton (1:1/2) to Open valve (0:2/3) to supply nutrients to the plants. It operates within the military time of 6:00 to 18:00. The military clock is located in N7:3=Hours N7:4=Min & N7:5=Sec. The Main or Formulation tank has water with the nutrients that serve as food for the plants. The formulation is supplied at intervals or cycles of time. In this project, the complete life cycle of the plant is simulated with 5 cycles. a. Cycle ON/OFF the formulation tank valve (0:2/3); The first 3 cycles is ON for 2 seconds every 4 seconds. Next two cycles (4 and 5) the pump is ON for 4 seconds every 2 seconds. b. When the 5 cycles are complete, turn ON Ready light LT3 (0:2/15) and continue with the cycles of the formulation pump. 4. Make sure the formulation is ready by checking that the PPM analog sensor (1:3.0) is within a value of 4,000 and 4500. Below the 4,000, turn ON "Low nutrient" light LT4 (0:2/5). To add nutrient, turn ON valve 1 (0:2/4). 5. Also, the PH analog sensor (1:3.1) must be within a value of 2,000 (PH=6) and 3,000 (PH=7). To add BASE turn ON Valve 2 (0:26) or Acid Valve 3 (0:2/7). Turn ON High acid light LTS (0:28). 6. When return tank hi level switch is active (1:1/3) turn ON return pump (0:29). Stop the return pump (0:279) in two conditions: when the formulation tank has hi level switch N.C. (1:1/4). Turn ON high level LT6 (0:2/10). When the Return tank has low level switch N.O. (1:1/5). Requirements: Design a PLC based system to control the hydroponic as described above. Draw the Process and Instrumentation Diagram (P& ID) Draw the Control panel and I/O wiring Write the ladder logic Detail of the design will be specified on the lab. Schematic: Base Acid Formulation Tank Hi level (1/4 13.0 PPM PH Lettuce HXH Valve (0-23) ! Hi Level (I:1/3) Pump 029) Low Level (1/5) Return Tank
Step by Step Solution
There are 3 Steps involved in it

Get step-by-step solutions from verified subject matter experts


