

Question
Language is C. The first 2 screenshots are all the instructions. The other screenshots are the accompanying code the instructions refer to (the turtle.c file).
Language is C. The first 2 screenshots are all the instructions. The other screenshots are the accompanying code the instructions refer to (the turtle.c file). Please let me know if anything more is needed.
Write the following functions according to the instructions above:
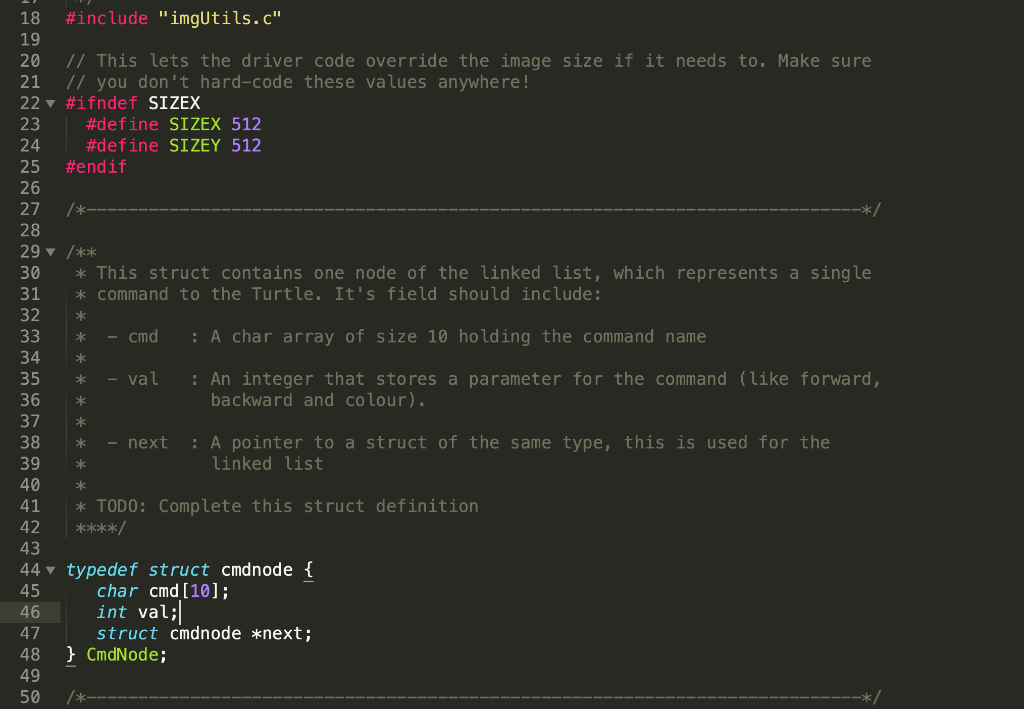
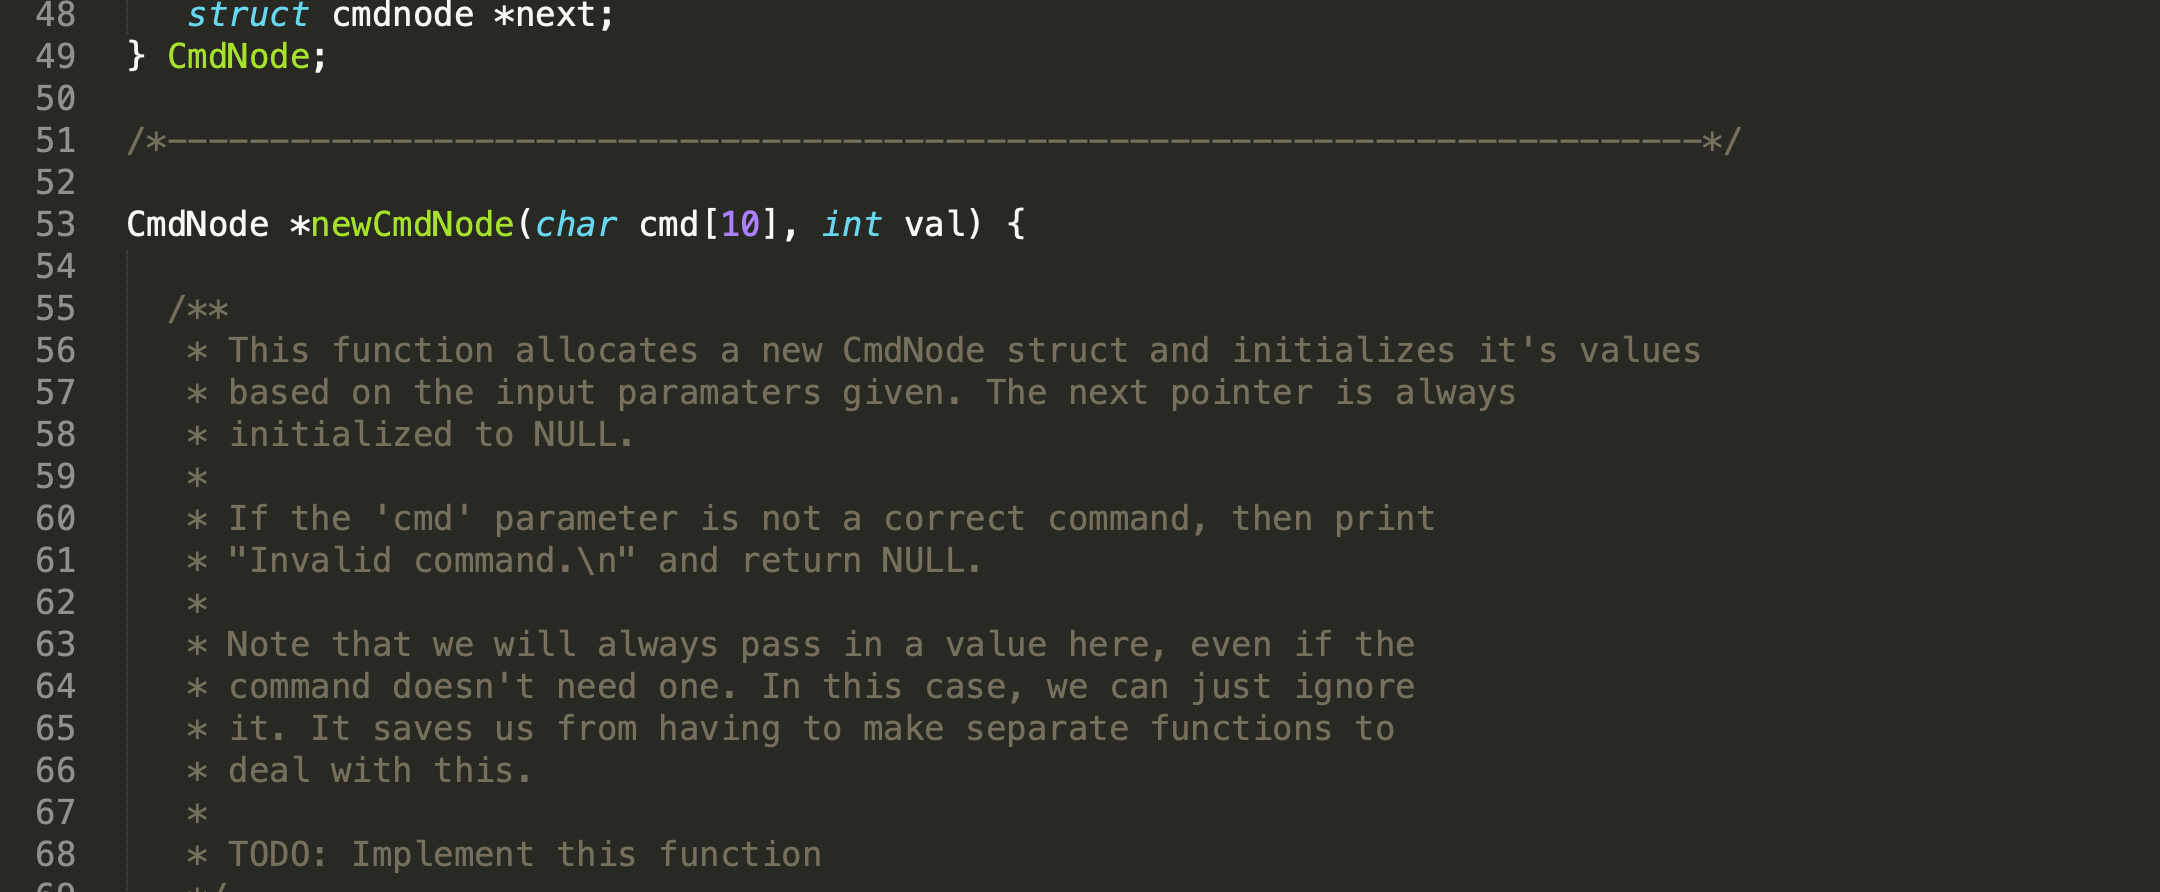

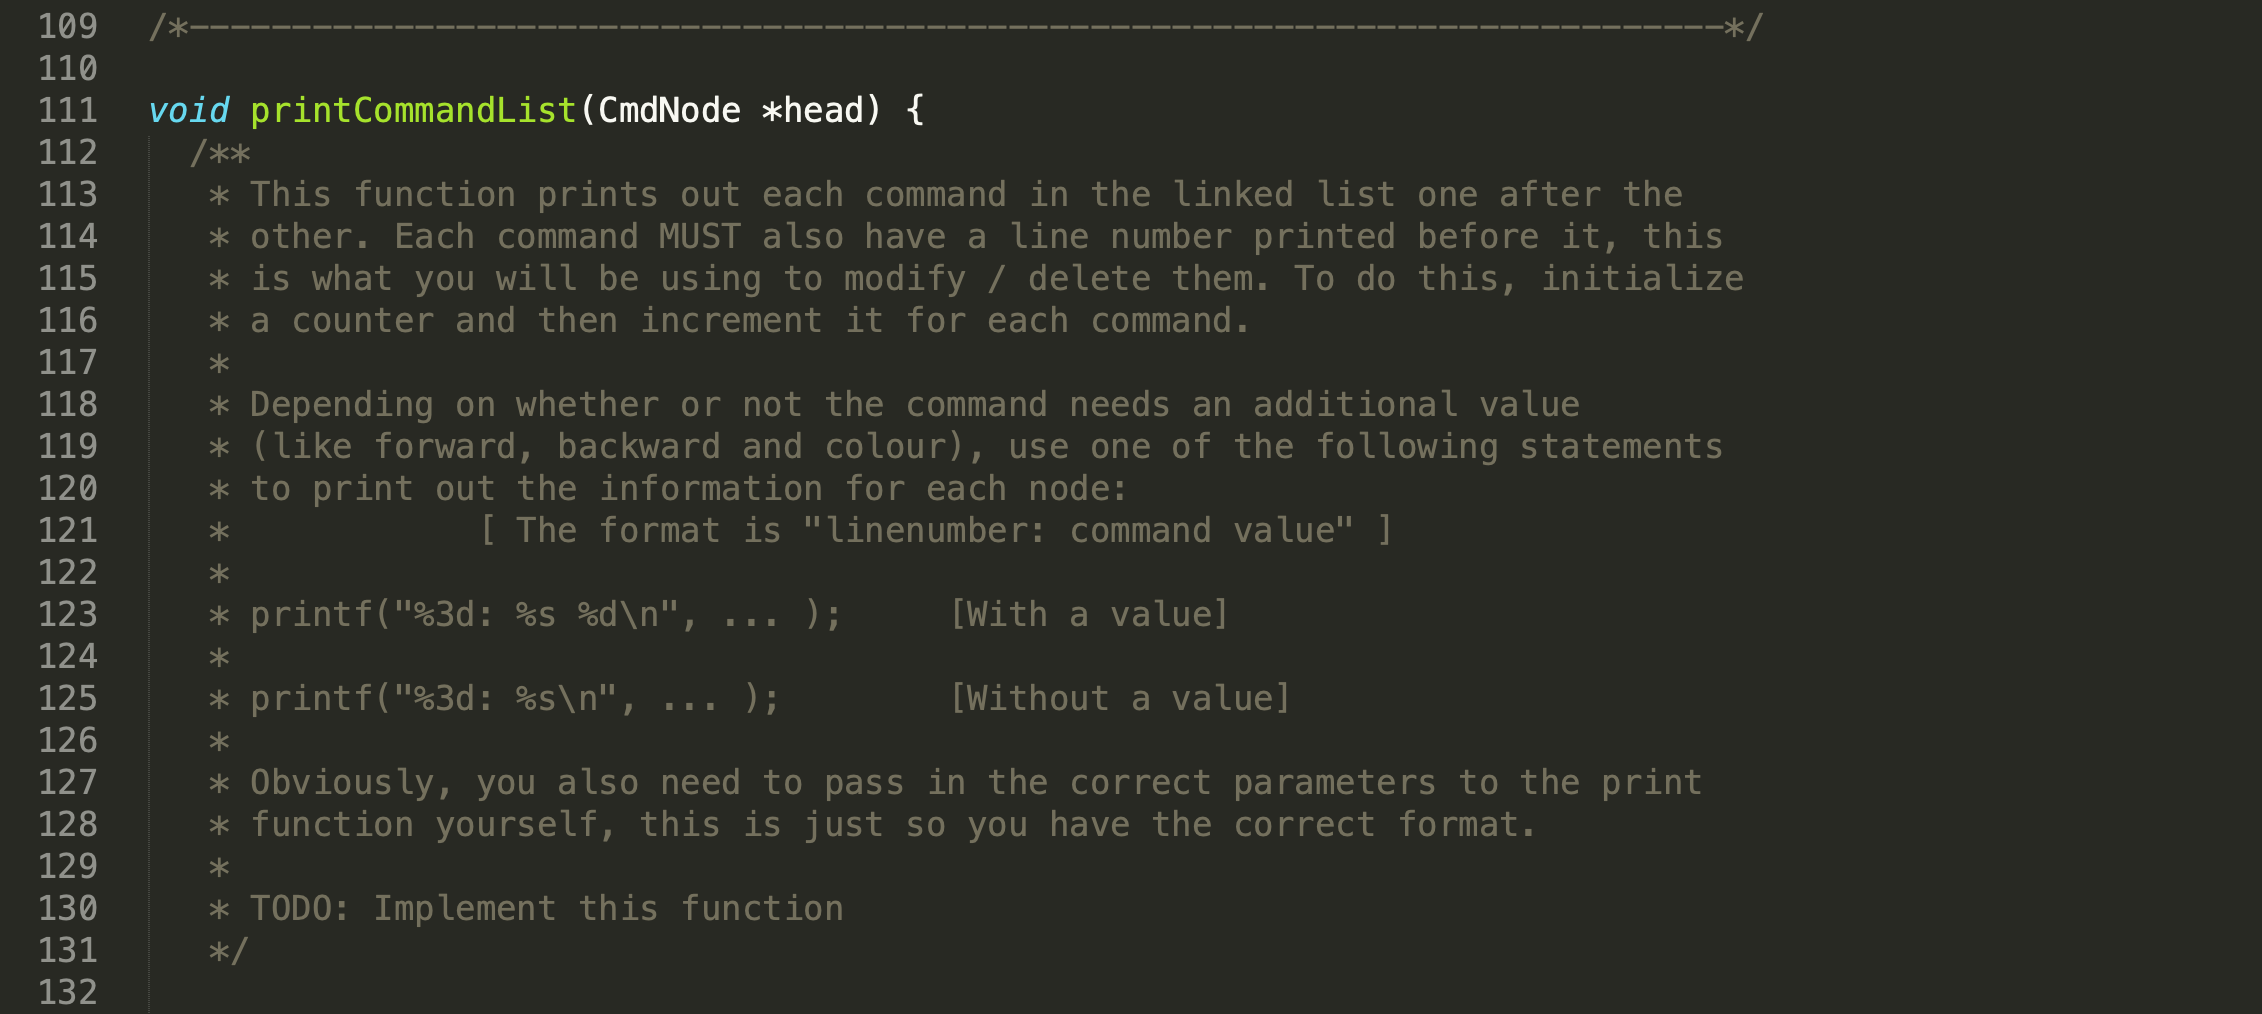
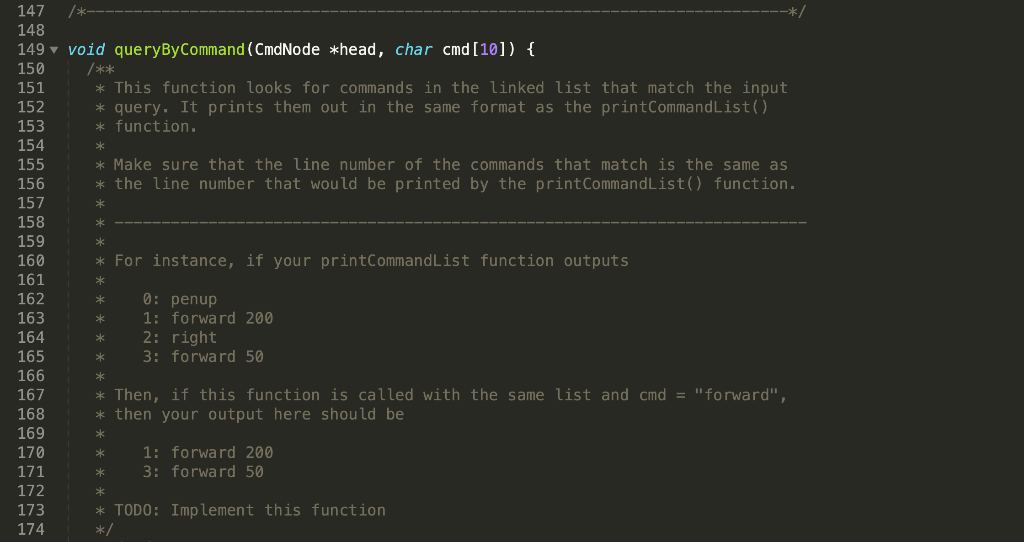
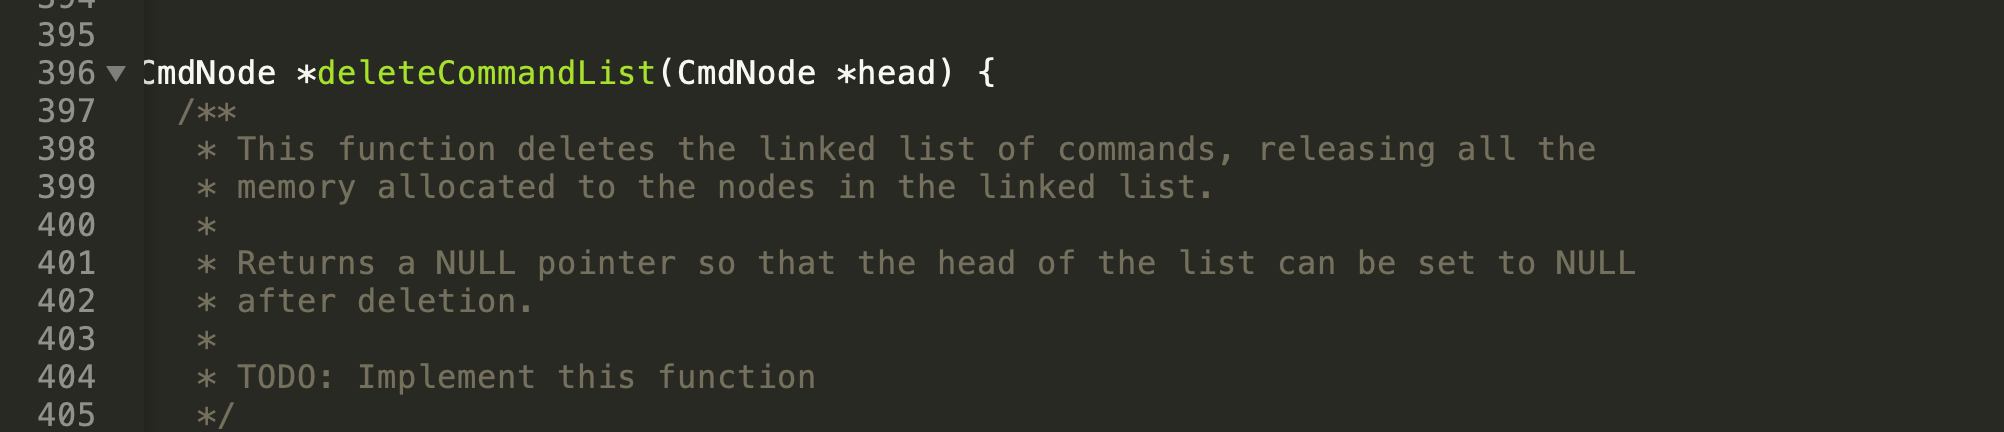
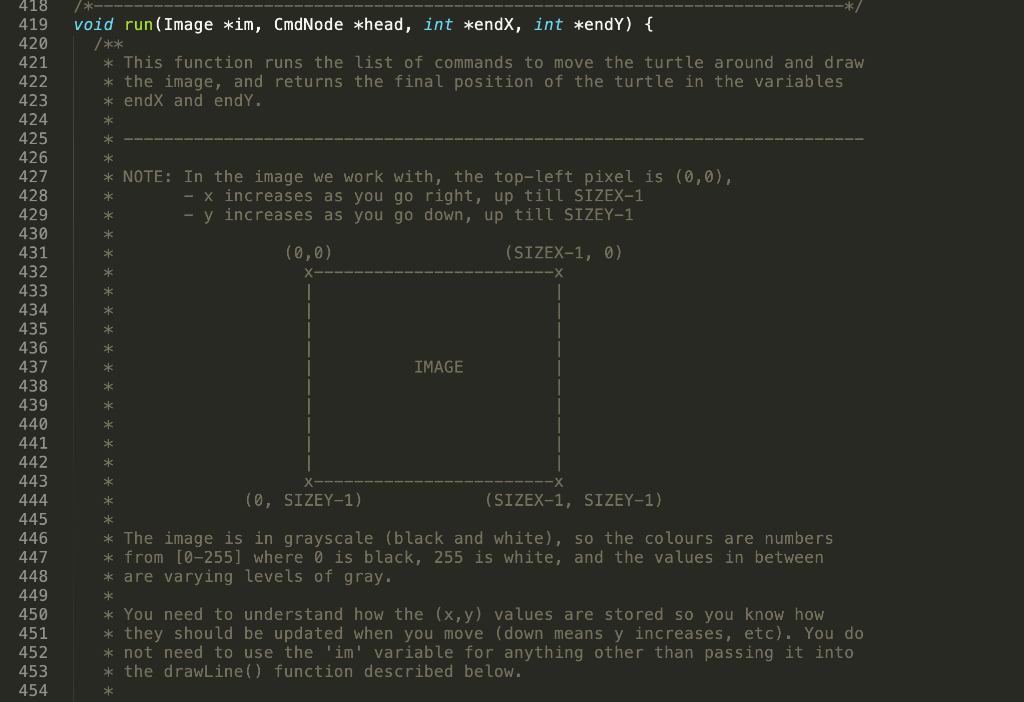
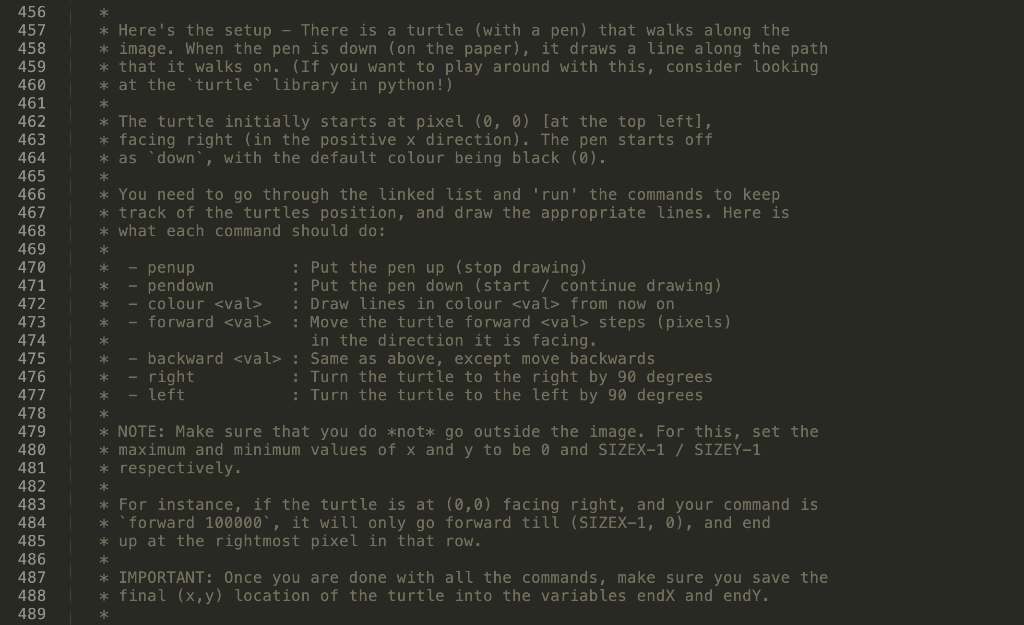
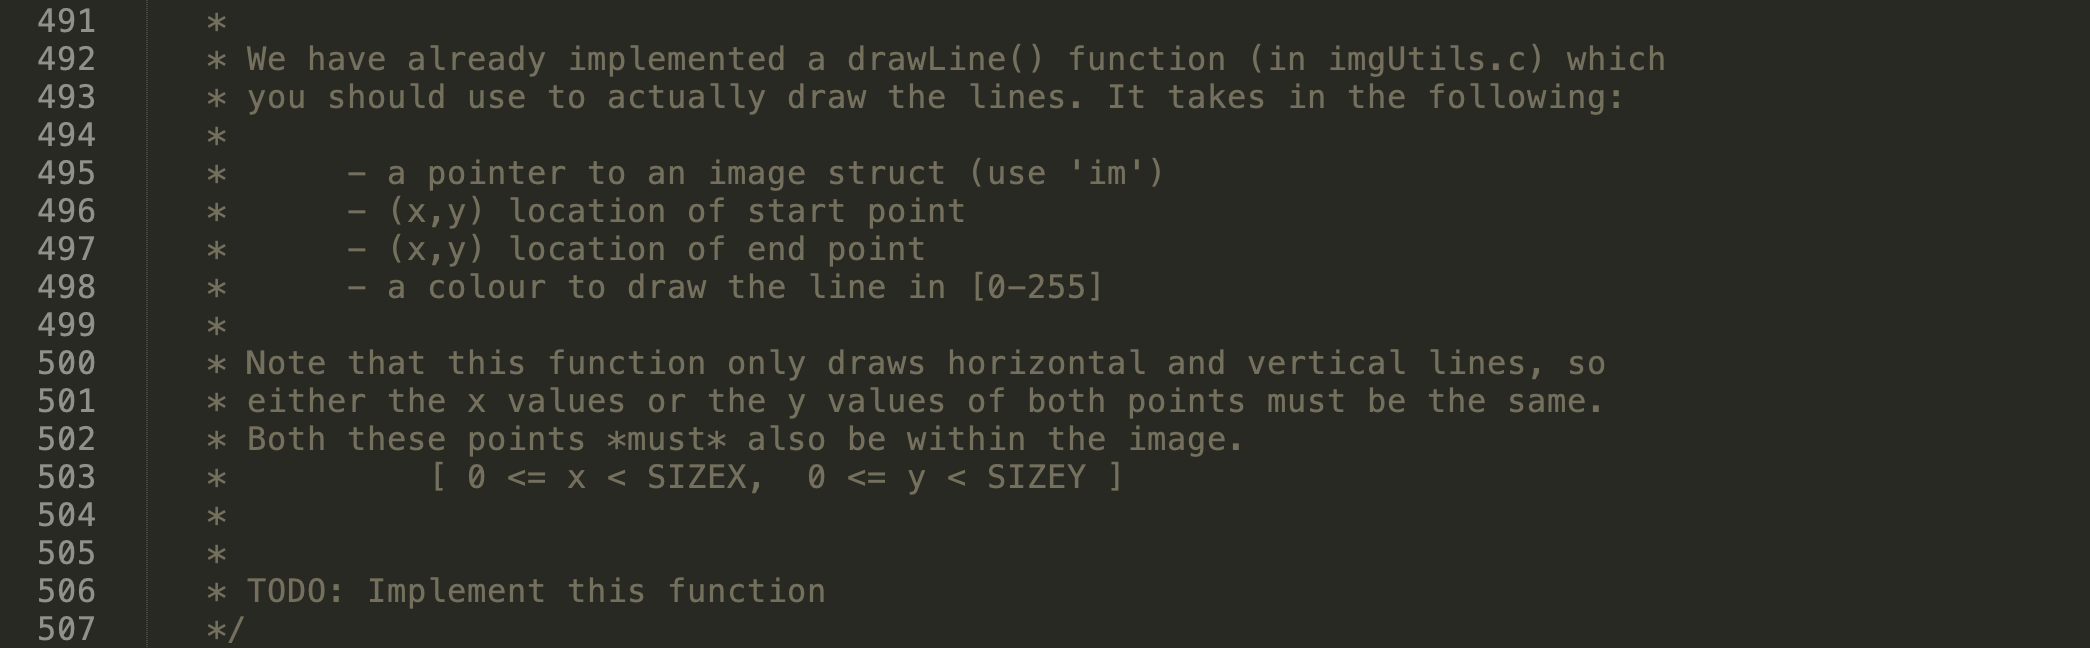
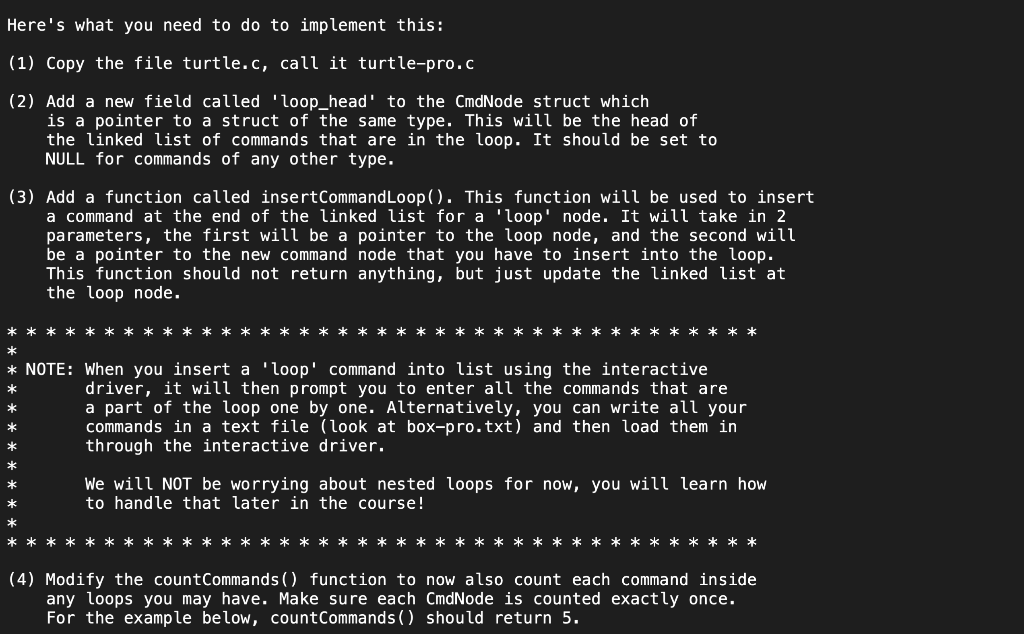
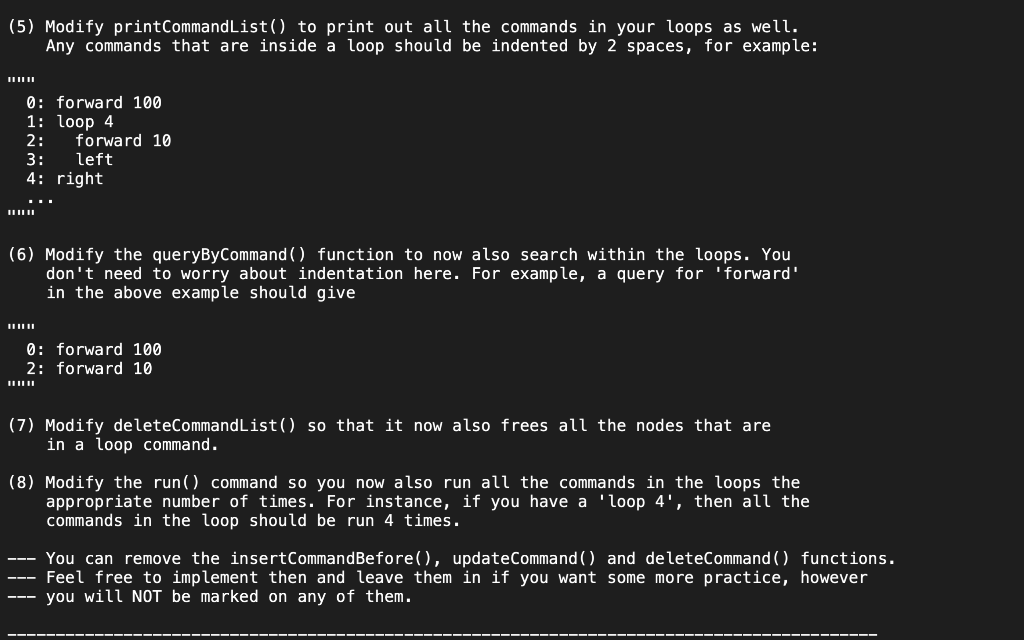
Here's what you need to do to implement this: (1) Copy the file turtle.c, call it turtle-pro.c (2) Add a new field called 'loop_head' to the CmdNode struct which is a pointer to a struct of the same type. This will be the head of the linked list of commands that are in the loop. It should be set to NULL for commands of any other type. (3) Add a function called insert CommandLoop(). This function will be used to insert a command at the end of the linked list for a 'loop' node. It will take in 2 parameters, the first will be a pointer to the loop node, and the second will be a pointer to the new command node that you have to insert into the loop. This function should not return anything, but just update the linked list at the loop node. * NOTE: When you insert a 'loop' command into list using the interactive driver, it will then prompt you to enter all the commands that are a part of the loop one by one. Alternatively, you can write all your commands in a text file (look at box-pro.txt) and then load them in through the interactive driver. We will NOT be worrying about nested loops for now, you will learn how to handle that later in the course! * * * * * * * * * * * * * * * * * * * * * * (4) Modify the countCommands() function to now also count each command inside any loops you may have. Make sure each CmdNode is counted exactly once. For the example below, countCommands() should return 5. (5) Modify printCommandList() to print out all the commands in your loops as well. Any commands that are inside a loop should be indented by 2 spaces, for example: 0: forward 100 1: loop 4 2: forward 10 3: left 4: right (6) Modify the queryByCommand() function to now also search within the loops. You don't need to worry about indentation here. For example, a query for 'forward' in the above example should give 0: forward 100 2: forward 10 (7) Modify deleteCommandList() so that it now also frees all the nodes that are in a loop command. (8) Modify the run() command so you now also run all the commands in the loops the appropriate number of times. For instance, if you have a 'loop 4', then all the commands in the loop should be run 4 times. --- You can remove the insert CommandBefore(), updateCommand() and deleteCommand() functions. Feel free to implement then and leave them in if you want some more practice, however you will NOT be marked on any of them. * 18 #include "imgutils.c" 19 20 // This lets the driver code override the image size if it needs to. Make sure 21 Il you don't hard-code these values anywhere! 22 #ifndef SIZEX 23 #define SIZEX 512 24 #define SIZEY 512 25 #endif 26 27 /* 28 29 30 * This struct contains one node of the linked list, which represents a single 31 * command to the Turtle. It's field should include: 32 * 33 cmd : A char array of size 10 holding the command name 34 35 - val : An integer that stores a parameter for the command (like forward, 36 backward and colour). 37 38 - next : A pointer to a struct of the same type, this is used for the 39 linked list 40 41 * TODO: Complete this struct definition 42 ****/ 43 44 typedef struct cmdnode { 45 char cmd [10]; 46 int val; 47 struct cmdnode *next; 48 } CmdNode; 49 50 * * * * * 48 struct cmdnode *next; } CmdNode; 49 /*- --*/ CmdNode *newCmdNode(char cmd [10], int val) { 50 51 52 53 54 55 56 57 58 59 /** * This function allocates a new CmdNode struct and initializes it's values * based on the input paramaters given. The next pointer is always * initialized to NULL. 60 * If the 'cmd' parameter is not a correct command, then print * "Invalid command. " and return NULL. 61 62 63 64 65 66 67 68 * Note that we will always pass in a value here, even if the * command doesn't need one. In this case, we can just ignore * it. It saves us from having to make separate functions to * deal with this. * TODO: Implement this function 190 /*- 191 192 v int count Commands (CmdNode *head) { 193 /** 194 * This function counts and returns the length of the linked list. It 195 * requires list traversal. 196 197 * TODO: Implement this function 198 */ * /* -*/ void printCommandList(CmdNode *head) { /** * This function prints out each command in the linked list one after the * other. Each command MUST also have a line number printed before it, this * is what you will be using to modify / delete them. To do this, initialize * a counter and then increment it for each command. 109 110 111 112 113 114 115 116 117 118 119 120 121 122 123 124 125 126 127 128 129 130 131 132 * Depending on whether or not the command needs an additional value * (like forward, backward and colour), use one of the following statements * to print out the information for each node: [ The format is "linenumber: command value" ] * * printf("%3d: %s %d ", ); [With a value] * printf("%3d: %s ", ... ); [Without a value] * * Obviously, you also need to pass in the correct parameters to the print * function yourself, this is just so you have the correct format. * TODO: Implement this function */ * * 147 148 149 void queryByCommand (CmdNode *head, char cmd[10]) { 150 151 * This function looks for commands in the linked list that match the input 152 * query. It prints them out in the same format as the printCommandListo) 153 * function. 154 155 * Make sure that the line number of the commands that match is the same as 156 * the line number that would be printed by the printCommandList() function. 157 158 159 160 * For instance, if your printCommandList function outputs 161 162 0: penup 163 1: forward 200 2: right 165 3: forward 50 166 167 * Then, if this function is called with the same list and cmd = "forward", 168 * then your output here should be 169 170 1: forward 200 171 3: forward 50 172 173 * TODO: Implement this function 174 */ * * 164 * *** * * CmdNode *deleteCommandList(CmdNode *head) { /** * This function deletes the linked list of commands, releasing all the * memory allocated to the nodes in the linked list. 395 396 397 398 399 400 401 402 403 404 405 * Returns a NULL pointer so that the head of the list can be set to NULL * after deletion. * TODO: Implement this function */ void run(Image *im, CmdNode *head, int *endx, int *endy) { * This function runs the list of commands to move the turtle around and draw * the image, and returns the final position of the turtle in the variables * endx and endY. * * * NOTE: In the image we work with, the top-left pixel is (0,0), - x increases as you go right, up till SIZEX-1 - y increases as you go down, up till SIZEY-1 * * * * (0,0) (SIZEX-1, 0) 418 419 420 421 422 423 424 425 426 427 428 429 430 431 432 433 434 435 436 437 438 439 440 441 442 443 444 445 446 447 448 449 450 451 452 453 454 IMAGE (0, SIZEY-1) (SIZEX-1, SIZEY-1) * The image is in grayscale (black and white), so the colours are numbers * from [0255] where 0 is black, 255 is white, and the values in between * are varying levels of gray. * * You need to understand how the (x,y) values are stored so you know how * they should be updated when you move (down means y increases, etc). You do * not need to use the 'im' variable for anything other than passing it into * the drawLine() function described below. ** * * Here's the setup - There is a turtle (with a pen) that walks along the * image. When the pen is down (on the paper), it draws a line along the path * that it walks on. (If you want to play around with this, consider looking * at the 'turtle library in python!) * * The turtle initially starts at pixel (0, 0) (at the top left], * facing right (in the positive x direction). The pen starts off * as down, with the default colour being black (0). * You need to go through the linked list and 'run' the commands to keep * track of the turtles position, and draw the appropriate lines. Here is * what each command should do: * * 456 457 458 459 460 461 462 463 464 465 466 467 468 469 470 471 472 473 474 475 476 477 478 479 480 481 482 483 484 485 486 487 488 489 * * penup : Put the pen up (stop drawing) - pendown : Put the pen down (start / continue drawing) colour
Step by Step Solution
There are 3 Steps involved in it
Step: 1

Get Instant Access to Expert-Tailored Solutions
See step-by-step solutions with expert insights and AI powered tools for academic success
Step: 2

Step: 3
Ace Your Homework with AI
Get the answers you need in no time with our AI-driven, step-by-step assistance
Get Started
Mastering Sports Analytics With R Insights From Soccer Nba Nfl Baseball Hockey Tennis Golf And Boxing
Authors: Lauren Gallardo
1st Edition
B0CHGB9X8T, 979-8860571174