Linux
You are tell me the difference from the outcome of Lecture 3 Step 2 (Compare man tar to pinfo tar) click on Submit Assignment and type in your response. You can perform this assignment in either NDG or virtual machine.
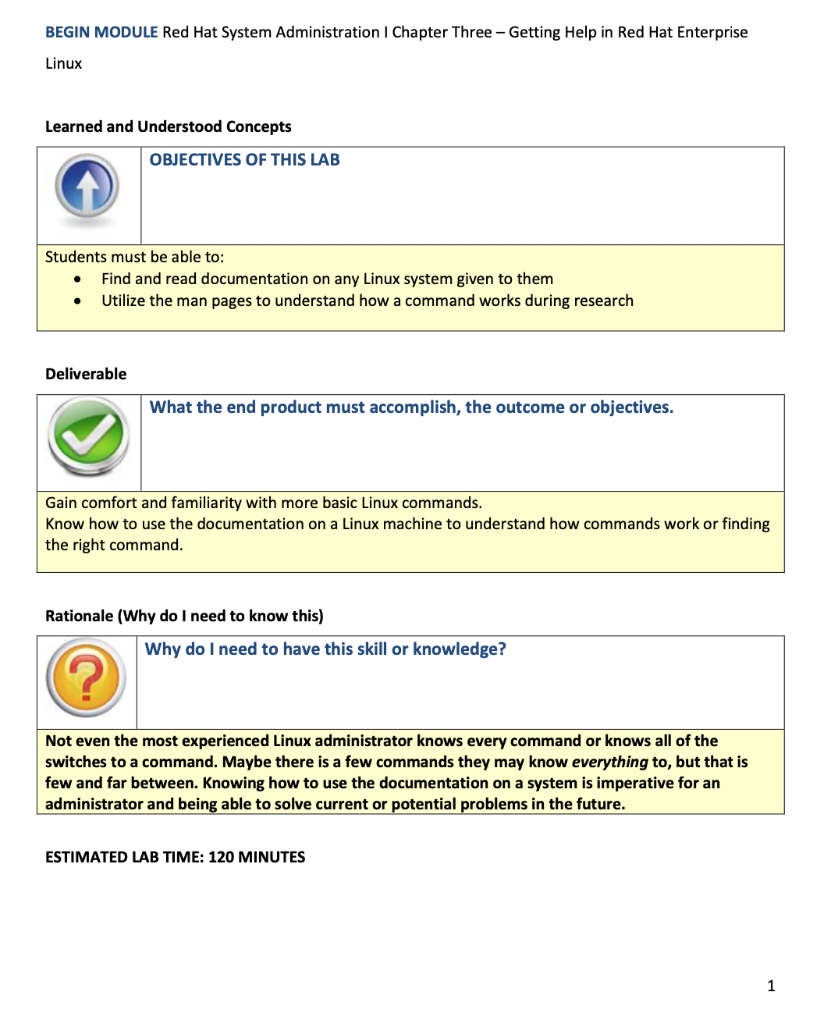
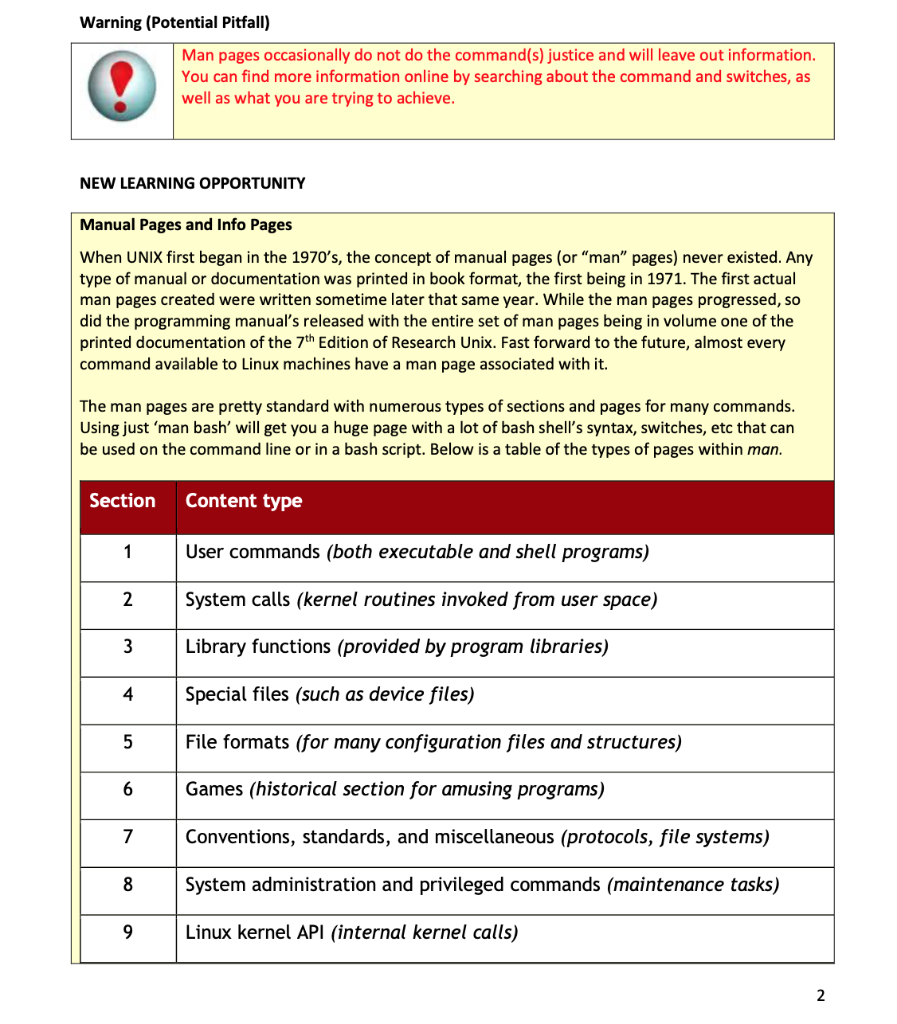
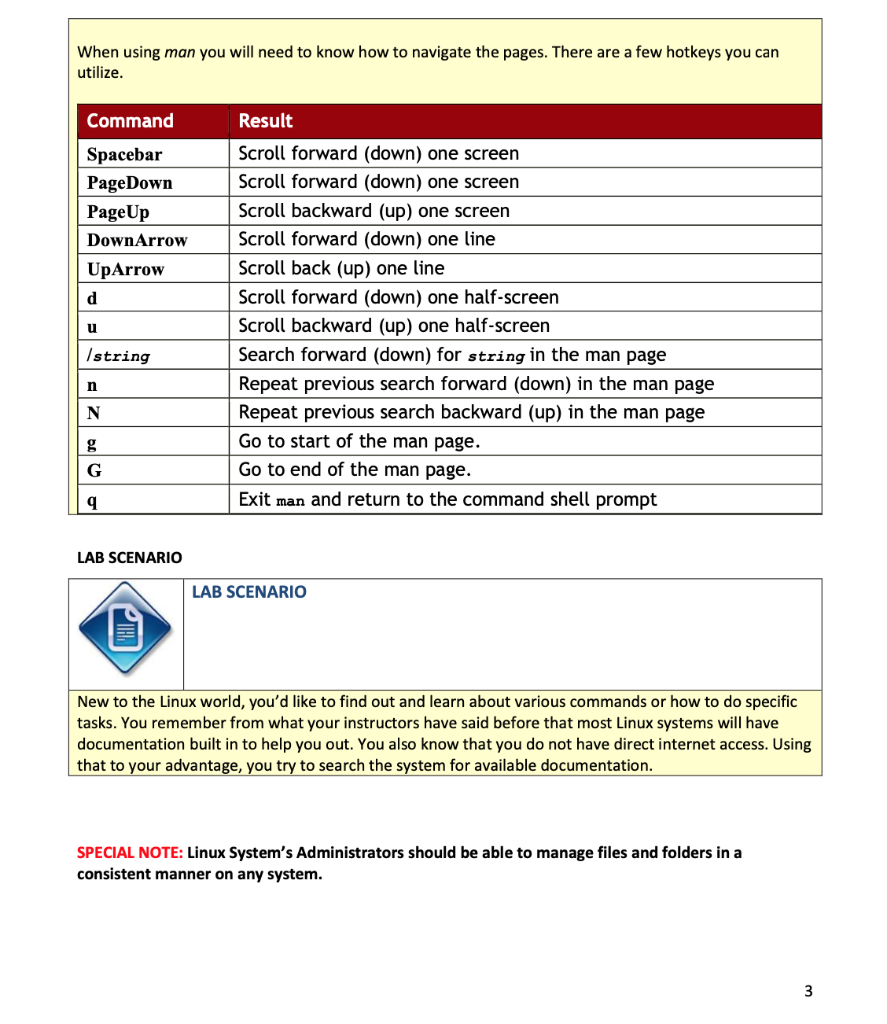
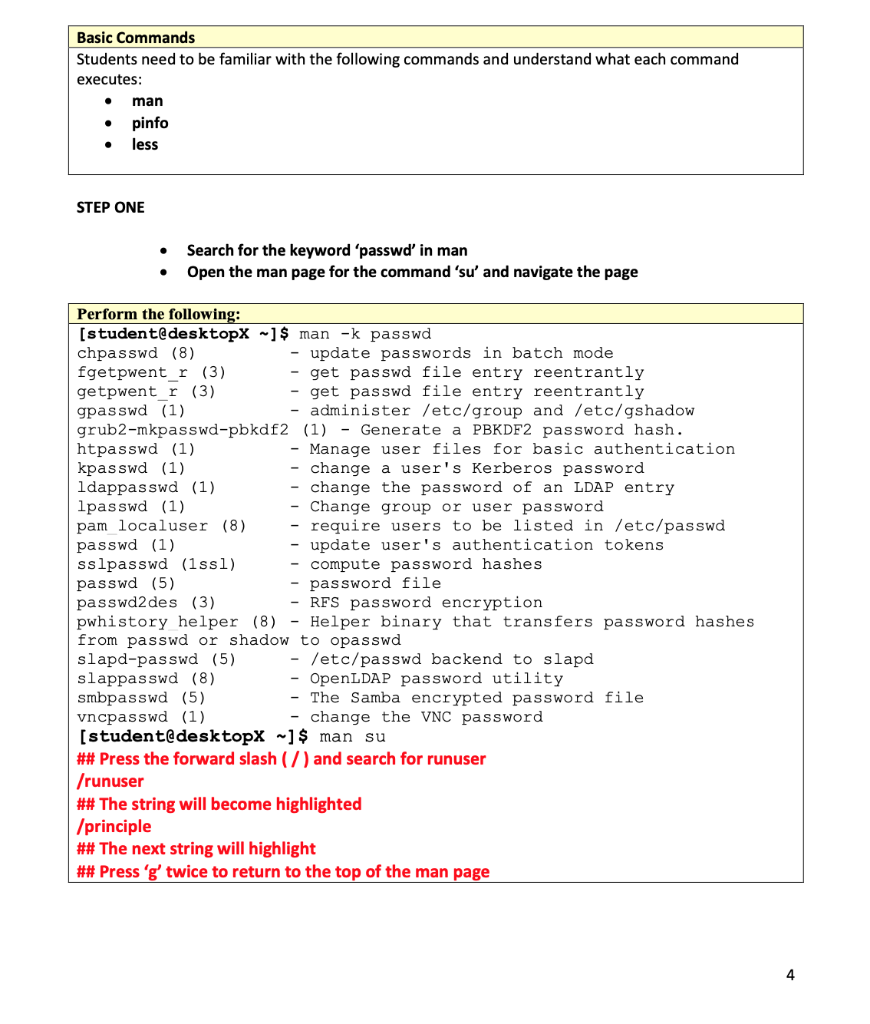
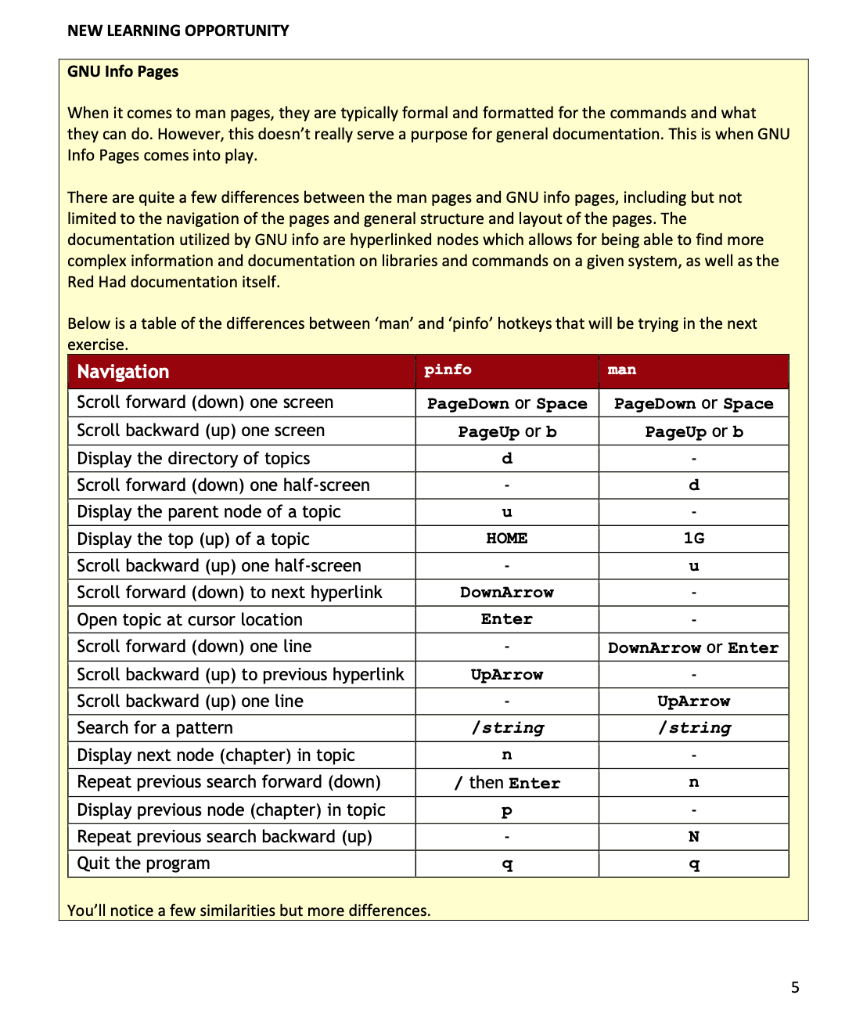
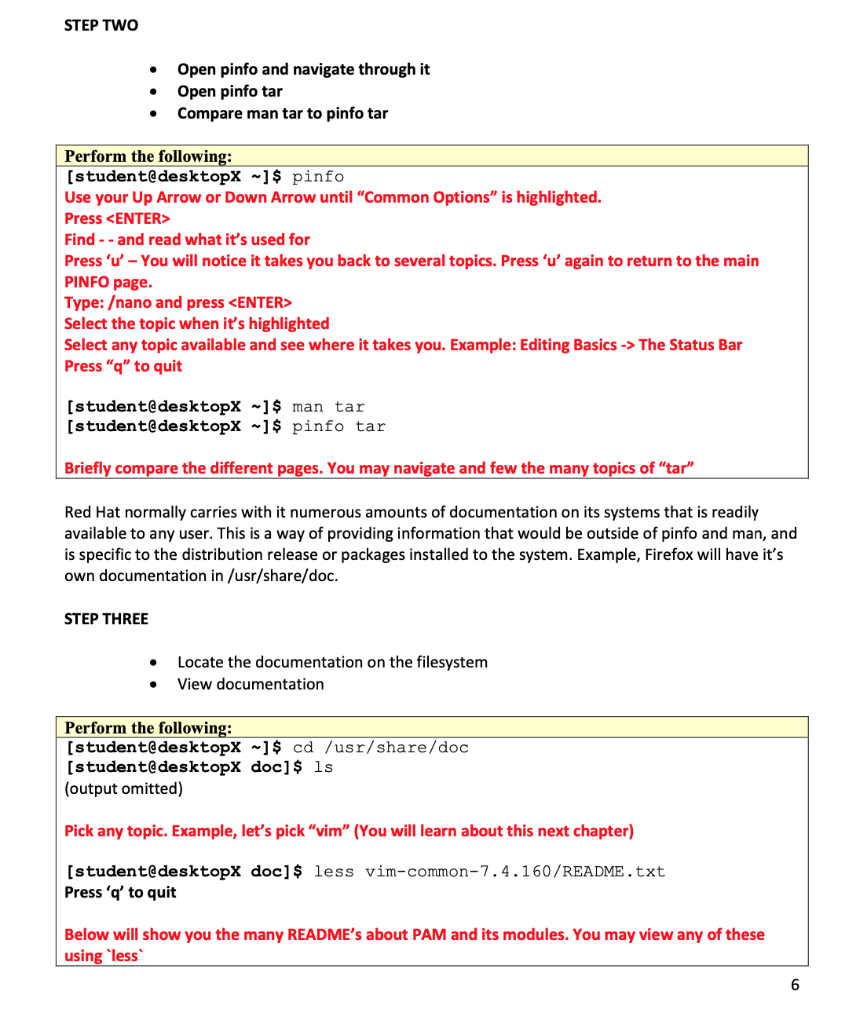
BEGIN MODULE Red Hat System Administration Chapter Three-Getting Help in Red Hat Enterprise Linux Learned and understood Concepts OBJECTIVES OF THIS LAB Students must be able to: Find and read documentation on any Linux system given to them Utilize the man pages to understand how a command works during research Deliverable What the end product must accomplish, the outcome or objectives. Gain comfort and familiarity with more basic Linux commands. Know how to use the documentation on a Linux machine to understand how commands work or finding the right command. Rationale (Why do I need to know this) Why do I need to have this skill or knowledge? Not even the most experienced Linux administrator knows every command or knows all of the switches to a command. Maybe there is a few commands they may know everything to, but that is few and far between. Knowing how to use the documentation on a system is imperative for an administrator and being able to solve current or potential problems in the future. ESTIMATED LAB TIME: 120 MINUTES Warning (Potential Pitfall) Man pages occasionally do not do the command(s) justice and will leave out information. You can find more information online by searching about the command and switches, as well as what you are trying to achieve. NEW LEARNING OPPORTUNITY Manual Pages and Info Pages When UNIX first began in the 1970's, the concept of manual pages (or "man" pages) never existed. Any type of manual or documentation was printed in book format, the first being in 1971. The first actual man pages created were written sometime later that same year. While the man pages progressed, so did the programming manual's released with the entire set of man pages being in volume one of the printed documentation of the 7th Edition of Research Unix. Fast forward to the future, almost every command available to Linux machines have a man page associated with it. The man pages are pretty standard with numerous types of sections and pages for many commands. Using just 'man bash' will get you a huge page with a lot of bash shell's syntax, switches, etc that can be used on the command line or in a bash script. Below is a table of the types of pages within man. Section Content type User commands (both executable and shell programs) 2 System calls (kernel routines invoked from user space) Library functions (provided by program libraries) Special files (such as device files) 5 File formats (for many configuration files and structures) Games (historical section for amusing programs) Conventions, standards, and miscellaneous (protocols, file systems) 8 System administration and privileged commands (maintenance tasks) Linux kernel API (internal kernel calls) When using man you will need to know how to navigate the pages. There are a few hotkeys you can utilize. Command Spacebar PageDown PageUp DownArrow UpArrow Result Scroll forward (down) one screen Scroll forward (down) one screen Scroll backward (up) one screen Scroll forward (down) one line Scroll back (up) one line Scroll forward (down) one half-screen Scroll backward (up) one half-screen Search forward (down) for string in the man page Repeat previous search forward (down) in the man page Repeat previous search backward (up) in the man page Go to start of the man page. Go to end of the man page. Exit man and return to the command shell prompt Istring N LAB SCENARIO LAB SCENARIO New to the Linux world, you'd like to find out and learn about various commands or how to do specific tasks. You remember from what your instructors have said before that most Linux systems will have documentation built in to help you out. You also know that you do not have direct internet access. Using that to your advantage, you try to search the system for available documentation. SPECIAL NOTE: Linux System's Administrators should be able to manage files and folders in a consistent manner on any system. Basic Commands Students need to be familiar with the following commands and understand what each command executes: man pinfo less STEP ONE Search for the keyword 'passwd in man Open the man page for the command 'su' and navigate the page Perform the following: [student@desktopX -] $ man -k passwd chpasswd (8) - update passwords in batch mode fgetpwent_r (3) - get passwd file entry reentrantly getpwent_r (3) - get passwd file entry reentrantly gpasswd (1) - administer /etc/group and /etc/gshadow grub2-mkpasswd-pbkdf2 (1) - Generate a PBKDF2 password hash. htpasswd (1) - Manage user files for basic authentication kpasswd (1) - change a user's Kerberos password Idappasswd (1) - change the password of an LDAP entry lpasswd (1) - Change group or user password pam localuser (8) - require users to be listed in /etc/passwd passwd (1) - update user's authentication tokens sslpasswd (1ssl) - compute password hashes passwd (5) - password file passwd2 des (3) - RFS password encryption pwhistory helper (8) - Helper binary that transfers password hashes from passwd or shadow to opasswd slapd-passwd (5) - /etc/passwd backend to slapd slappasswd (8) - OpenLDAP password utility smbpasswd (5) - The Samba encrypted password file vncpasswd (1) - change the VNC password [student@desktopX -] $ man su ## Press the forward slash ( 7 ) and search for runuser /runuser ## The string will become highlighted /principle ## The next string will highlight ## Press 'g' twice to return to the top of the man page NEW LEARNING OPPORTUNITY GNU Info Pages When it comes to man pages, they are typically formal and formatted for the commands and what they can do. However, this doesn't really serve a purpose for general documentation. This is when GNU Info Pages comes into play. There are quite a few differences between the man pages and GNU info pages, including but not limited to the navigation of the pages and general structure and layout of the pages. The documentation utilized by GNU info are hyperlinked nodes which allows for being able to find more complex information and documentation on libraries and commands on a given system, as well as the Red Had documentation itself. Below is a table of the differences between 'man' and 'pinfo' hotkeys that will be trying in the next exercise. Navigation pinfo man Scroll forward (down) one screen PageDown or Space PageDown or Space Scroll backward (up) one screen PageUp or b PageUp or b Display the directory of topics Scroll forward (down) one half-screen Display the parent node of a topic u Display the top (up) of a topic HOME 1G Scroll backward (up) one half-screen Scroll forward (down) to next hyperlink DownArrow Open topic at cursor location Enter . Scroll forward (down) one line DownArrow or Enter Scroll backward (up) to previous hyperlink UpArrow Scroll backward (up) one line 1 UpArrow Search for a pattern | string | string Display next node (chapter) in topic Repeat previous search forward (down) / then Enter Display previous node (chapter) in topic P Repeat previous search backward (up) Quit the program q You'll notice a few similarities but more differences. STEP TWO Open pinfo and navigate through it Open pinfo tar Compare man tar to pinfo tar Perform the following: [student@desktopX -] $ pinfo Use your Up Arrow or Down Arrow until "Common Options" is highlighted. Press
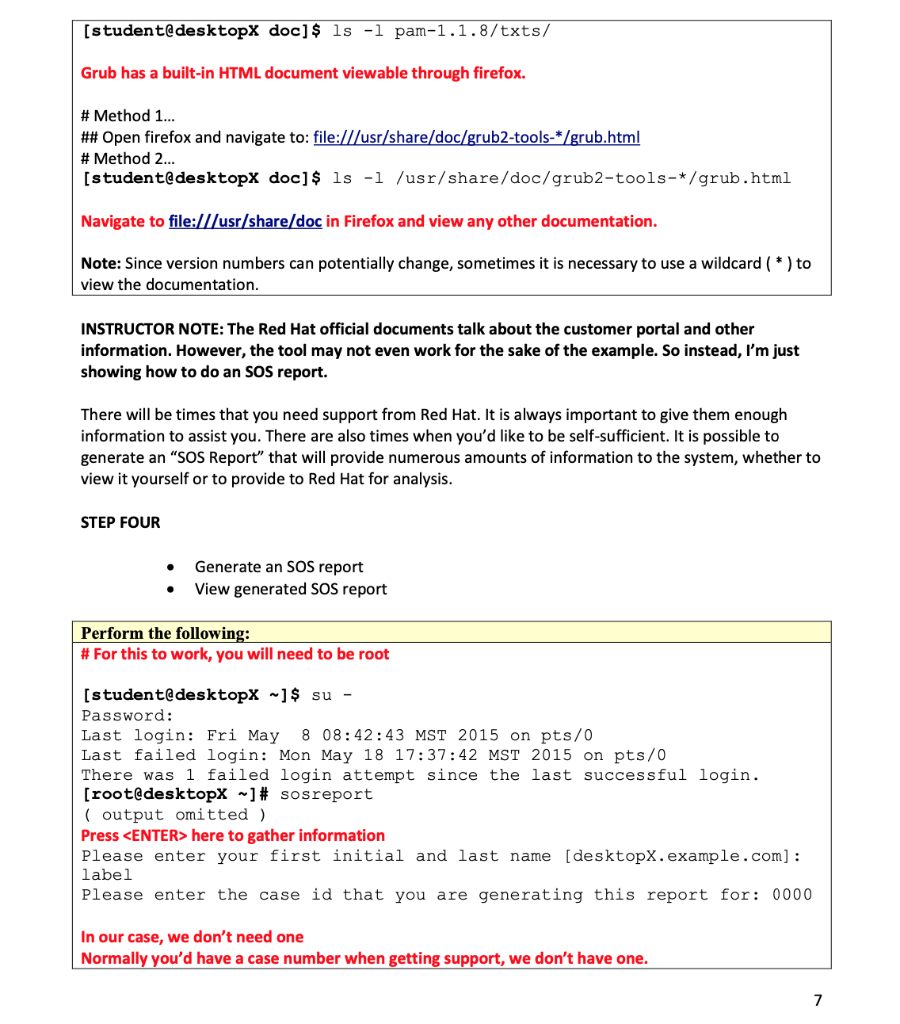
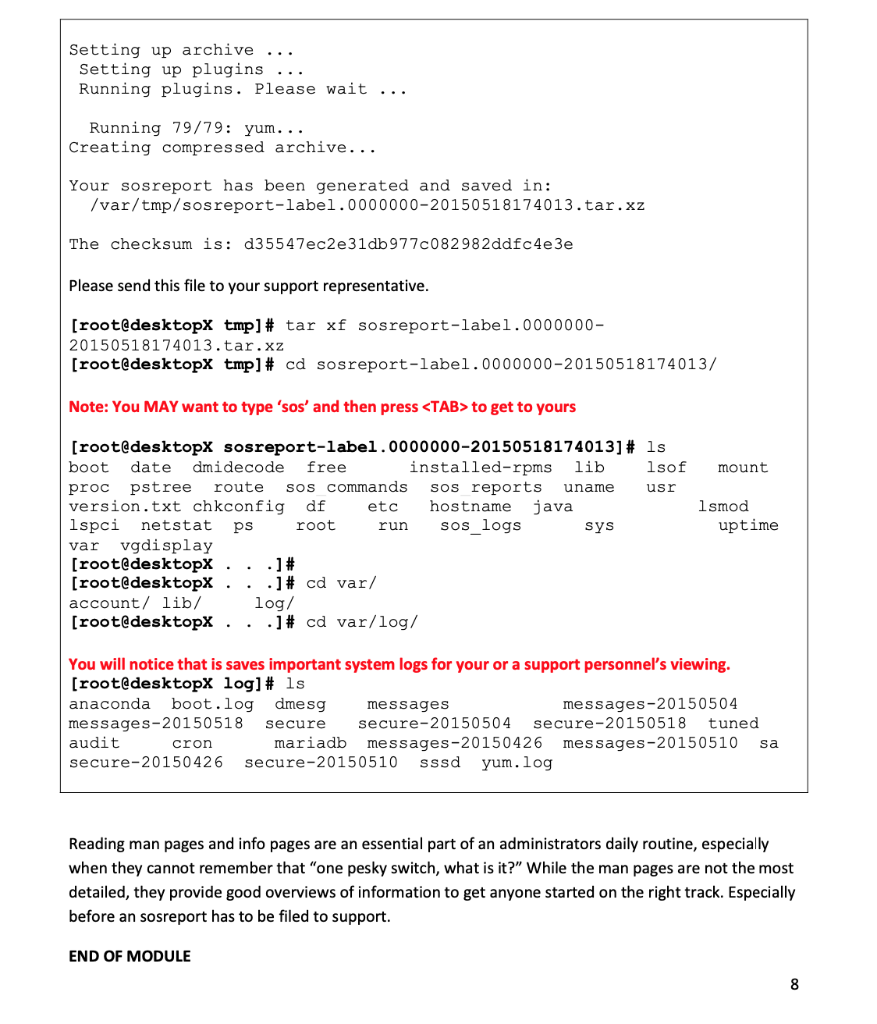
Find -- and read what it's used for Press 'u' - You will notice it takes you back to several topics. Press 'u' again to return to the main PINFO page. Type: ano and press Select the topic when it's highlighted Select any topic available and see where it takes you. Example: Editing Basics -> The Status Bar Press "q" to quit (student@desktopX -] $ man tar (student@desktopX -] $ pinfo tar Briefly compare the different pages. You may navigate and few the many topics of "tar" Red Hat normally carries with it numerous amounts of documentation on its systems that is readily available to any user. This is a way of providing information that would be outside of pinfo and man, and is specific to the distribution release or packages installed to the system. Example, Firefox will have it's own documentation in /usr/share/doc. STEP THREE Locate the documentation on the filesystem View documentation Perform the following: (student@desktopX -] $ cd /usr/share/doc (student@desktopx doc] $ ls (output omitted) Pick any topic. Example, let's pick "vim" (You will learn about this next chapter) [student@desktopx doc] $ less vim-common-7.4.160/README.txt Press 'q' to quit Below will show you the many README's about PAM and its modules. You may view any of these using 'less (student@desktopX doc] $ ls -l pam-1.1.8/txts/ Grub has a built-in HTML document viewable through firefox. # Method 1.. ## Open firefox and navigate to: file:///usr/share/doc/grub2-tools-*/grub.html # Method 2... [student@desktopx doc] $ ls -1 /usr/share/doc/grub2-tools-*/grub.html Navigate to file:///usr/share/doc in Firefox and view any other documentation. Note: Since version numbers can potentially change, sometimes it is necessary to use a wildcard ( * ) to view the documentation INSTRUCTOR NOTE: The Red Hat official documents talk about the customer portal and other information. However, the tool may not even work for the sake of the example. So instead, I'm just showing how to do an SOS report. There will be times that you need support from Red Hat. It is always important to give them enough information to assist you. There are also times when you'd like to be self-sufficient. It is possible to generate an "SOS Report" that will provide numerous amounts of information to the system, whether to view it yourself or to provide to Red Hat for analysis. STEP FOUR Generate an SOS report View generated SOS report Perform the following: # For this to work, you will need to be root (student@desktopX -] $ su - Password: Last login: Fri May 8 08:42:43 MST 2015 on pts/0 Last failed login: Mon May 18 17:37:42 MST 2015 on pts/0 There was 1 failed login attempt since the last successful login. [root@desktopX ~]# sosreport ( output omitted) Press here to gather information Please enter your first initial and last name (desktopx.example.com] : label Please enter the case id that you are generating this report for: 0000 In our case, we don't need one Normally you'd have a case number when getting support, we don't have one. Setting up archive ... Setting up plugins ... Running plugins. Please wait ... Running 79/79: yum... Creating compressed archive... Your sosreport has been generated and saved in: /var/tmp/sosreport-label.0000000-20150518174013.tar.xz The checksum is: d35547ec2e31 db 9770082982ddfc4e3e Please send this file to your support representative. [root@desktopx tmp) # tar xf sosreport-label. 0000000- 20150518174013.tar.xz [root@desktopX tmp) # cd sosreport-label.0000000-20150518174013/ Note: You MAY want to type 'sos' and then press to get to yours mount [root@desktopx sosreport-label.0000000-20150518174013] # ls boot date dmidecode free installed-rpms lib lsof proc pstree route sos commands sos reports uname usr version.txt chkconfig df etc hostname java lspci netstat ps root run sos_logs sys var vgdisplay [root@desktopx...) # [root@desktopX...]# cd var/ account/ lib/ log/ [root@desktopX...] # cd var/log/ lsmod uptime You will notice that is saves important system logs for your or a support personnel's viewing. [root@desktopX log] # ls anaconda boot.log dmesg messages messages-20150504 messages-20150518 Secure secure-20150504 secure-20150518 tuned audit cron mariadb messages-20150426 messages-20150510 sa secure-20150426 secure-20150510 sssd yum.log Reading man pages and info pages are an essential part of an administrators daily routine, especially when they cannot remember that "one pesky switch, what is it?" While the man pages are not the most detailed, they provide good overviews of information to get anyone started on the right track. Especially before an sosreport has to be filed to support. END OF MODULE BEGIN MODULE Red Hat System Administration Chapter Three-Getting Help in Red Hat Enterprise Linux Learned and understood Concepts OBJECTIVES OF THIS LAB Students must be able to: Find and read documentation on any Linux system given to them Utilize the man pages to understand how a command works during research Deliverable What the end product must accomplish, the outcome or objectives. Gain comfort and familiarity with more basic Linux commands. Know how to use the documentation on a Linux machine to understand how commands work or finding the right command. Rationale (Why do I need to know this) Why do I need to have this skill or knowledge? Not even the most experienced Linux administrator knows every command or knows all of the switches to a command. Maybe there is a few commands they may know everything to, but that is few and far between. Knowing how to use the documentation on a system is imperative for an administrator and being able to solve current or potential problems in the future. ESTIMATED LAB TIME: 120 MINUTES Warning (Potential Pitfall) Man pages occasionally do not do the command(s) justice and will leave out information. You can find more information online by searching about the command and switches, as well as what you are trying to achieve. NEW LEARNING OPPORTUNITY Manual Pages and Info Pages When UNIX first began in the 1970's, the concept of manual pages (or "man" pages) never existed. Any type of manual or documentation was printed in book format, the first being in 1971. The first actual man pages created were written sometime later that same year. While the man pages progressed, so did the programming manual's released with the entire set of man pages being in volume one of the printed documentation of the 7th Edition of Research Unix. Fast forward to the future, almost every command available to Linux machines have a man page associated with it. The man pages are pretty standard with numerous types of sections and pages for many commands. Using just 'man bash' will get you a huge page with a lot of bash shell's syntax, switches, etc that can be used on the command line or in a bash script. Below is a table of the types of pages within man. Section Content type User commands (both executable and shell programs) 2 System calls (kernel routines invoked from user space) Library functions (provided by program libraries) Special files (such as device files) 5 File formats (for many configuration files and structures) Games (historical section for amusing programs) Conventions, standards, and miscellaneous (protocols, file systems) 8 System administration and privileged commands (maintenance tasks) Linux kernel API (internal kernel calls) When using man you will need to know how to navigate the pages. There are a few hotkeys you can utilize. Command Spacebar PageDown PageUp DownArrow UpArrow Result Scroll forward (down) one screen Scroll forward (down) one screen Scroll backward (up) one screen Scroll forward (down) one line Scroll back (up) one line Scroll forward (down) one half-screen Scroll backward (up) one half-screen Search forward (down) for string in the man page Repeat previous search forward (down) in the man page Repeat previous search backward (up) in the man page Go to start of the man page. Go to end of the man page. Exit man and return to the command shell prompt Istring N LAB SCENARIO LAB SCENARIO New to the Linux world, you'd like to find out and learn about various commands or how to do specific tasks. You remember from what your instructors have said before that most Linux systems will have documentation built in to help you out. You also know that you do not have direct internet access. Using that to your advantage, you try to search the system for available documentation. SPECIAL NOTE: Linux System's Administrators should be able to manage files and folders in a consistent manner on any system. Basic Commands Students need to be familiar with the following commands and understand what each command executes: man pinfo less STEP ONE Search for the keyword 'passwd in man Open the man page for the command 'su' and navigate the page Perform the following: [student@desktopX -] $ man -k passwd chpasswd (8) - update passwords in batch mode fgetpwent_r (3) - get passwd file entry reentrantly getpwent_r (3) - get passwd file entry reentrantly gpasswd (1) - administer /etc/group and /etc/gshadow grub2-mkpasswd-pbkdf2 (1) - Generate a PBKDF2 password hash. htpasswd (1) - Manage user files for basic authentication kpasswd (1) - change a user's Kerberos password Idappasswd (1) - change the password of an LDAP entry lpasswd (1) - Change group or user password pam localuser (8) - require users to be listed in /etc/passwd passwd (1) - update user's authentication tokens sslpasswd (1ssl) - compute password hashes passwd (5) - password file passwd2 des (3) - RFS password encryption pwhistory helper (8) - Helper binary that transfers password hashes from passwd or shadow to opasswd slapd-passwd (5) - /etc/passwd backend to slapd slappasswd (8) - OpenLDAP password utility smbpasswd (5) - The Samba encrypted password file vncpasswd (1) - change the VNC password [student@desktopX -] $ man su ## Press the forward slash ( 7 ) and search for runuser /runuser ## The string will become highlighted /principle ## The next string will highlight ## Press 'g' twice to return to the top of the man page NEW LEARNING OPPORTUNITY GNU Info Pages When it comes to man pages, they are typically formal and formatted for the commands and what they can do. However, this doesn't really serve a purpose for general documentation. This is when GNU Info Pages comes into play. There are quite a few differences between the man pages and GNU info pages, including but not limited to the navigation of the pages and general structure and layout of the pages. The documentation utilized by GNU info are hyperlinked nodes which allows for being able to find more complex information and documentation on libraries and commands on a given system, as well as the Red Had documentation itself. Below is a table of the differences between 'man' and 'pinfo' hotkeys that will be trying in the next exercise. Navigation pinfo man Scroll forward (down) one screen PageDown or Space PageDown or Space Scroll backward (up) one screen PageUp or b PageUp or b Display the directory of topics Scroll forward (down) one half-screen Display the parent node of a topic u Display the top (up) of a topic HOME 1G Scroll backward (up) one half-screen Scroll forward (down) to next hyperlink DownArrow Open topic at cursor location Enter . Scroll forward (down) one line DownArrow or Enter Scroll backward (up) to previous hyperlink UpArrow Scroll backward (up) one line 1 UpArrow Search for a pattern | string | string Display next node (chapter) in topic Repeat previous search forward (down) / then Enter Display previous node (chapter) in topic P Repeat previous search backward (up) Quit the program q You'll notice a few similarities but more differences. STEP TWO Open pinfo and navigate through it Open pinfo tar Compare man tar to pinfo tar Perform the following: [student@desktopX -] $ pinfo Use your Up Arrow or Down Arrow until "Common Options" is highlighted. Press Find -- and read what it's used for Press 'u' - You will notice it takes you back to several topics. Press 'u' again to return to the main PINFO page. Type: ano and press Select the topic when it's highlighted Select any topic available and see where it takes you. Example: Editing Basics -> The Status Bar Press "q" to quit (student@desktopX -] $ man tar (student@desktopX -] $ pinfo tar Briefly compare the different pages. You may navigate and few the many topics of "tar" Red Hat normally carries with it numerous amounts of documentation on its systems that is readily available to any user. This is a way of providing information that would be outside of pinfo and man, and is specific to the distribution release or packages installed to the system. Example, Firefox will have it's own documentation in /usr/share/doc. STEP THREE Locate the documentation on the filesystem View documentation Perform the following: (student@desktopX -] $ cd /usr/share/doc (student@desktopx doc] $ ls (output omitted) Pick any topic. Example, let's pick "vim" (You will learn about this next chapter) [student@desktopx doc] $ less vim-common-7.4.160/README.txt Press 'q' to quit Below will show you the many README's about PAM and its modules. You may view any of these using 'less (student@desktopX doc] $ ls -l pam-1.1.8/txts/ Grub has a built-in HTML document viewable through firefox. # Method 1.. ## Open firefox and navigate to: file:///usr/share/doc/grub2-tools-*/grub.html # Method 2... [student@desktopx doc] $ ls -1 /usr/share/doc/grub2-tools-*/grub.html Navigate to file:///usr/share/doc in Firefox and view any other documentation. Note: Since version numbers can potentially change, sometimes it is necessary to use a wildcard ( * ) to view the documentation INSTRUCTOR NOTE: The Red Hat official documents talk about the customer portal and other information. However, the tool may not even work for the sake of the example. So instead, I'm just showing how to do an SOS report. There will be times that you need support from Red Hat. It is always important to give them enough information to assist you. There are also times when you'd like to be self-sufficient. It is possible to generate an "SOS Report" that will provide numerous amounts of information to the system, whether to view it yourself or to provide to Red Hat for analysis. STEP FOUR Generate an SOS report View generated SOS report Perform the following: # For this to work, you will need to be root (student@desktopX -] $ su - Password: Last login: Fri May 8 08:42:43 MST 2015 on pts/0 Last failed login: Mon May 18 17:37:42 MST 2015 on pts/0 There was 1 failed login attempt since the last successful login. [root@desktopX ~]# sosreport ( output omitted) Press here to gather information Please enter your first initial and last name (desktopx.example.com] : label Please enter the case id that you are generating this report for: 0000 In our case, we don't need one Normally you'd have a case number when getting support, we don't have one. Setting up archive ... Setting up plugins ... Running plugins. Please wait ... Running 79/79: yum... Creating compressed archive... Your sosreport has been generated and saved in: /var/tmp/sosreport-label.0000000-20150518174013.tar.xz The checksum is: d35547ec2e31 db 9770082982ddfc4e3e Please send this file to your support representative. [root@desktopx tmp) # tar xf sosreport-label. 0000000- 20150518174013.tar.xz [root@desktopX tmp) # cd sosreport-label.0000000-20150518174013/ Note: You MAY want to type 'sos' and then press to get to yours mount [root@desktopx sosreport-label.0000000-20150518174013] # ls boot date dmidecode free installed-rpms lib lsof proc pstree route sos commands sos reports uname usr version.txt chkconfig df etc hostname java lspci netstat ps root run sos_logs sys var vgdisplay [root@desktopx...) # [root@desktopX...]# cd var/ account/ lib/ log/ [root@desktopX...] # cd var/log/ lsmod uptime You will notice that is saves important system logs for your or a support personnel's viewing. [root@desktopX log] # ls anaconda boot.log dmesg messages messages-20150504 messages-20150518 Secure secure-20150504 secure-20150518 tuned audit cron mariadb messages-20150426 messages-20150510 sa secure-20150426 secure-20150510 sssd yum.log Reading man pages and info pages are an essential part of an administrators daily routine, especially when they cannot remember that "one pesky switch, what is it?" While the man pages are not the most detailed, they provide good overviews of information to get anyone started on the right track. Especially before an sosreport has to be filed to support. END OF MODULE