

Answered step by step
Verified Expert Solution
Question
1 Approved Answer
Linux-Unix Operating Systems SYST13416 Lab 1 (10% of the total marks) READ THE ENTIRE INSTRUCTON BEFORE SUBMITING YOUR WORK IN THE SLATE DROPBOX Description Finish
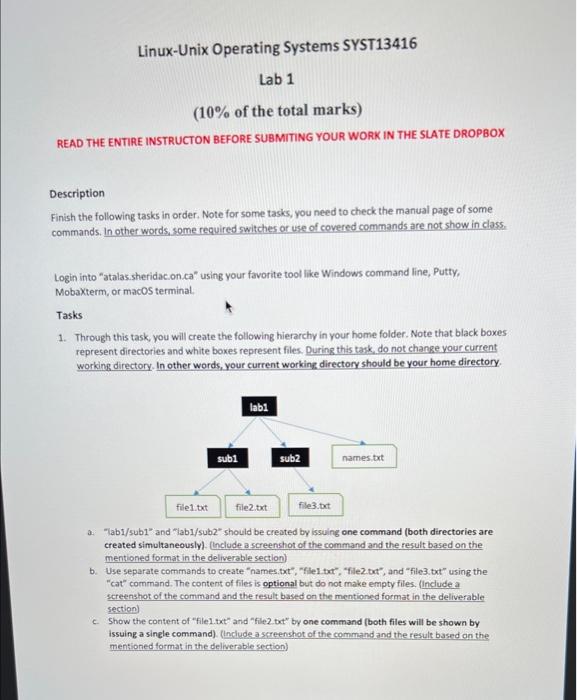
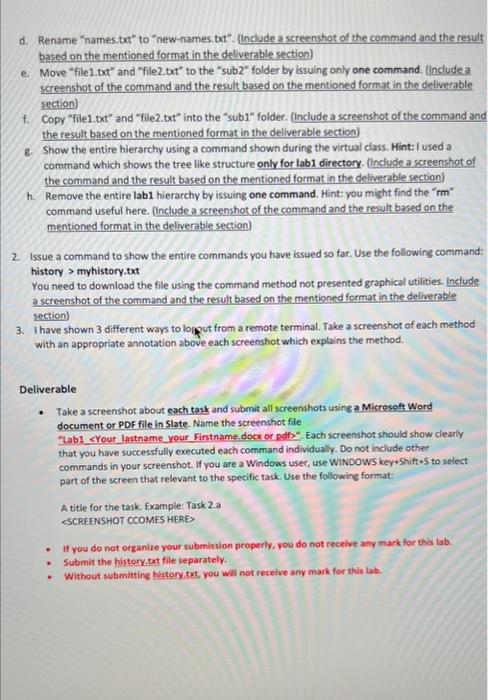 Linux-Unix Operating Systems SYST13416 Lab 1 (10\% of the total marks) READ THE ENTIRE INSTRUCTON BEFORE SUBMITING YOUR WORK IN THE SLATE DROPBOX Description Finish the following tasks in order. Note for some tasks, you need to check the manual page of some commands. In other words, some required switches or use of covered commands are not show in class. Login into "atalas. sheridac.on ca" using your favorite tool like Windows command line, Putty, Mobaxterm, or macOS terminal. Tasks 1. Through this task, you will create the following hierarchy in your home folder. Note that black boxes represent directories and white boxes represent files. During this tark, do not change your current working directory. In other words, your current working directory should be your home directory. a. "lab1/sub1" and "lab1/sub2" should be created by issuing one command (both directories are created simultaneously). (hnclude a screenshot of the command and the result based on the mentioned format in the deliverable section) b. Use separate commands to create "names.txt", "file1 tot", "file2. ort", and "file3. bt" using the "cat" command. The content of files is optional but do not make empty files. (include a screenshot of the command and the result based on the mentioned format in the deliverable section) c. Show the content of "file1.txt" and "filez bet" by one command (both files will be shown by issuing a sinele command). (linclude a screenshot of the command and the result based an the mentioned format in the delwerable section) d. Rename "names.txt" to "new-names. bxt". (tnclude a screenshot of the command and the result based on the mentioned format in the deliverable section) e. Move "file1.txt" and "filez.txt" to the "sub2" folder by issuing only one command. (lnclude a screenshot of the command and the result based on the mentioned format in the deliverable section) f. Copy "file1.tot" and "filez.tot" into the "sub1" folder. (Include a screenshot of the command and the result based on the mentioned format in the deliverable section) g. Show the entire hierarchy using a command shown during the virtual class. Hint:I used a command which shows the tree like structure only for lab1 directory. (include a screenshot of the command and the result based on the mentioned format in the deliverable section) h. Remove the entire lab1 hierarchy by issuing one command. Hint: you might find the " rm " command useful here. (Include a screenshot of the command and the result based on the mentioned format in the deliverable section) 2. Issue a command to show the entire commands you have issued so far. Use the following command: history > myhistory.txt You need to download the file using the command method not presented graphical utilities. Include as screenshot of the command and the result based on the mentioned format in the deliverable section) 3. I have shown 3 different ways to logput from a remote terminal. Take a screenshot of each method with an appropriate annotation above each screenshot which explains the method. Deliverable - Take a screenshot about each task and submit all screenshots using a Micreseft Word document or PDF file in Slate. Name the screenshot file "Lab1 \&Your lastname your Firstname, docx or afli", Each screenshot should show clearly that you have successfully executed each command individually. Do not include other commands in your screenshot. If you are a Windows user, use WiNDOWS key+5hift +5 to select part of the screen that relevant to the specific task. Use the following format: A title for the task. Example: Task 2 a ESCREENSHOT CCOMES HEREP - If you do not organize your submission properly, you do not receive any mark for this lab. - Submit the history. oxt file separately. - Without submitting history tokt, you will not recelve amy mark for this lab
Step by Step Solution
There are 3 Steps involved in it
Step: 1

Get Instant Access with AI-Powered Solutions
See step-by-step solutions with expert insights and AI powered tools for academic success
Step: 2

Step: 3
Ace Your Homework with AI
Get the answers you need in no time with our AI-driven, step-by-step assistance
Get Started