Answered step by step
Verified Expert Solution
Question
1 Approved Answer
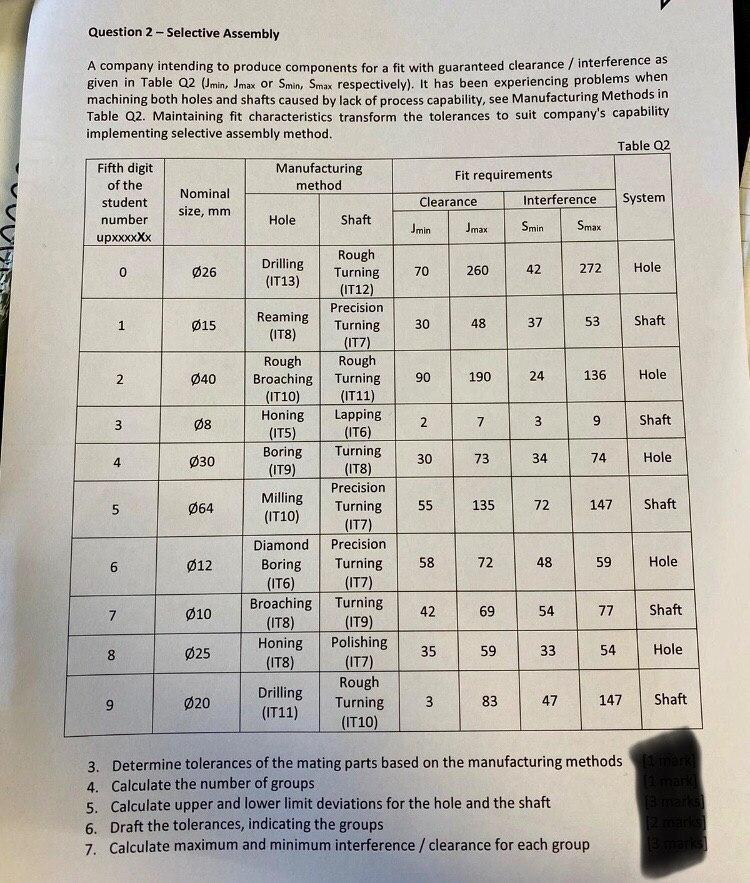
MY STUDENT ROLL NO. is 2031906 So,You will be asked to solve for X=0 Question 2 - Selective Assembly Jmin 1 37 2 A company

MY STUDENT ROLL NO. is 2031906
So,You will be asked to solve for X=0
Question 2 - Selective Assembly Jmin 1 37 2 A company intending to produce components for a fit with guaranteed clearance / interference as given in Table Q2 (min, Jmax or Smin, Smax respectively). It has been experiencing problems when machining both holes and shafts caused by lack of process capability, see Manufacturing Methods in Table Q2. Maintaining fit characteristics transform the tolerances to suit company's capability implementing selective assembly method. Table Q2 Fifth digit Manufacturing Fit requirements of the method Nominal student Clearance Interference System size, mm number Hole Shaft Jmax Smin Smax upxxxxXx Rough 0 026 Drilling Turning 70 260 42 272 Hole (IT13) (IT12) Precision 015 Reaming Turning 30 48 53 Shaft (ITS) (IT7) Rough Rough 2 040 Broaching Turning 90 190 24 136 Hole (IT10) (IT11) Honing 08 Lapping 3 2 7 9 Shaft (T5) (116) Boring Turning 4 030 30 73 34 74 Hole (119) (ITS) Precision Milling 5 064 Turning 55 135 72 Shaft (IT10) (IT7) Diamond Precision 6 012 Boring Turning 58 72 48 59 Hole (1T6) (IT7) Broaching Turning 7 10 42 69 54 77 Shaft (ITS) (ITY) Honing Polishing 8 25 35 59 33 54 Hole (IT8) (117) Rough Drilling 9 020 Turning 3 83 47 147 Shaft (IT11) (IT10) 3 4 147 6 7 9 3 3. Determine tolerances of the mating parts based on the manufacturing methods and 4. Calculate the number of groups Timane 5. Calculate upper and lower limit deviations for the hole and the shaft mark 6. Draft the tolerances, indicating the groups Calculate maximum and minimum interference / clearance for each group man Question 2 - Selective Assembly Jmin 1 37 2 A company intending to produce components for a fit with guaranteed clearance / interference as given in Table Q2 (min, Jmax or Smin, Smax respectively). It has been experiencing problems when machining both holes and shafts caused by lack of process capability, see Manufacturing Methods in Table Q2. Maintaining fit characteristics transform the tolerances to suit company's capability implementing selective assembly method. Table Q2 Fifth digit Manufacturing Fit requirements of the method Nominal student Clearance Interference System size, mm number Hole Shaft Jmax Smin Smax upxxxxXx Rough 0 026 Drilling Turning 70 260 42 272 Hole (IT13) (IT12) Precision 015 Reaming Turning 30 48 53 Shaft (ITS) (IT7) Rough Rough 2 040 Broaching Turning 90 190 24 136 Hole (IT10) (IT11) Honing 08 Lapping 3 2 7 9 Shaft (T5) (116) Boring Turning 4 030 30 73 34 74 Hole (119) (ITS) Precision Milling 5 064 Turning 55 135 72 Shaft (IT10) (IT7) Diamond Precision 6 012 Boring Turning 58 72 48 59 Hole (1T6) (IT7) Broaching Turning 7 10 42 69 54 77 Shaft (ITS) (ITY) Honing Polishing 8 25 35 59 33 54 Hole (IT8) (117) Rough Drilling 9 020 Turning 3 83 47 147 Shaft (IT11) (IT10) 3 4 147 6 7 9 3 3. Determine tolerances of the mating parts based on the manufacturing methods and 4. Calculate the number of groups Timane 5. Calculate upper and lower limit deviations for the hole and the shaft mark 6. Draft the tolerances, indicating the groups Calculate maximum and minimum interference / clearance for each group manStep by Step Solution
There are 3 Steps involved in it
Step: 1

Get Instant Access to Expert-Tailored Solutions
See step-by-step solutions with expert insights and AI powered tools for academic success
Step: 2

Step: 3

Ace Your Homework with AI
Get the answers you need in no time with our AI-driven, step-by-step assistance
Get Started


