

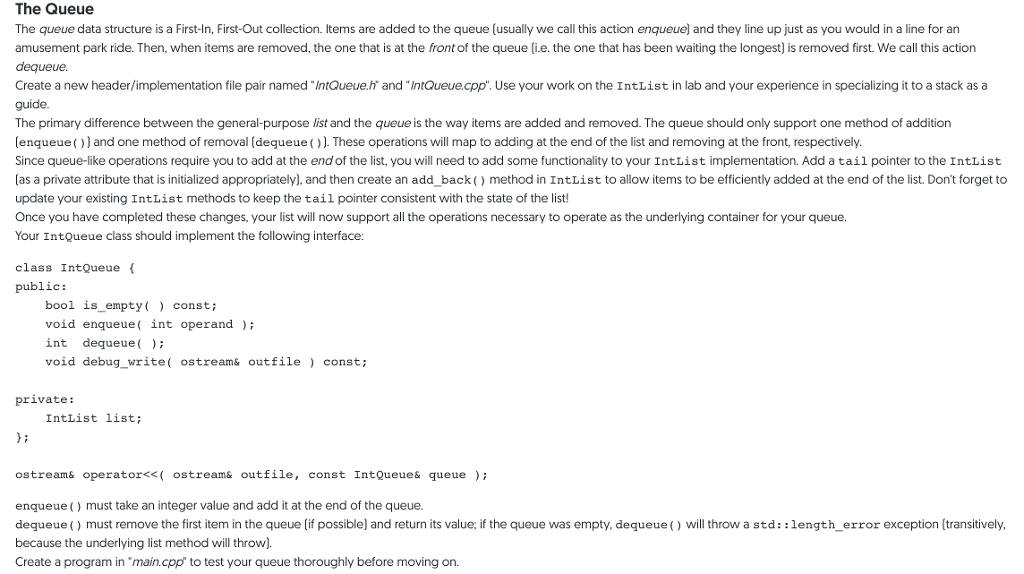
Question
need c++ format need .h .cpp and main.cpp here is start code ************************************************************************************************************ #ifndef INTLIST_H #define INTLIST_H #include IntNode.h #include using std::ostream; class IntList {
need c++ format
need .h .cpp and main.cpp
here is start code
************************************************************************************************************
#ifndef INTLIST_H
#define INTLIST_H
#include "IntNode.h"
#include
using std::ostream;
class IntList {
public:
IntList( ) = default;
~IntList( void );
bool is_empty( void ) const;
void add_front( int newData );
int remove_front(int& oldData );
void write( ostream& outfile ) const;
private:
IntNode* head = nullptr;
// disallow copies by restricting the following to `private`:
IntList( const IntList& );
IntList& operator=( const IntList& );
};
ostream& operatorconst IntList& list );
#endif
******************************************************************************************************************
#include "IntList.h"
#include "IntNode.h"
#include
#include
using std::ostream;
IntList::~IntList()
{
int oldData;
while(!remove_front(oldData))
{
remove_front(oldData);
}
}
bool IntList::is_empty () const
{
bool check = true;
if(head)
{
check = false;
}
return check;
}
void IntList::add_front( int newData )
{
IntNode* newNode = new IntNode(newData);
newNode -> set_next(head);
head = newNode;
}
void IntList::write (ostream& outfile) const
{
IntNode* current = head;
while (current)
{
if (current -> get_next()) //current is last two element
{
outfile get_data() " get_next() -> get_data()
current = current -> get_next();
}
else
{
outfile get_data() / ) ";
current = current -> get_next();
}
}
}
ostream& operator const IntList& list)
{
list.write(outfile);
return outfile;
}
int IntList::remove_front (int& oldData)
{
IntNode* current = new IntNode(oldData);
bool status=true;
if (is_empty())
{
status = false;
}
else
{
current = head;
oldData = current -> get_data();
head = current -> get_next();
delete current;
}
return status;
}
***************************************************************************************
Step by Step Solution
There are 3 Steps involved in it
Step: 1

Get Instant Access to Expert-Tailored Solutions
See step-by-step solutions with expert insights and AI powered tools for academic success
Step: 2

Step: 3
Ace Your Homework with AI
Get the answers you need in no time with our AI-driven, step-by-step assistance
Get Started
Machine Learning And Knowledge Discovery In Databases European Conference Ecml Pkdd 2014 Nancy France September 15 19 2014 Proceedings Part 3 Lnai 8726
Authors: Toon Calders ,Floriana Esposito ,Eyke Hullermeier ,Rosa Meo
2014th Edition
3662448440, 978-3662448441