Question: Need help with JAVA program. Steps are given below. Please write program and share program + result Look at this image : http://s000.tinyupload.com/index.php?file_id=94569703793462768168 Note: Please
Need help with JAVA program. Steps are given below. Please write program and share program + result
Look at this image: http://s000.tinyupload.com/index.php?file_id=94569703793462768168
Note: Please don't write a program using a custom png or jpeg image. Use a 256x256 .dat image if you have one else use one from link provided.
1. Write a program to display the histogram, negative image and image equalization
Steps for Histogram
i)Convert image file into a 256x256 unsigned two dimension array
ii) Populate 1d integer array with frequencies of all gray levels 0 to 255
iii) populate 2d array with gray scale value 255, using 0 for frequency of each gray level.
iv) convert the 2d integer array to byte aray and give resulting output image as .dat file or .pgm file.
Steps for negative image:
i)Convert image file into a 256x256 unsigned two dimension array
ii) Use the oepration 255 - Array[i][j] for each element on 2d integer array.
iii) Convert 2d integer array to byte array.
iv) display resulting image in .dat file or .pgm file.
Steps for image equalization:
i) convert image.dat to 256x256 unsigned 2d int array
ii) populate 1d integer array with frequencies of gray levels 0 to 255
iii) initialize 2d histogram integer array with gray scale value 255
iv) divide each element of gray scale frequeney array with 65536
v) multiply each element of gray scale frequency array with 255
vi) update 2d histogram integer array with gray scale value 255 , 0 for frequency of each gray level.
vii) convert 2d histogram integer array.to byte array and generate resulting image in .dat file or .pgm file.
Supplement:
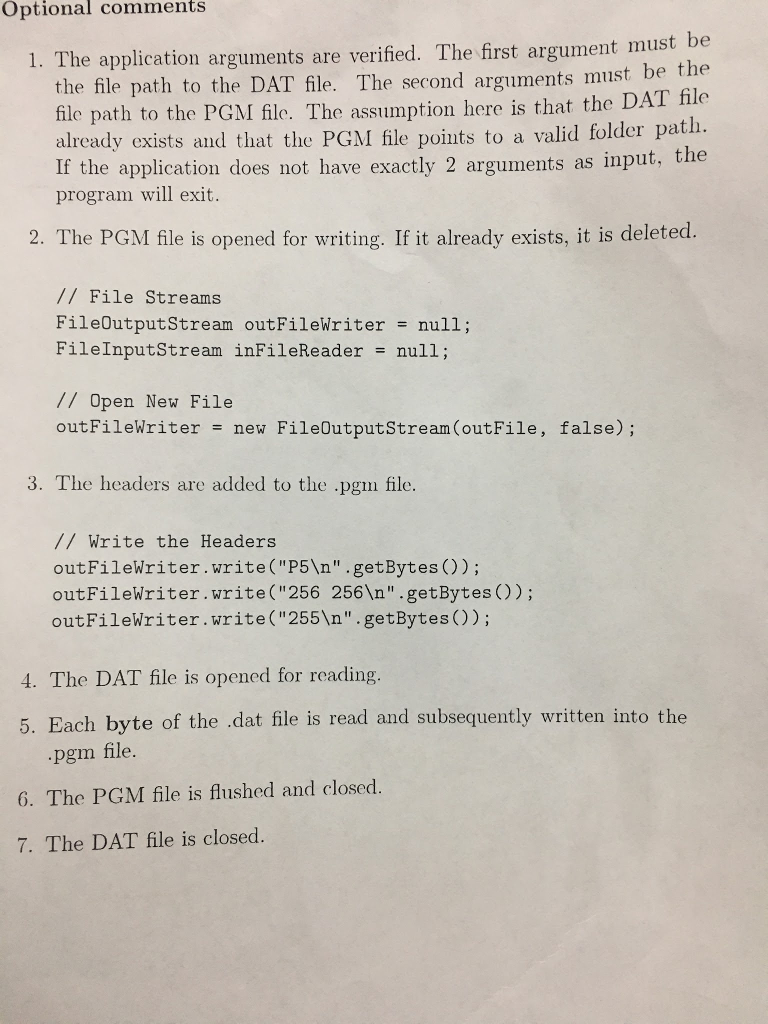
Steps to convert .dat image to pgm image: see image below for comments.

Optional comments 1. The application arguments are verified. The first argument must be the file path to the DAT file. The second arguments must be the fle. The serond arguments the file path to the PGM flo. The assumption here is that the DAT file th. already exists and that the PGM file points to a valid folder pa If the application does not have exactly 2 arguments as input, the program will exit. 2. The PGM file is opened for writing. If it already exists, it is deleted. // File Streams FileOutputStream outFileWriter = null; FileInputStream inF11eReader = null; // Open New File outFileWriter = new FileOutputStream(outFile, false); 3. The headers are added to the .pgm file. // Write the Headers outFilewriter.write("P5 " .getBytes O); outFileWriter.write("256 256 ".getBytes)); outFileWriter.write ("255 ".getBytes()); 4. The DAT file is opened for reading. 5. Each byte of the .dat file is read and subsequently written into the -pgm file. 6. The PGM file is flushed and closed. 7. The DAT file is closed. Optional comments 1. The application arguments are verified. The first argument must be the file path to the DAT file. The second arguments must be the fle. The serond arguments the file path to the PGM flo. The assumption here is that the DAT file th. already exists and that the PGM file points to a valid folder pa If the application does not have exactly 2 arguments as input, the program will exit. 2. The PGM file is opened for writing. If it already exists, it is deleted. // File Streams FileOutputStream outFileWriter = null; FileInputStream inF11eReader = null; // Open New File outFileWriter = new FileOutputStream(outFile, false); 3. The headers are added to the .pgm file. // Write the Headers outFilewriter.write("P5 " .getBytes O); outFileWriter.write("256 256 ".getBytes)); outFileWriter.write ("255 ".getBytes()); 4. The DAT file is opened for reading. 5. Each byte of the .dat file is read and subsequently written into the -pgm file. 6. The PGM file is flushed and closed. 7. The DAT file is closed
Step by Step Solution
There are 3 Steps involved in it

Get step-by-step solutions from verified subject matter experts


