Need to check my work with this to see where i went wrong, in Netbeans Java.
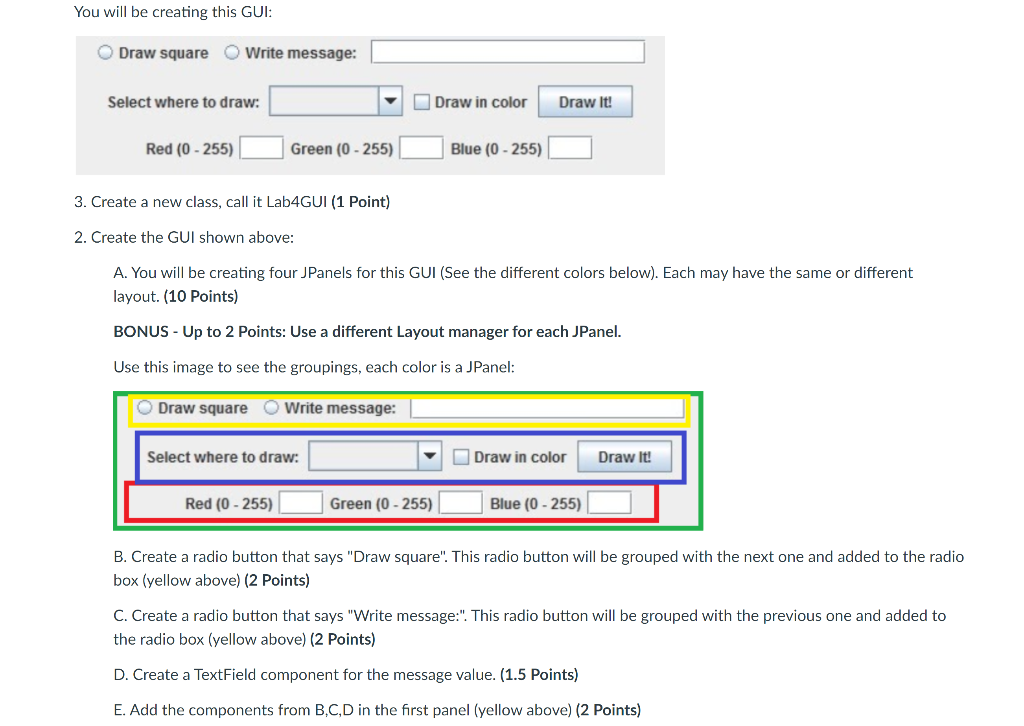
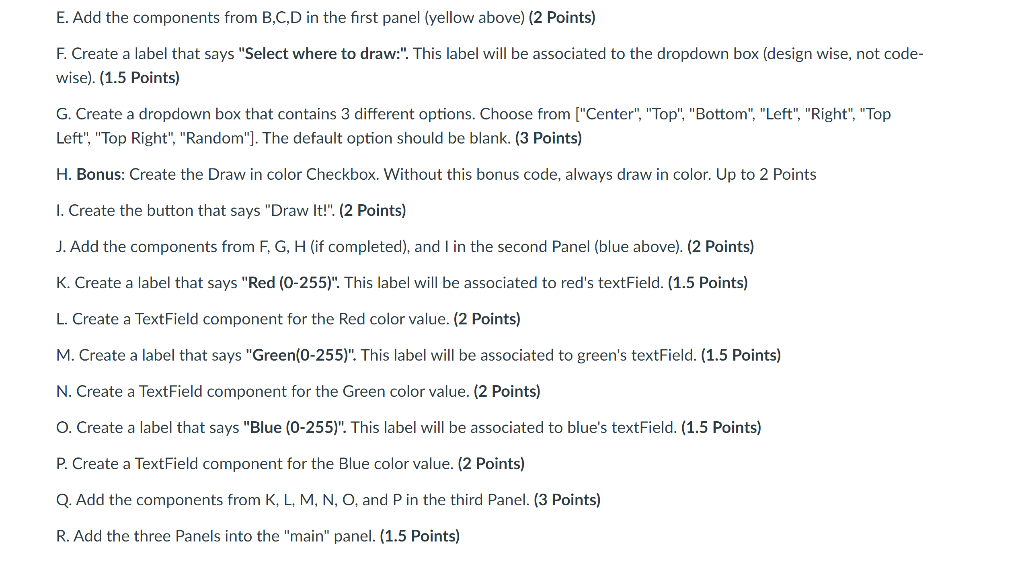
You will be creating this GUI: Draw square O Write message: Select where to draw: Draw in color Draw it! Red (0 - 255) Green (0 - 255) Blue (0 - 255) 3. Create a new class, call it Lab4GUI (1 Point) 2. Create the GUI shown above: A. You will be creating four JPanels for this GUI (See the different colors below). Each may have the same or different layout. (10 Points) BONUS - Up to 2 Points: Use a different Layout manager for each JPanel. Use this image to see the groupings, each color is a JPanel: Draw square O Write message: Select where to draw: Draw in color Draw it! Red (0 - 255) Green (0 - 255) Blue (0 - 255) B. Create a radio button that says "Draw square". This radio button will be grouped with the next one and added to the radio box (yellow above) (2 Points) C. Create a radio button that says "Write message:". This radio button will be grouped with the previous one and added to the radio box (yellow above) (2 Points) D. Create a TextField component for the message value. (1.5 points) E. Add the components from B.C,D in the first panel (yellow above) (2 Points) E. Add the components from B,C,D in the first panel (yellow above) (2 Points) F. Create a label that says "Select where to draw:". This label will be associated to the dropdown box (design wise, not code- wise). (1.5 Points) G. Create a dropdown box that contains 3 different options. Choose from ["Center", "Top", "Bottom", "Left", "Right", "Top Left", "Top Right", "Random"]. The default option should be blank. (3 Points) H. Bonus: Create the Draw in color Checkbox. Without this bonus code, always draw in color. Up to 2 Points 1. Create the button that says "Draw It!". (2 Points) J. Add the components from F, G, H (if completed), and I in the second Panel (blue above). (2 Points) K. Create a label that says "Red (0-255)". This label will be associated to red's textField. (1.5 Points) L. Create a TextField component for the Red color value. (2 Points) M. Create a label that says "Green(0-255)". This label will be associated to green's textField. (1.5 Points) N. Create a TextField component for the Green color value. (2 Points) O. Create a label that says "Blue (0-255)". This label will be associated to blue's textField. (1.5 Points) P. Create a TextField component for the Blue color value. (2 Points) Q. Add the components from K, L, M, N, O, and P in the third Panel. (3 Points) R. Add the three Panels into the "main" panel. (1.5 Points) You will be creating this GUI: Draw square O Write message: Select where to draw: Draw in color Draw it! Red (0 - 255) Green (0 - 255) Blue (0 - 255) 3. Create a new class, call it Lab4GUI (1 Point) 2. Create the GUI shown above: A. You will be creating four JPanels for this GUI (See the different colors below). Each may have the same or different layout. (10 Points) BONUS - Up to 2 Points: Use a different Layout manager for each JPanel. Use this image to see the groupings, each color is a JPanel: Draw square O Write message: Select where to draw: Draw in color Draw it! Red (0 - 255) Green (0 - 255) Blue (0 - 255) B. Create a radio button that says "Draw square". This radio button will be grouped with the next one and added to the radio box (yellow above) (2 Points) C. Create a radio button that says "Write message:". This radio button will be grouped with the previous one and added to the radio box (yellow above) (2 Points) D. Create a TextField component for the message value. (1.5 points) E. Add the components from B.C,D in the first panel (yellow above) (2 Points) E. Add the components from B,C,D in the first panel (yellow above) (2 Points) F. Create a label that says "Select where to draw:". This label will be associated to the dropdown box (design wise, not code- wise). (1.5 Points) G. Create a dropdown box that contains 3 different options. Choose from ["Center", "Top", "Bottom", "Left", "Right", "Top Left", "Top Right", "Random"]. The default option should be blank. (3 Points) H. Bonus: Create the Draw in color Checkbox. Without this bonus code, always draw in color. Up to 2 Points 1. Create the button that says "Draw It!". (2 Points) J. Add the components from F, G, H (if completed), and I in the second Panel (blue above). (2 Points) K. Create a label that says "Red (0-255)". This label will be associated to red's textField. (1.5 Points) L. Create a TextField component for the Red color value. (2 Points) M. Create a label that says "Green(0-255)". This label will be associated to green's textField. (1.5 Points) N. Create a TextField component for the Green color value. (2 Points) O. Create a label that says "Blue (0-255)". This label will be associated to blue's textField. (1.5 Points) P. Create a TextField component for the Blue color value. (2 Points) Q. Add the components from K, L, M, N, O, and P in the third Panel. (3 Points) R. Add the three Panels into the "main" panel. (1.5 Points)