

Answered step by step
Verified Expert Solution
Question
1 Approved Answer
needed detailed solution and clear explanation for all the question above thank you. Lab Exercise 2: Control Niryo One with ROS Python Programming Simulation Mode
needed detailed solution and clear explanation for all the question above thank you.
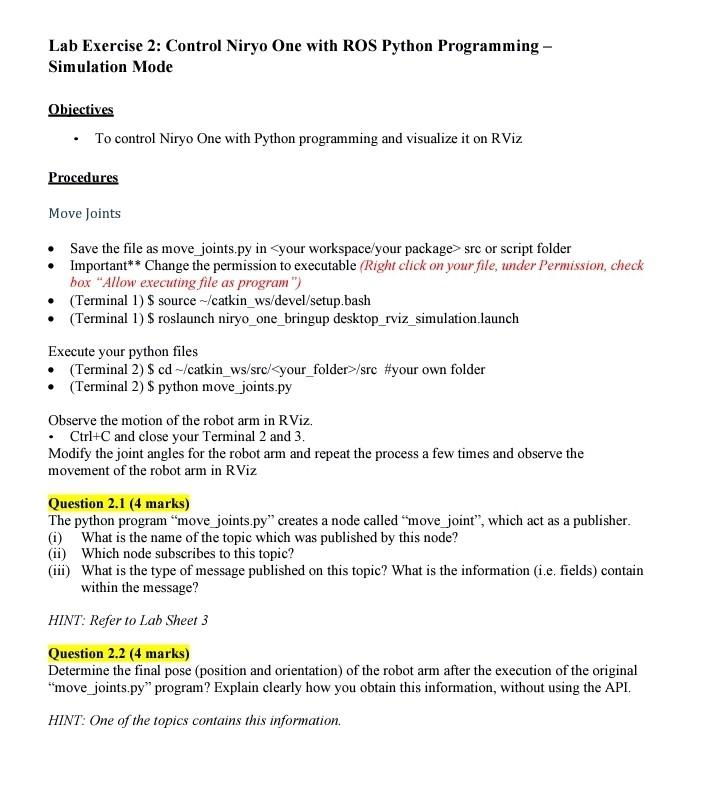
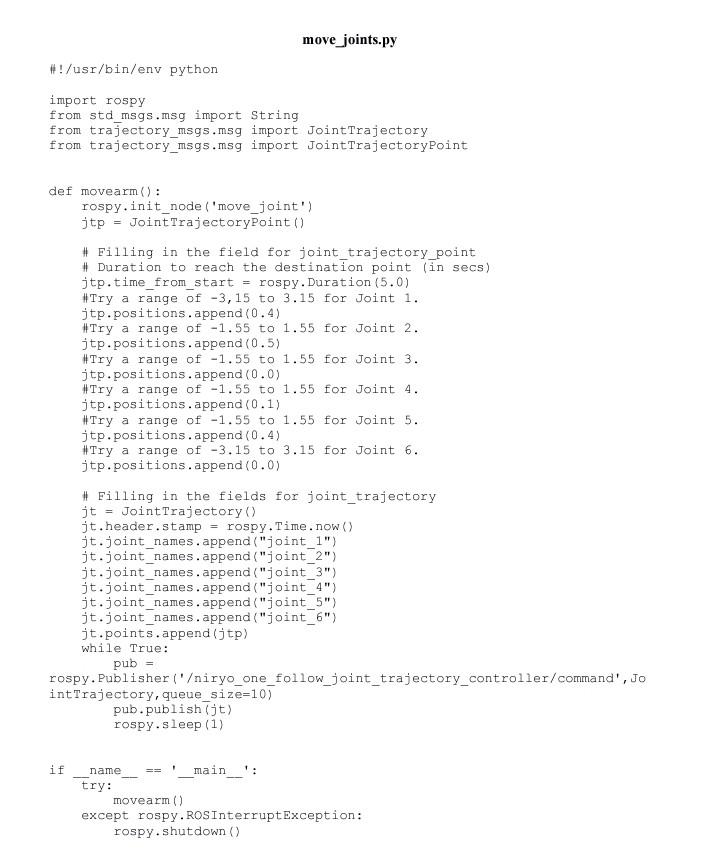
Lab Exercise 2: Control Niryo One with ROS Python Programming Simulation Mode Obiectives - To control Niryo One with Python programming and visualize it on RViz Procedures Move Joints - Save the file as move joints.py in src or script folder - Important** Change the permission to executable (Right click on your file, under Permission, check box "Allow executing file as program") - (Terminal 1) \$ source / catkin_ws/devel/setup.bash - (Terminal 1) \$roslaunch niryo_one_bringup desktop_rviz_simulation.launch Execute your python files - (Terminal 2) $cd/ catkin_ws / src/ / your_folder >/ src \#your own folder - (Terminal 2) \$ python move_joints.py Observe the motion of the robot arm in RViz. - Ctrl +C and close your Terminal 2 and 3 . Modify the joint angles for the robot arm and repeat the process a few times and observe the movement of the robot arm in RViz Question 2.1 (4 marks) The python program "move joints.py" creates a node called "move joint", which act as a publisher. (i) What is the name of the topic which was published by this node? (ii) Which node subscribes to this topic? (iii) What is the type of message published on this topic? What is the information (i.e. fields) contain within the message? HINT: Refer to Lab Sheet 3 Question 2.2 (4 marks) Determine the final pose (position and orientation) of the robot arm after the execution of the original "move_joints.py" program? Explain clearly how you obtain this information, without using the API. HINT: One of the topics contains this information. move_joints.py \#!/usr/bin/env python import rospy from std-msgs.msg import string from trajectory_msgs.msg import JointTrajectory from trajectory_msgs.msg import JointTrajectorypoint def movearm(): rospy.init_node('move_joint') jtp = JointTrajectoryPoint() \# Filing in the field for joint_trajectory_point \# Duration to reach the destination point (in secs) jtp.time_from_start = rospy.Duration (5.0) \#Try a range of 3,15 to 3.15 for Joint 1 . jtp.positions. append (0,4) \#Try a range of 1.55 to 1.55 for Joint 2 . jtp.positions. append (0.5) \#Try a range of 1.55 to 1.55 for Joint 3 . jtp.positions. append (0.0) \#Try a range of 1.55 to 1.55 for Joint 4 . jtp.positions. append (0.1) \#Try a range of 1.55 to 1.55 for Joint 5 . jtp.positions. append (0.4) \#Try a range of 3.15 to 3.15 for Joint 6 . jtp.positions. append (0.0) \# Filling in the fields for joint_trajectory jt = Jointrrajectory ( angle jt. header stamp = rospy Time. now ( angle jt.joint_names.append ("joint_1") jt.joint_names.append ("joint_2") jt.joint names.append ("joint 3 ") jt. joint_names.append ("joint_4") jt. joint_names.append ("joint_5") jt. joint_names.append ("joint_6") jt.points. append (jtp) while True: pub = rospy.Publisher ('iryo_one_follow_joint_trajectory_controller/command', Jo intTrajectory, queue size =10) pub.publish (jt) rospy.sleep (1)Step by Step Solution
There are 3 Steps involved in it
Step: 1

Get Instant Access to Expert-Tailored Solutions
See step-by-step solutions with expert insights and AI powered tools for academic success
Step: 2

Step: 3
Ace Your Homework with AI
Get the answers you need in no time with our AI-driven, step-by-step assistance
Get Started
Professional Visual Basic 6 Databases
Authors: Charles Williams
1st Edition
1861002025, 978-1861002020