Answered step by step
Verified Expert Solution
Question
1 Approved Answer
Objectives To configure the router. To use the ping, traceroute and show commands to check network connectivity. To understand the RIP protocol. Equipment Two
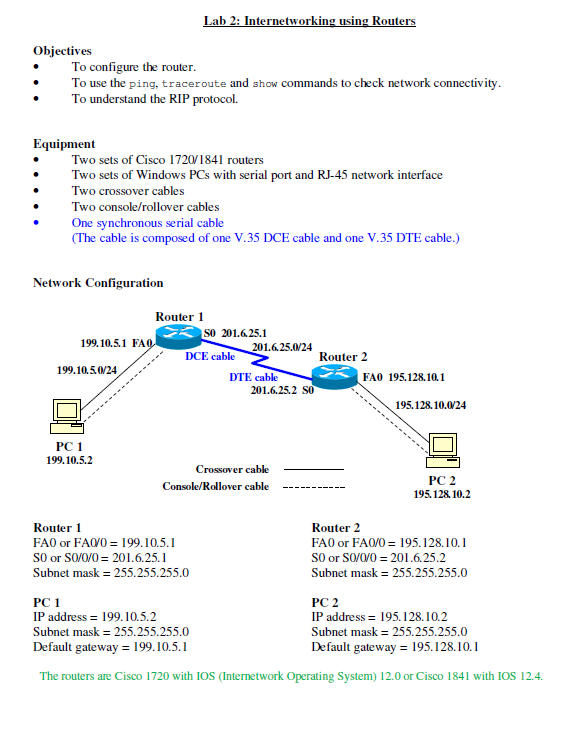
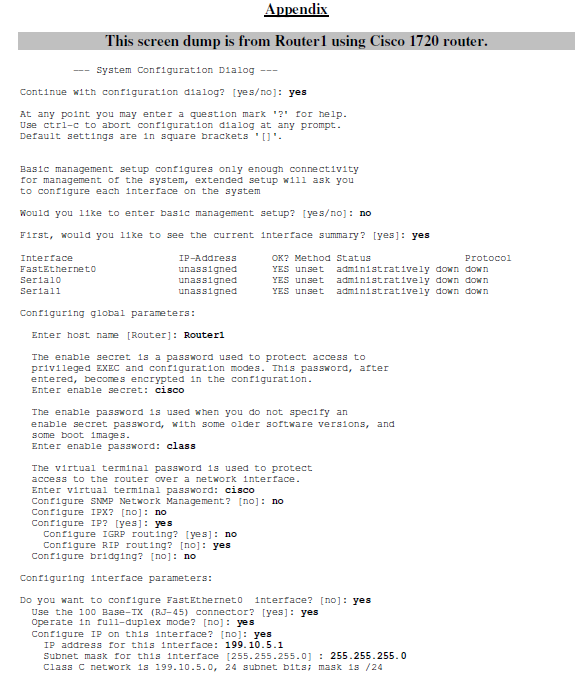
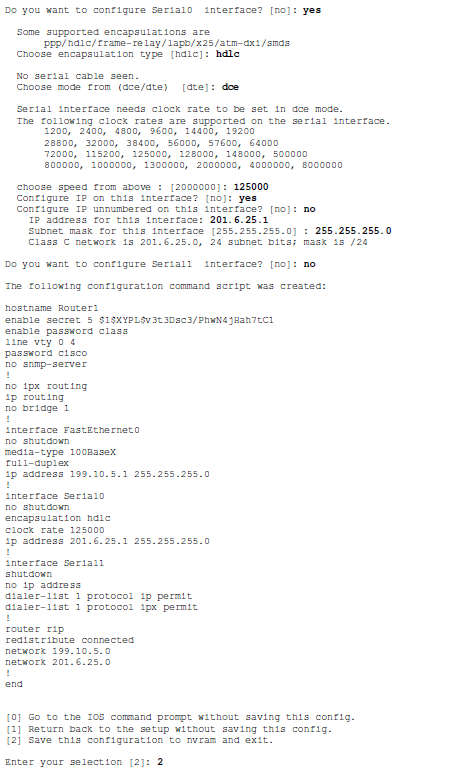
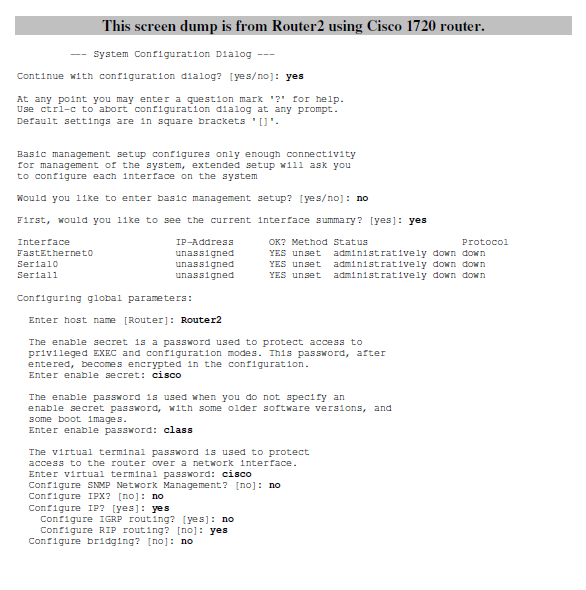
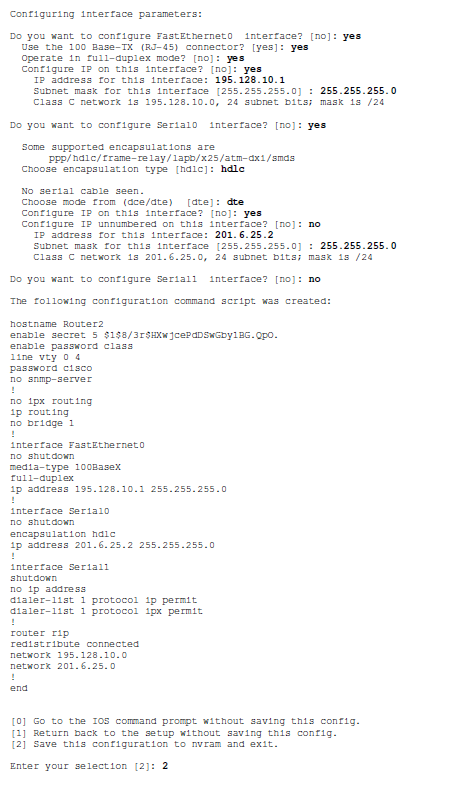
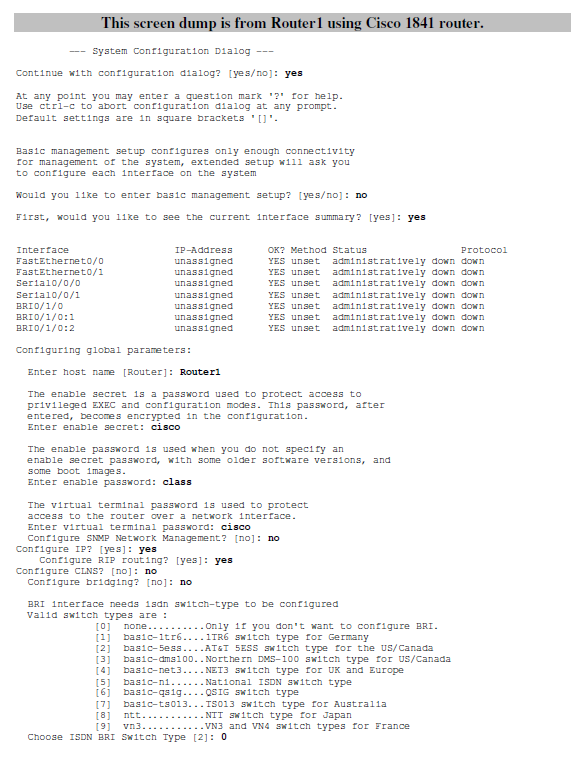
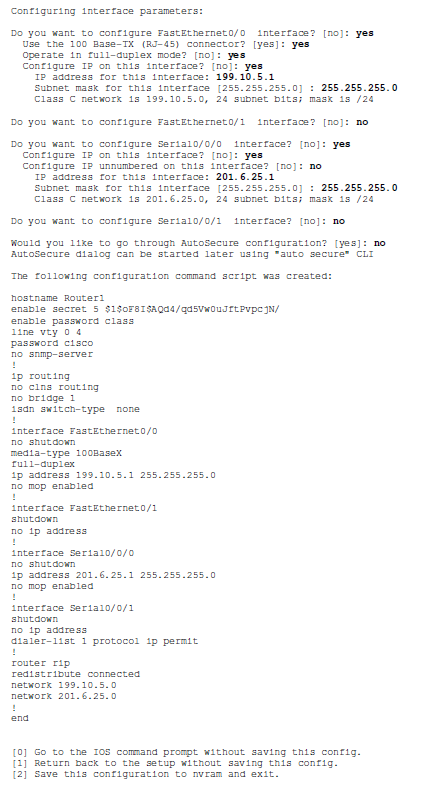

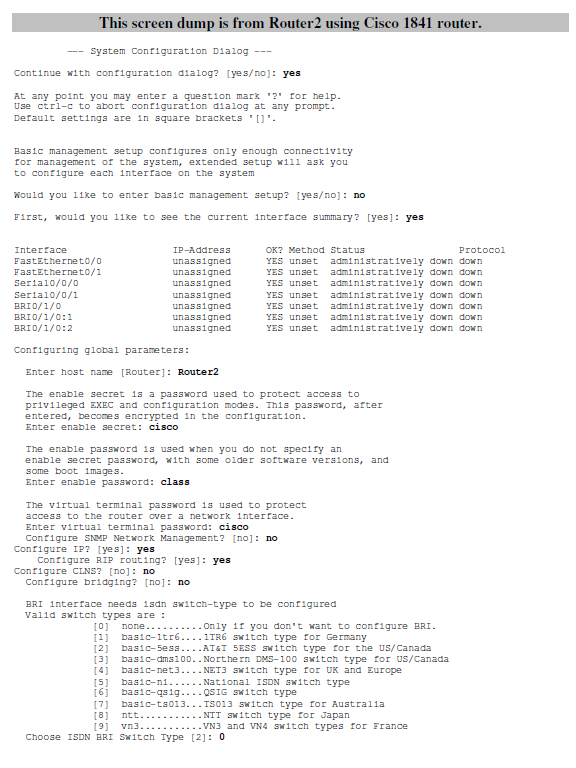
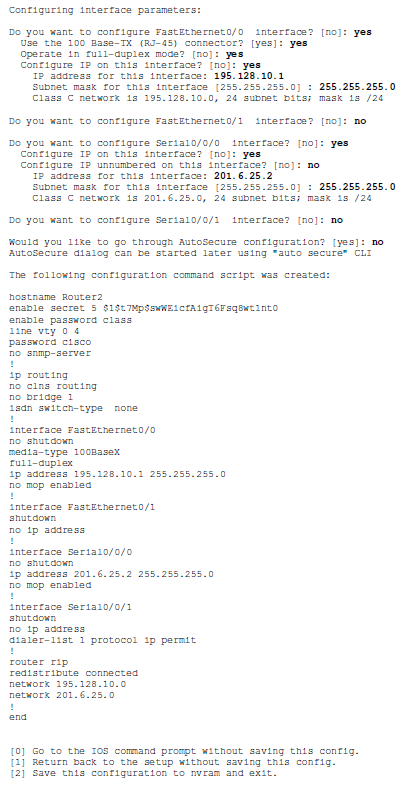

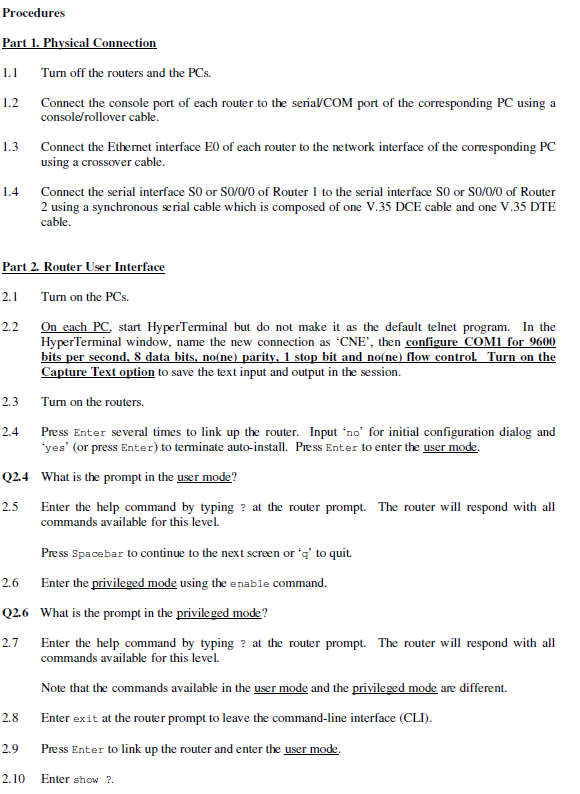
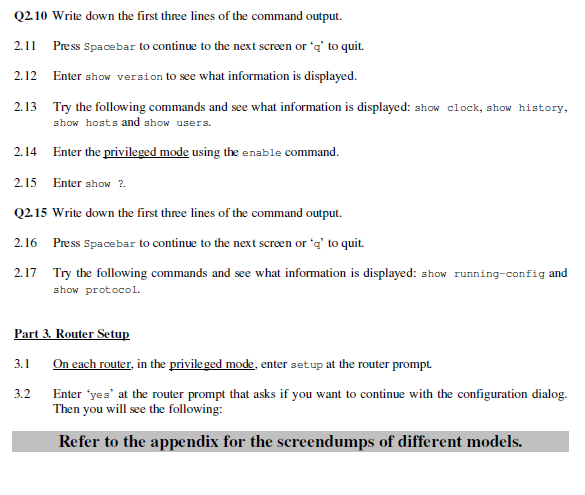
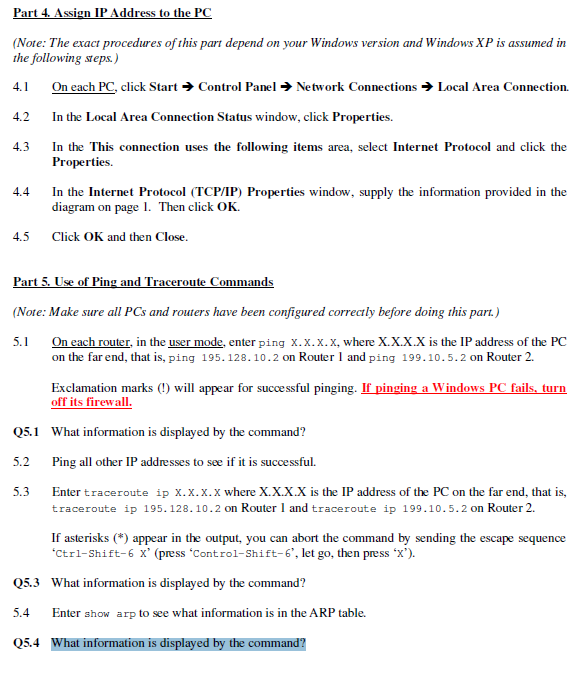
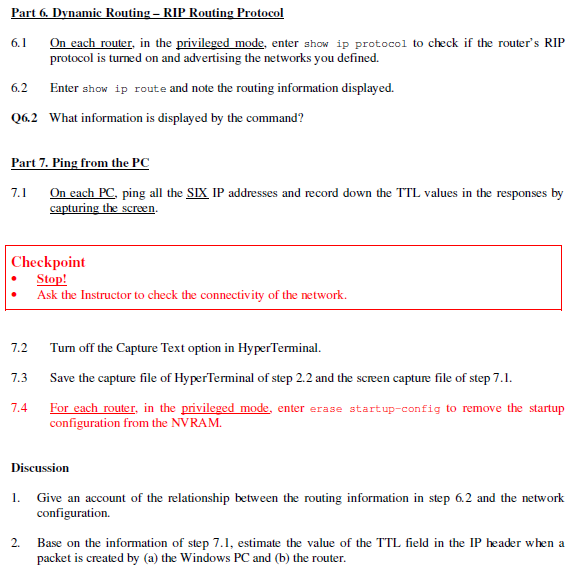
Objectives To configure the router. To use the ping, traceroute and show commands to check network connectivity. To understand the RIP protocol. Equipment Two sets of Cisco 1720/1841 routers Two sets of Windows PCs with serial port and RJ-45 network interface Two crossover cables Two console/rollover cables One synchronous serial cable (The cable is composed of one V.35 DCE cable and one V.35 DTE cable.) Network Configuration 199.10.5.1 FAQ 199.10.5.0/24 Lab 2: Internetworking using Routers PC 1 199.10.5.2 Router 1 PC 1 IP address = 199.10.5.2 Router 1 FA0 or FA0/0 = 199.10.5.1 SO or S0/0/0 = 201.6.25.1 Subnet mask = 255.255.255.0 SO 201.6.25.1 DCE cable 201.6.25.0/24 DTE cable 201.6.25.2 SO Crossover cable Console/Rollover cable Router 2 FAO 195.128.10.1 195.128.10.0/24 PC 2 195.128.10.2 Router 2 FA0 or FA0/0 = 195.128.10.1 SO or S0/0/0 = 201.6.25.2 Subnet mask = 255.255.255.0 PC 2 Subnet mask = 255.255.255.0 IP address 195.128.10.2 Subnet mask = 255.255.255.0 Default gateway = 195.128.10.1 Default gateway = 199.10.5.1 The routers are Cisco 1720 with IOS (Internetwork Operating System) 12.0 or Cisco 1841 with IOS 12.4. System Configuration Dialog --- Continue with configuration dialog? [yes/no]: yes At any point you may enter a question mark '?' for help. Use ctrl-c to abort configuration dialog at any prompt. Default settings are in square brackets '[]'. -- Appendix This screen dump is from Router1 using Cisco 1720 router. Basic management setup configures only enough connectivity for management of the system, extended setup will ask you to configure each interface on the system Would you like to enter basic management setup? [yes/no]: no First, would you like to see the current interface summary? [yes]: yes Interface FastEtherneto Serial0 Seriall IP-Address unassigned unassigned unassigned Configuring global parameters: Enter host name [Router]: Router1 OK? Method Status YES unset administratively down down YES unset administratively down down YES unset administratively down down The enable secret is a password used to protect access to privileged EXEC and configuration modes. This password, after entered, becomes encrypted in the configuration. Enter enable secret: cisco The enable password is used when you do not specify and enable secret password, with some older software versions, and some boot images. Enter enable password: class The virtual terminal password is used to protect access to the router over a network interface. Enter virtual terminal password: cisco Configure SNMP Network Management? [no]: no Configure IPX? [no]: no Configure IP? [yes]: yes Configure IGRP routing? [yes]: no Configure RIP routing? [no]: yes Configure bridging? [no]: no Configuring interface parameters: Protocol Do you want to configure FastEthernet0 interface? [no]: yes Use the 100 Base-TX (RJ-45) connector? [yes]: yes Operate in full-duplex mode? [no]: yes Configure IP on this interface? [no]: yes IP address for this interface: 199.10.5.1 Subnet mask for this interface [255.255.255.0]: 255.255.255.0 Class C network is 199.10.5.0, 24 subnet bits; mask is /24 Do you want to configure Serial0 interface? [no]: yes Some supported encapsulations are ppp/hdlc/frame-relay/lapb/x25/atm-dx1/smds Choose encapsulation type [hdlc]: hdlc No serial cable seen. Choose mode from (dce/dte) [dte]: doe Serial interface needs clock rate to be set in dce mode. The following clock rates are supported on the serial interface. 1200, 2400, 4800, 9600, 14400, 19200 28800, 32000, 38400, 56000, 57600, 64000 72000, 115200, 125000, 128000, 148000, 500000 800000, 1000000, 1300000, 2000000, 4000000, 8000000 choose speed from above: [2000000]: 125000 Configure IP on this interface? [no]: yes Configure IP unnumbered on this interface? [no]: no IP address for this interface: 201. 6.25.1 Subnet mask for this interface [255.255.255.0]: 255.255.255.0 Class C network is 201.6.25.0, 24 subnet bits; mask is /24 Do you want to configure Seriall interface? [no]: no The following configuration command script was created: hostname Routerl enable secret 5 $1$XYPL$v 3t 3Dsc3/PhwN4jHah7tC1 enable password class line vty 0 4 password cisco no snmp-server ! no ipx routing ip routing no bridge 1 ! interface FastEthernet0 no shutdown media-type 100Basex full-duplex ip address 199.10.5.1 255.255.255.0 ! interface Serial0 no shutdown encapsulation hdlc clock rate 125000 ip address 201.6.25.1 255.255.255.0 ! ! interface Seriall shutdown no ip address dialer-list 1 protocol ip permit dialer-list 1 protocol 1px permit router rip redistribute connected network 199.10.5.0 network 201.6.25.0 ! end [0] Go to the IOS command prompt without saving this config. [1] Return back to the setup without saving this config. [2] Save this configuration to nvram and exit. Enter your selection [2]: 2 This screen dump is from Router2 using Cisco 1720 router. System Configuration Dialog --- Continue with configuration dialog? [yes/no]: yes At any point you may enter a question mark '?' for help. Use ctrl-c to abort configuration dialog at any prompt. Default settings are in square brackets *[]'. -- Basic management setup configures only enough connectivity for management of the system, extended setup will ask you to configure each interface on the system Would you like to enter basic management setup? [yes/no]: no First, would you like to see the current interface summary? [yes]: yes. Interface FastEtherneto Serial0 Seriall IP-Address unassigned unassigned unassigned Configuring global parameters: Enter host name [Router]: Router2 OK? Method Status YES unset administratively down down YES unset administratively down down YES unset administratively down down The enable secret is a password used to protect access to privileged EXEC and configuration modes. This password, after entered, becomes encrypted in the configuration. Enter enable secret: cisco The enable password is used when you do not specify an enable secret password, with some older software versions, and some boot images. Enter enable password: class The virtual terminal password is used to protect access to the router over a network interface. Enter virtual terminal password: cisco Configure SNMP Network Management? [no]: no Configure IPX? [no]: no Configure IP? [yes]: yes Configure IGRP routing? [yes]: no Configure RIP routing? [no]: yes Configure bridging? [no]: no Protocol Configuring interface parameters: Do you want to configure FastEthernet0 interface? [no]: yes Use the 100 Base-TX (RJ-45) connector? [yes]: yes Operate in full-duplex mode? [no]: yes Configure IP on this interface? [no]: yes IP address for this interface: 195.128.10.1 Subnet mask for this interface [255.255.255.0]: 255.255.255.0 Class C network is 195.128.10.0, 24 subnet bits; mask is /24 Do you want to configure Serial0 interface? [no]: yes Some supported encapsulations are ppp/hdlc/frame-relay/lapb/x25/atm-dx1/smds Choose encapsulation type [hdle]: hdlc No serial cable seen. Choose mode from (dce/dte) [dte]: dte Configure IP on this interface? [no]: yes Configure IP unnumbered on this interface? [no]: no 201. 6. 25.2 IP address for this interface: Subnet mask for this interface [255.255.255.0]: 255.255.255.0 Class C network is 201.6.25.0, 24 subnet bits; mask is /24 Do you want to configure Seriall interface? [no]: no The following configuration command script was created: hostname Router2 enable secret 5 $1$8/31SHXwjcePdDSwGbylBG.Qpo. enable password class line vty 0 4 password cisco no snmp-server ! no 1px routing ip routing no bridge 1 ! interface FastEthernet0 no shutdown media-type 100Basex full-duplex ip address 195.128.10.1 255.255.255.0 ! interface Serial0 no shutdown encapsulation hdlc ip address 201.6.25.2 255.255.255.0 ! interface Seriall shutdown no ip address dialer-list 1 protocol ip permit dialer-list 1 protocol 1px permit ! router rip redistribute connected network 195.128.10.0 network 201.6.25.0 ! end [0] Go to the IOS command prompt without saving this config. [1] Return back to the setup without saving this config. [2] Save this configuration to nvram and exit. Enter your selection [2]: 2 This screen dump is from Router1 using Cisco 1841 router. System Configuration Dialog --- Continue with configuration dialog? [yes/no]: yes At any point you may enter a question mark '?' for help. Use ctrl-c to abort configuration dialog at any prompt. Default settings are in square brackets '[]'. -- Basic management setup configures only enough connectivity for management of the system, extended setup will ask you to configure each interface on the system Would you like to enter basic management setup? [yes/no]: no First, would you like to see the current interface summary? [yes]: yes Interface FastEthernet0/0 FastEthernet0/1 IP-Address unassigned unassigned unassigned unassigned unassigned Serial0/0/0 Serial0/0/1 BRIO/1/0 BRIO/1/0:1 BRIO/1/0:2 Configuring global parameters: Enter host name [Router]: Router1 The enable secret is a password used to protect access to privileged EXEC and configuration modes. This password, after entered, becomes encrypted in the configuration. Enter enable secret: cisco Configure IP? [yes]: yes unassigned unassigned The enable password is used when you do not specify and enable secret password, with some older software versions, and some boot images. Enter enable password: class The virtual terminal password is used to protect access to the router over a network interface. Enter virtual terminal password: cisco Configure SNMP Network Management? [no]: no Configure RIP routing? [yes]: yes OK? Method Status YES unset YES unset YES unset YES unset YES unset YES unset YES unset Configure CLNS? [no]: no Configure bridging? [no]: no [5] [6] administratively down down administratively down down administratively down down administratively down down administratively down down administratively down down administratively down down BRI interface needs isdn switch-type to be configured Valid switch types are : [0] none..........Only if you don't want to configure BRI. [1] basic-1tr6....1TR6 switch type for Germany basic-sess....AT&T 5ESS switch type for the US/Canada basic-dms100.. Northern DMS-100 switch type for US/Canada basic-net3....NET3 switch type for UK and Europe [2] [3] basic-ni...... National ISDN switch type basic-qsig....QSIG switch type basic-ts013... IS013 switch type for Australia [8] [9] vn3.... Choose ISDN BRI Switch Type [2]: 0 ntt...........NII switch type for Japan Protocol .VN3 and VN4 switch types for France Configuring interface parameters: interface? [no]: yes Do you want to configure FastEthernet0/0 Use the 100 Base-TX (RJ-45) connector? [yes]: yes Operate in full-duplex mode? [no]: yes Configure IP on this interface? [no]: yes IP address for this interface: 199.10.5.1 Subnet mask for this interface [255.255.255.0]: 255.255.255.0 Class C network is 199.10.5.0, 24 subnet bits; mask is /24 Do you want to configure FastEthernet0/1 interface? [no]: no Do you want to configure Serial0/0/0 interface? [no]: yes Configure IP on this interface? [no]: yes Configure IP unnumbered on this interface? [no]: no IP address for this interface: 201. 6.25.1 Subnet mask for this interface [255.255.255.0]: 255.255.255.0 Class C network is 201.6.25.0, 24 subnet bits; mask is /24 Do you want to configure Serial0/0/1 interface? [no]: no Would you like to go through AutoSecure configuration? [yes]: no AutoSecure dialog can be started later using "auto secure" CLI The following configuration command script was created: hostname Router1 enable secret 5 $1$0F81SAQd4/qd5Vw0uJft PvpcjN/ enable password class line vty 04 password cisco no snmp-server ! ip routing no cins routing no bridge 1 isdn switch-type none ! interface FastEthernet0/0 no shutdown media-type 100Basex full-duplex ip address 199.10.5.1 255.255.255.0 no mop enabled ! interface FastEthernet0/1 shutdown no ip address ! interface Serial0/0/0 no shutdown ip address 201.6.25.1 255.255.255.0 no mop enabled ! interface Serial0/0/1 shutdown no ip address dialer-list 1 protocol ip permit ! router rip redistribute connected network 199.10.5.0 network 201.6.25.0 ! end [0] Go to the IOS command prompt without saving this config. [1] Return back to the setup without saving this config. [2] Save this configuration to nvram and exit. Enter your selection [2]: 2 This screen dump is from Router2 using Cisco 1841 router. System Configuration Dialog --- Continue with configuration dialog? [yes/no]: yes At any point you may enter a question mark '?' for help. Use ctrl-c to abort configuration dialog at any prompt. Default settings are in square brackets '[]'. Basic management setup configures only enough connectivity for management of the system, extended setup will ask you to configure each interface on the system Would you like to enter basic management setup? [yes/no]: no First, would you like to see the current interface summary? [yes]: yes Interface FastEthernet0/0 FastEthernet0/1 Serial0/0/0 Serial0/0/1 BRIO/1/0 BRIO/1/0:1 BRIO/1/0:2 IP-Address unassigned unassigned unassigned unassigned unassigned unassigned unassigned Configuring global parameters: Enter host name [Router]: Router2 OK? Method Status YES unset YES unset YES unset YES unset YES unset YES unset YES unset The enable secret is a password used to protect access to privileged EXEC and configuration modes. This password, after entered, becomes encrypted in the configuration. Enter enable secret: cisco The enable password is used when you do not specify an enable secret password, with some older software versions, and some boot images. Enter enable password: class The virtual terminal password is used to protect access to the router over a network interface. Enter virtual terminal password: cisco Configure SNMP Network Management? [no]: no Configure IP? [yes]: yes. Configure RIP routing? [yes]: yes Configure CLNS? [no]: no Configure bridging? [no]: no administratively down down administratively down down administratively down down administratively down down administratively down down administratively down down administratively down down BRI interface needs isdn switch-type to be configured Valid switch types are: [8] [9] vn3.... Choose ISDN BRI Switch Type [2]: 0 [0] none.......... Only if you don't want to configure BRI. [1] basic-1tr6....1TR6 switch type for Germany [2] basic-sess....AT&T 5ESS switch type for the US/Canada [3] basic-dms100.. Northern DMS-100 switch type for US/Canada basic-net3....NET3 switch type for UK and Europe [5] basic-ni...... National ISDN switch type [6] basic-qsig....QSIG switch type basic-ts013... IS013 switch type for Australia ntt...........NII switch type for Japan ...VN3 and VN4 switch types for France Protocol Configuring interface parameters: Do you want to configure FastEthernet0/0 interface? [no]: yes Use the 100 Base-TX (RJ-45) connector? [yes]: yes Operate in full-duplex mode? [no]: yes Configure IP on this interface? [no]: yes IP address for this interface: 195.128.10.1 Subnet mask for this interface [255.255.255.0]: 255.255.255.0 Class C network is 195.128.10.0, 24 subnet bits; mask 18 /24 Do you want to configure FastEthernet0/1 interface? [no]: no Do you want to configure Serial0/0/0 interface? [no]: yes Configure IP on this interface? [no]: yes Configure IP unnumbered on this interface? [no]: no IP address for this interface: 201. 6.25.2 Subnet mask for this interface [255.255.255.0]: 255.255.255.0 Class C network is 201.6.25.0, 24 subnet bits; mask is /24 Do you want to configure Serial0/0/1 interface? [no]: no Would you like to go through AutoSecure configuration? [yes]: no AutoSecure dialog can be started later using "auto secure CLI The following configuration command script was created: hostname Router2 enable secret 5 $1$t7MpSswWE1cfA1gT6Fsq8wtinto enable password class line vty 0 4 password cisco no snmp-server ! ip routing no cins routing no bridge 1 isdn switch-type none ! interface FastEthernet0/0 no shutdown media-type 100Basex full-duplex ip address 195.128.10.1 255.255.255.0 no mop enabled ! interface FastEthernet0/1 shutdown no ip address ! interface Serial0/0/0 no shutdown ip address 201.6.25.2 255.255.255.0 no mop enabled ! interface Serial0/0/1 shutdown no ip address dialer-list 1 protocol ip permit ! router rip redistribute connected network 195.128.10.0 network 201.6.25.0 ! end [0] Go to the IOS command prompt without saving this config. [1] Return back to the setup without saving this config. [2] Save this configuration to nvram and exit. Enter your selection [2]: 2 Procedures Part 1. Physical Connection 1.1 Turn off the routers and the PCs. Connect the console port of each router to the serial/COM port of the corresponding PC using a console/rollover cable. 1.2 1.3 1.4 2.3 Part 2. Router User Interface 2.1 Turn on the PCs. 2.2 On each PC, start HyperTerminal but do not make it as the default telnet program. In the HyperTerminal window, name the new connection as 'CNE', then configure COM1 for 9600 bits per second, 8 data bits, no(ne) parity, 1 stop bit and no(ne) flow control. Turn on the Capture Text option to save the text input and output in the session. Turn on the routers. Press Enter several times to link up the router. Input 'no' for initial configuration dialog and 'yes' (or press Enter) to terminate auto-install. Press Enter to enter the user mode. Q2.4 What is the prompt in the user mode? Enter the help command by typing ? at the router prompt. The router will respond with all commands available for this level. 2.4 2.5 2.6 Q2.6 2.7 2.8 2.9 Connect the Ethernet interface EO of each router to the network interface of the corresponding PC using a crossover cable. 2.10 Connect the serial interface SO or S0/0/0 of Router 1 to the serial interface SO or S0/0/0 of Router 2 using a synchronous serial cable which is composed of one V.35 DCE cable and one V.35 DTE cable. Press Spacebar to continue to the next screen or 'q' to quit. Enter the privileged mode using the enable command. What is the prompt in the privileged mode? Enter the help command by typing? at the router prompt. The router will respond with all commands available for this level. Note that the commands available in the user mode and the privileged mode are different. Enter exit at the router prompt to leave the command-line interface (CLI). Press Enter to link up the router and enter the user mode. Enter show ?. Q2.10 Write down the first three lines of the command output. 2.11 Press Spacebar to continue to the next screen or 'q' to quit. 2.12 Enter show version to see what information is displayed. 2.13 Try the following commands and see what information is displayed: show clock, show history, show hosts and show users. 2.14 Enter the privileged mode using the enable command. 2.15 Enter show 2. Q2.15 Write down the first three lines of the command output. 2.16 Press Spacebar to continue to the next screen or 'q' to quit. 2.17 Try the following commands and see what information is displayed: show running-config and show protocol. Part 3. Router Setup 3.1 On each router, in the privileged mode, enter set up at the router prompt. Enter 'yes' at the router prompt that asks if you want to continue with the configuration dialog. Then you will see the following: Refer to the appendix for the screendumps of different models. 3.2 Part 4. Assign IP Address to the PC (Note: The exact procedures of this part depend on your Windows version and Windows XP is assumed in the following steps.) 4.1 On each PC, click Start Control Panel Network Connections Local Area Connection. In the Local Area Connection Status window, click Properties. In the This connection uses the following items area, select Internet Protocol and click the Properties. 4.2 4.3 4.4 4.5 Part 5. Use of Ping and Traceroute Commands (Note: Make sure all PCs and routers have been configured correctly before doing this part.) On each router, in the user mode, enter ping X.X.X.X, where X.X.X.X is the IP address of the PC on the far end, that is, ping 195.128.10.2 on Router 1 and ping 199.10.5.2 on Router 2. 5.1 5.2 In the Internet Protocol (TCP/IP) Properties window, supply the information provided in the diagram on page 1. Then click OK. Click OK and then Close. Q5.1 What information is displayed by the command? Ping all other IP addresses to see if it is successful. Enter traceroute ip X.X.X.X where X.X.X.X is the IP address of the PC on the far end, that is, traceroute ip 195.128.10.2 on Router I and traceroute ip 199.10.5.2 on Router 2. 5.3 Exclamation marks (!) will appear for successful pinging. If pinging a Windows PC fails, turn off its firewall. 5.4 If asterisks (*) appear in the output, you can abort the command by sending the escape sequence *Ctrl-Shift-6 x' (press 'Control-Shift-6', let go, then press 'x'). Q5.3 What information is displayed by the command? Enter show arp to see what information is in the ARP table. Q5.4 What information is displayed by the command? Part 6. Dynamic Routing RIP Routing Protocol 6.1 On each router, in the privileged mode, enter show ip protocol to check if the router's RIP protocol is turned on and advertising the networks you defined. Enter show ip route and note the routing information displayed. 6.2 Q6.2 What information is displayed by the command? Part 7. Ping from the PC 7.1 On each PC. ping all the SIX IP addresses and record down the TTL values in the responses by capturing the screen. Checkpoint Stop! Ask the Instructor to check the connectivity of the network. 7.2 7.3 7.4 Turn off the Capture Text option in HyperTerminal. Save the capture file of HyperTerminal of step 2.2 and the screen capture file of step 7.1. For each router, in the privileged mode, enter erase startup-config to remove the startup configuration from the NVRAM. Discussion 1. Give an account of the relationship between the routing information in step 6.2 and the network configuration. 2. Base on the information of step 7.1, estimate the value of the TTL field in the IP header when a packet is created by (a) the Windows PC and (b) the router.
Step by Step Solution
There are 3 Steps involved in it
Step: 1

Get Instant Access to Expert-Tailored Solutions
See step-by-step solutions with expert insights and AI powered tools for academic success
Step: 2

Step: 3

Ace Your Homework with AI
Get the answers you need in no time with our AI-driven, step-by-step assistance
Get Started


