Answered step by step
Verified Expert Solution
Question
1 Approved Answer
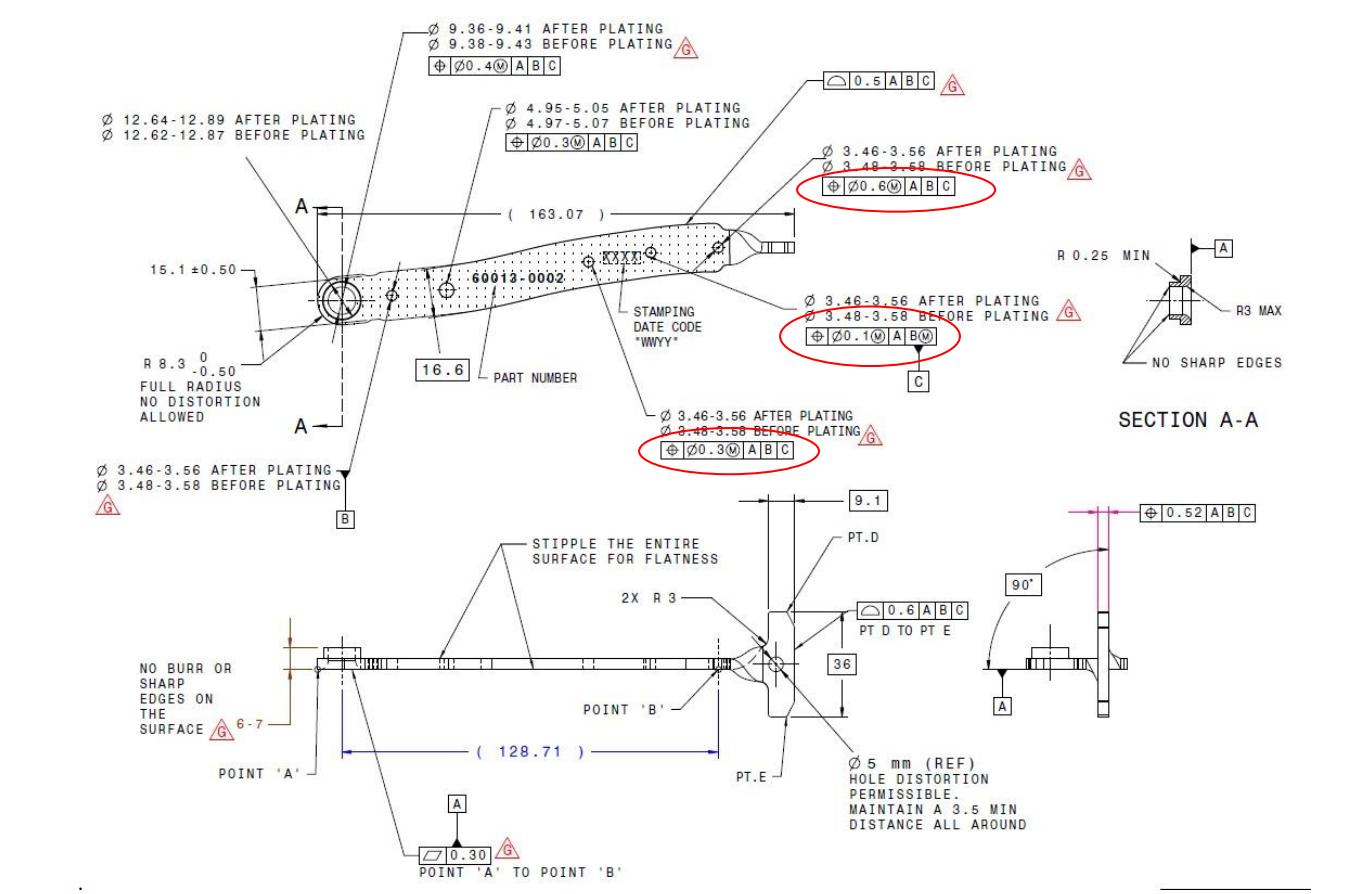
On the drawing below: Draw a schematic of a functional gauge to show the datums and size and shape of each datum. Design a


On the drawing below: Draw a schematic of a functional gauge to show the datums and size and shape of each datum. Design a gauge and draw a schematic of the gauge for the inspection of the three identified holes (Circled in Red) 12.64-12.89 AFTER PLATING 12.62-12.87 BEFORE PLATING 15.10.50 R 8.30 -0.50 FULL RADIUS NO DISTORTION ALLOWED A 3.46-3.56 AFTER PLATING 3.48-3.58 BEFORE PLATING NO BURR OR SHARP EDGES ON THE SURFACE 6 A 6-7 POINT 'A' B HHH 9.36-9.41 AFTER PLATING 9.38-9.43 BEFORE PLATING 00.40 ABC b... ........ L 60013-0002 10. THE 16.6 4.95-5.05 AFTER PLATING 4.97-5.07 BEFORE PLATING 00.30 ABC A (163.07 ) PART NUMBER ***** In (128.71 ) STAMPING DATE CODE "WWYY" STIPPLE THE ENTIRE SURFACE FOR FLATNESS 2X R 3 POINT 'B' 0.30 POINT A TO POINT 'B' HH PT.E 0.5 ABC 3.46-3.56 AFTER PLATING 03 48 3.68 BEFORE PLATING 00.60 ABC 3.46-3.56 AFTER PLATING 9.48-3.58 BEFORE PLATING 00.30 ABC 3.46-3.56 AFTER PLATING 3.48-3.58 BEFORE PLATING 00.10 A BM 36 9.1 PT.D 0.6ABC PT D TO PT E 5 mm (REF) HOLE DISTORTION 90 PERMISSIBLE. MAINTAIN A 3.5 MIN DISTANCE ALL AROUND R 0.25 MIN A NII R3 MAX NO SHARP EDGES SECTION A-A 0.52 ABC
Step by Step Solution
There are 3 Steps involved in it
Step: 1
Answer 1Schematic diagram of ...
Get Instant Access to Expert-Tailored Solutions
See step-by-step solutions with expert insights and AI powered tools for academic success
Step: 2

Step: 3

Ace Your Homework with AI
Get the answers you need in no time with our AI-driven, step-by-step assistance
Get Started


