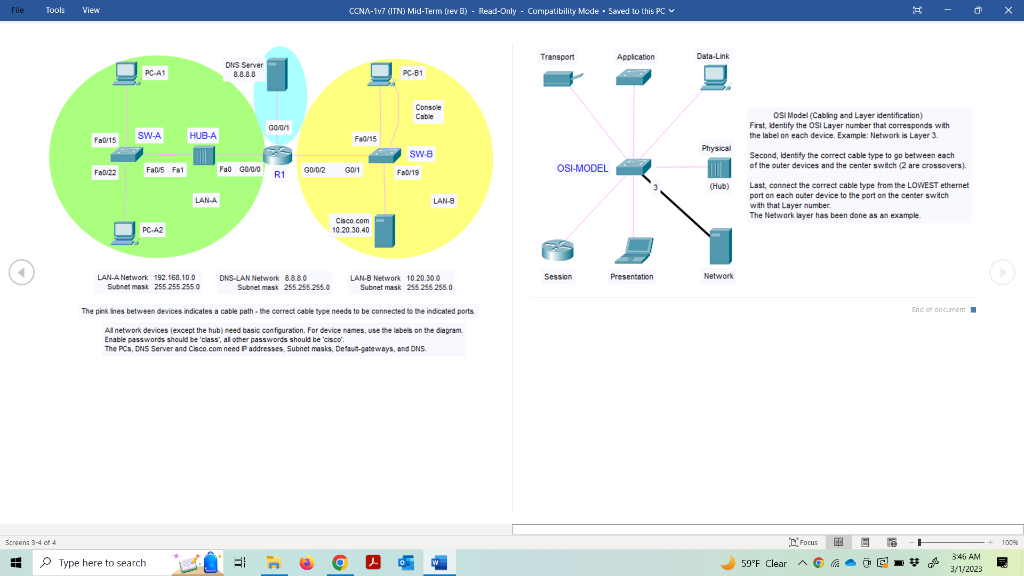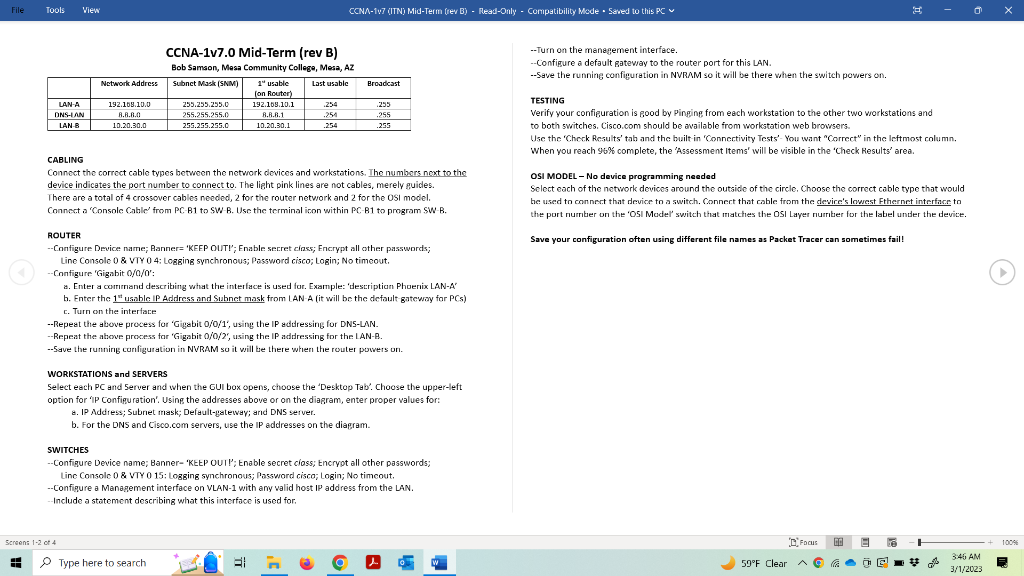

Osi Model (Cabling and Layer identification) First, identify the OSI Layer number that corresponds with the label on each device. Example: Network is Layer 3. Second, Ientity the correct cable type to go between each of the outer devices and the center switch (2 are crossovers). Last, connect the correct cable type from the LOWEST ethernet port on each outer device to the port on the center switch with that Layer number. The Network layer has been done as an example. LAN-A Network 192.168.10.0 LAN-B Network 10.20.30.0 Subnet mask 255.255.255.0 Subnet mask 255.255.255.0 The pink ines between devices indicates a cable path - the correct cable bye needs to be connected to the indicated ports. All network devices (except the hub) need basic configuration. For device names, use the labels on the dagram. Enable passwords should be 'class', al other passwords should be 'cisco'. The PCs, oNs Server and Claco com need P addresses, Subnet masks, Detaut-gateways, and DN5. CCNA-1v7.0 Mid-Term (rev B) --Turn on the management interface. Bob Sameon, Meas Community College, Mesa, AZ --Configure a default gateway to the router port for this LAN. --Save the running configuration in NVRAM so it will be there when the switch powers on. TESTING Verify your confieuration is good by pinging from each workstation to the other two workstations and to both switches. Cisco.com should be available from workstation web browsers. Use the 'Check Results' tals and the built in 'Connertivity Tests'. You want "Correct" in the Ieftmost column. When you reach 96% complete, the 'Assessment Items' will be visible in the 'Check Results' area. CABLING Connect the correct cable types between the network devices and workstations. The numbers next to the OSI MODEL - No device programming needed device indicates the port number to connect to. The light pink lines are not cables, merely guides. Select each of the network devicos around the outside of the circle, Choose the correct cable type that would There are a total of 4 crossover cables needed, 2 for the router netwrork and 2 for the osi model. be used to connnert that device tn a switch. Connert that cable from the devire's lowest Fthernet interfacer to Connect a 'Console Cable' from PC. B1 to SW' B. Use the terminal icon within PC. B1 to program SW. B. the port numitier on the 'O5I Madel' switch that matcches the OSI Laver nuirriter for the label under the device. ROUTER Save your configuration often using different file names as Packet Tracer can sometimes fail! --Configure Device narme; Banners 'KEEP OUTY'; Enable secret ciass; Encrypt all other passwonords; Line Console 0 \& VTY 0 4; LogBing synchronous; Password cisco; Login; No timeout. --Configure 'Gigabit 0/0/0 : a. Enter a comitrand describing what the interface is used far. Example: 'descriptian Phoerix LAN-A' b. Enter the 1 " u sible. IP Address and Subnet mask from LAN-A (it will be the defoult gatewary for PCS) c. Turn on the interiace --Repeat the above process for 'Gigabit o/O/1', using the IP addressing for DNS-LAN. --Repeat the ahove process tar 'Gigabit 0///2/2 ', using the IP addressing for the LAN-B. --5ave the runnirg curfiguration in NVRAM so it will te there whent the router powers on. WORKSTATIONS and SERVERS Select each PC and 5erver and when the GUI box opens, choose the 'Desktop Tab'. Choose the upper-left. option for 'If configuration'. Using the addresses above or on the diagram, enter proper values for: 8. Ip Address; Subnet mask; Default-pateway; and DNS server. b. For the DNS and Cisco.com servers, use the IP addresses on the diagram. SWITCHES --Configure Device name; Banner- 'KEtP OUIl'; Enable secret cioss; tncrypt all other passwords; Line Console 0 \& VTY 0 15; Logging synchronous; Password cisco; Login; No timcout. --Configure a Management interface on VLAN-1 with any valid host If address from the LAN. - Include a statement describing what this interface is used for. Osi Model (Cabling and Layer identification) First, identify the OSI Layer number that corresponds with the label on each device. Example: Network is Layer 3. Second, Ientity the correct cable type to go between each of the outer devices and the center switch (2 are crossovers). Last, connect the correct cable type from the LOWEST ethernet port on each outer device to the port on the center switch with that Layer number. The Network layer has been done as an example. LAN-A Network 192.168.10.0 LAN-B Network 10.20.30.0 Subnet mask 255.255.255.0 Subnet mask 255.255.255.0 The pink ines between devices indicates a cable path - the correct cable bye needs to be connected to the indicated ports. All network devices (except the hub) need basic configuration. For device names, use the labels on the dagram. Enable passwords should be 'class', al other passwords should be 'cisco'. The PCs, oNs Server and Claco com need P addresses, Subnet masks, Detaut-gateways, and DN5. CCNA-1v7.0 Mid-Term (rev B) --Turn on the management interface. Bob Sameon, Meas Community College, Mesa, AZ --Configure a default gateway to the router port for this LAN. --Save the running configuration in NVRAM so it will be there when the switch powers on. TESTING Verify your confieuration is good by pinging from each workstation to the other two workstations and to both switches. Cisco.com should be available from workstation web browsers. Use the 'Check Results' tals and the built in 'Connertivity Tests'. You want "Correct" in the Ieftmost column. When you reach 96% complete, the 'Assessment Items' will be visible in the 'Check Results' area. CABLING Connect the correct cable types between the network devices and workstations. The numbers next to the OSI MODEL - No device programming needed device indicates the port number to connect to. The light pink lines are not cables, merely guides. Select each of the network devicos around the outside of the circle, Choose the correct cable type that would There are a total of 4 crossover cables needed, 2 for the router netwrork and 2 for the osi model. be used to connnert that device tn a switch. Connert that cable from the devire's lowest Fthernet interfacer to Connect a 'Console Cable' from PC. B1 to SW' B. Use the terminal icon within PC. B1 to program SW. B. the port numitier on the 'O5I Madel' switch that matcches the OSI Laver nuirriter for the label under the device. ROUTER Save your configuration often using different file names as Packet Tracer can sometimes fail! --Configure Device narme; Banners 'KEEP OUTY'; Enable secret ciass; Encrypt all other passwonords; Line Console 0 \& VTY 0 4; LogBing synchronous; Password cisco; Login; No timeout. --Configure 'Gigabit 0/0/0 : a. Enter a comitrand describing what the interface is used far. Example: 'descriptian Phoerix LAN-A' b. Enter the 1 " u sible. IP Address and Subnet mask from LAN-A (it will be the defoult gatewary for PCS) c. Turn on the interiace --Repeat the above process for 'Gigabit o/O/1', using the IP addressing for DNS-LAN. --Repeat the ahove process tar 'Gigabit 0///2/2 ', using the IP addressing for the LAN-B. --5ave the runnirg curfiguration in NVRAM so it will te there whent the router powers on. WORKSTATIONS and SERVERS Select each PC and 5erver and when the GUI box opens, choose the 'Desktop Tab'. Choose the upper-left. option for 'If configuration'. Using the addresses above or on the diagram, enter proper values for: 8. Ip Address; Subnet mask; Default-pateway; and DNS server. b. For the DNS and Cisco.com servers, use the IP addresses on the diagram. SWITCHES --Configure Device name; Banner- 'KEtP OUIl'; Enable secret cioss; tncrypt all other passwords; Line Console 0 \& VTY 0 15; Logging synchronous; Password cisco; Login; No timcout. --Configure a Management interface on VLAN-1 with any valid host If address from the LAN. - Include a statement describing what this interface is used for


