Please help with #5 and #6
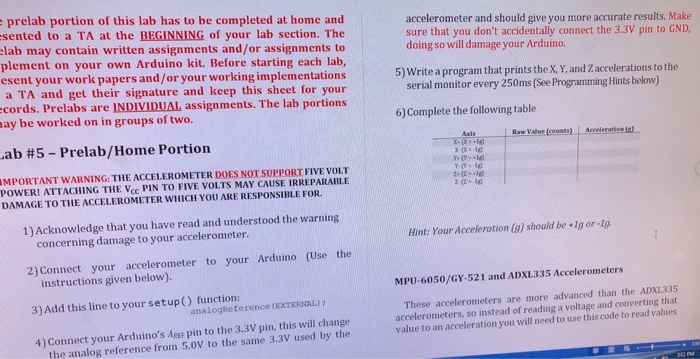
prelab portion of this lab has to be completed at home and sented to a TA at the BEGINNING of your lab section. The lab may contain written assignments and/or assignments to plement on your own Arduino kit. Before starting each lab, esent your work papers and/or your working implementations a TA and get their signature and keep this sheet for your cords. Prelabs are INDIVIDUAL assignments. The lab portions ay be worked on in groups of two. accelerometer and should give you more accurate results. Make sure that you don't accidentally connect the 3.3V pin to GNID doing so will damage your Arduino. 5) Write a program that prints the X, Y, and Z.accelerations to the serial monitor every 250ms (See Programming Hints below) 6) Complete the following table .ab #5-Prelab/Home Portion MPORTANT WARNING: THE ACCELEROMETER DOES NOT SUPPORT FIVE VOLT POWER! ATTACHING THE Vcc PIN TO FIVE VOLTS MAY CAUSE IRREPARABLE DAMAGE TO THE ACCELEROMETER WHICH YOU ARE RESPONSIBLE FOR 1) Acknowledge that you have read and understood the warning concerning damage to your accelerometer. Hint: Your Acceleration (g) should be +1g or-1g. 2) Connect your accelerometer to your Arduino (Use the instructions given below). MPU-6050/GY-521 and ADXI335 Accelerometers 3) Add this line to your setup() function: These accelerometers are more advanced than the ADXL335 accelerometers, so instead of reading a voltage and converting that value to an acceleration you will need to use this code to read values analogRe ference (EXTERNAL) 7 4) Connect your Arduino's AREr pin to the 3.3V pin, this will change the analog reference from 5.0V to the same 3.3V used by the prelab portion of this lab has to be completed at home and sented to a TA at the BEGINNING of your lab section. The lab may contain written assignments and/or assignments to plement on your own Arduino kit. Before starting each lab, esent your work papers and/or your working implementations a TA and get their signature and keep this sheet for your cords. Prelabs are INDIVIDUAL assignments. The lab portions ay be worked on in groups of two. accelerometer and should give you more accurate results. Make sure that you don't accidentally connect the 3.3V pin to GNID doing so will damage your Arduino. 5) Write a program that prints the X, Y, and Z.accelerations to the serial monitor every 250ms (See Programming Hints below) 6) Complete the following table .ab #5-Prelab/Home Portion MPORTANT WARNING: THE ACCELEROMETER DOES NOT SUPPORT FIVE VOLT POWER! ATTACHING THE Vcc PIN TO FIVE VOLTS MAY CAUSE IRREPARABLE DAMAGE TO THE ACCELEROMETER WHICH YOU ARE RESPONSIBLE FOR 1) Acknowledge that you have read and understood the warning concerning damage to your accelerometer. Hint: Your Acceleration (g) should be +1g or-1g. 2) Connect your accelerometer to your Arduino (Use the instructions given below). MPU-6050/GY-521 and ADXI335 Accelerometers 3) Add this line to your setup() function: These accelerometers are more advanced than the ADXL335 accelerometers, so instead of reading a voltage and converting that value to an acceleration you will need to use this code to read values analogRe ference (EXTERNAL) 7 4) Connect your Arduino's AREr pin to the 3.3V pin, this will change the analog reference from 5.0V to the same 3.3V used by the


