Question
Please help with these instructions and provide a screenshot showing the code and indentation working in Microsoft Visual Studio. The code should be in the
Please help with these instructions and provide a screenshot showing the code and indentation working in Microsoft Visual Studio. The code should be in the .NET framework. How do I change the pictures in the given example to pictures of my choice? Here are the instructions:
INSTRUCTIONS
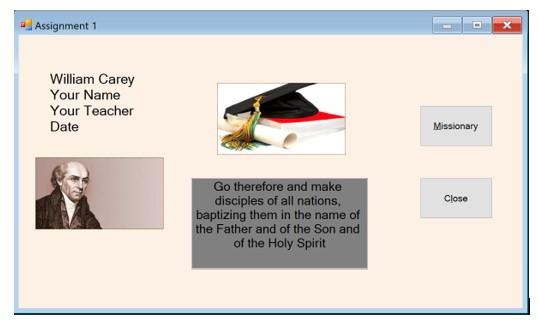
When the application runs the user will see the picture of your choice and a Bible Verse on mission work. The form will have the option to close the application and a mission button. When the mission button is pressed, the user will be presented with an image of a missionary of your choice and a label with information on the missionary.
The following steps must be completed. 1. Form Setup a. Your form should have 2 buttons, 2 images, 1 label, and 1 textbox. b. Name the initial form frmAssignment1 and put Assignment 1 in its title bar. c. Set the backcolor of the form to a color of your choice in the properties menu. d. Lock all controls on the form e. Create access keys for the buttons for both buttons. f. The tab order of the buttons should go from Missions to Quit. The form should open with the Missions button as the highlighted option.
2. PictureBox a. Add two PictureBox controls to your form and name the PictureBox picStudentImage and picMissionary b. Import an image for both picture boxes to the resources of the project (Make sure you save the image in the project folder before you inport it to the resources folder) c. Use the stretch image property for the image d. Make the picMissionary not available for vieiwing at the run of the application.
3. TextBox a. Name the textbox txtVerse and enter a Bible verse on why missionary work is important. b. The font of the textbox should be something other than the default Microsoft Sans Serif. c. The text should be center aligned d. The text box should be multi-line. e. The backcolor and forecolor should be different from the default. f. The user should not be able to tab to the text box.
4. Label a. A label should be created called lblMissions. b. The label should be created on the form but not show on the load. c. The label should include the missionary name, your name and your teacher name and the date you finished your project.. **This is a main requirement and the assignment will not be accepted without this detail.
5. Mission Button a. When the Missionary button is pressed the lblMissions label is displayed using the visible property. b. The Missionary image is also made visible
6. Quit Button a. The application will quit
7. Code a. Create a comment section at the beginning of the code with the name of the assignment, purpose of the assignment, and your name. Comments must be throughout each sub of the application. b. Remove any subs that are not utilized by the program

Step by Step Solution
There are 3 Steps involved in it
Step: 1

Get Instant Access to Expert-Tailored Solutions
See step-by-step solutions with expert insights and AI powered tools for academic success
Step: 2

Step: 3

Ace Your Homework with AI
Get the answers you need in no time with our AI-driven, step-by-step assistance
Get Started


