

Question
**please use processing program to solve this coding assignment ** *this is a coding class please use code only * this is a coding class
**please use processing program to solve this coding assignment **
*this is a coding class please use code only
* this is a coding class use code only please
**please use processing program to solve this coding assignment **
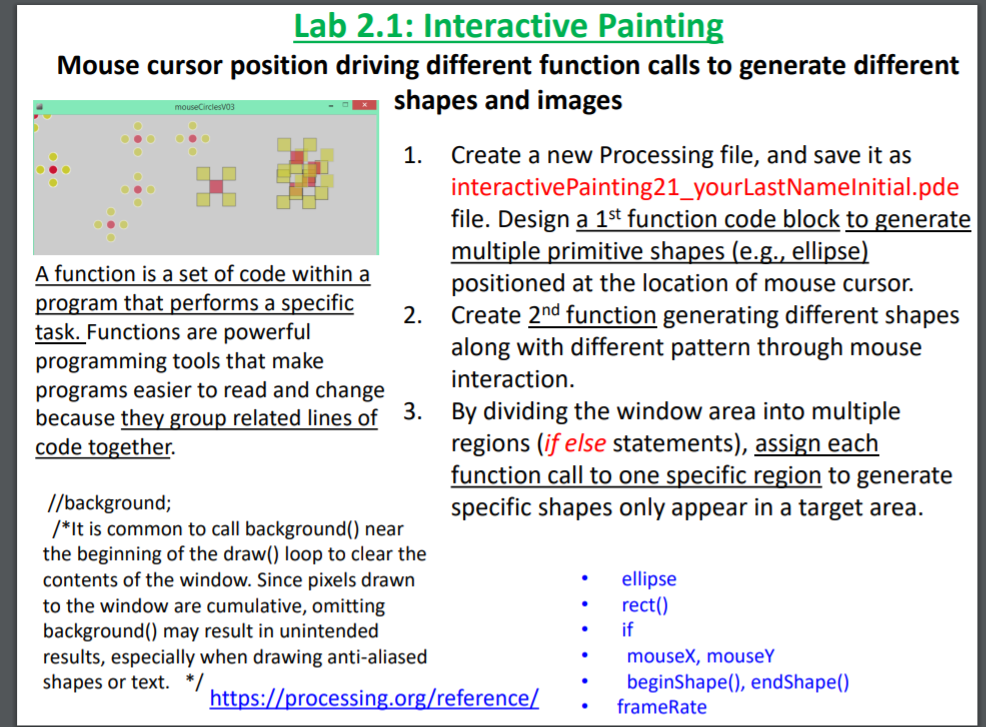
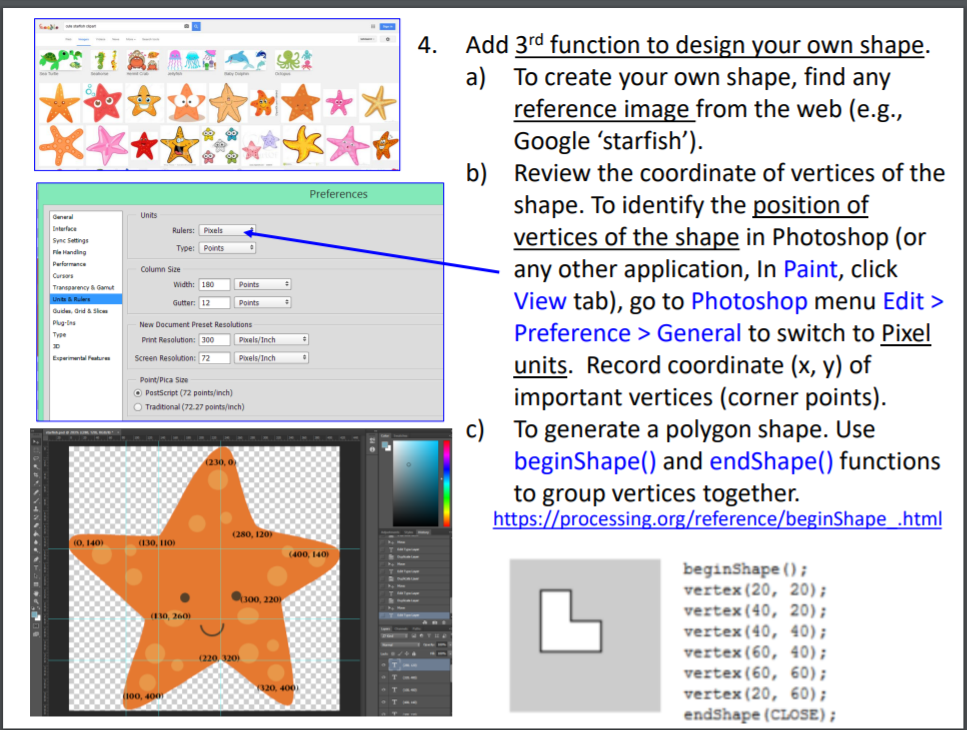
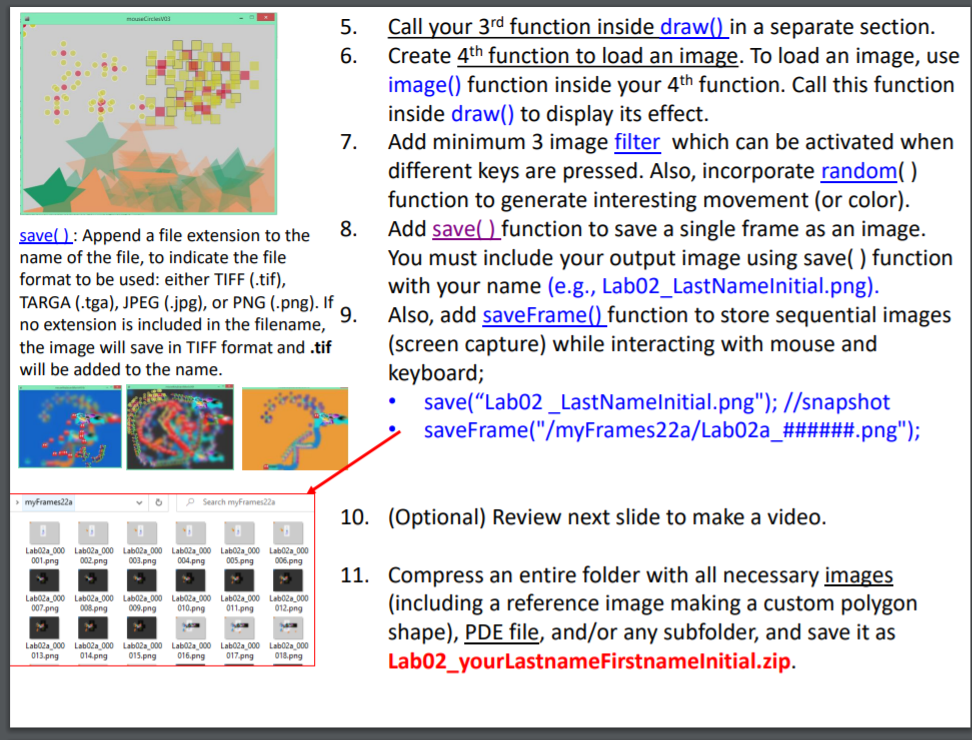
Lab 2.1: Interactive Painting Mouse cursor position driving different function calls to generate different shapes and images mouseCirclesvos 1. Create a new Processing file, and save it as interactive Painting21_yourLastNamelnitial.pde file. Design a 1st function code block to generate multiple primitive shapes (e.g., ellipse) A function is a set of code within a positioned at the location of mouse cursor. program that performs a specific 2. Create 2nd function generating different shapes task. Functions are powerful along with different pattern through mouse programming tools that make interaction. programs easier to read and change because they group related lines of 3. By dividing the window area into multiple code together. regions (if else statements), assign each function call to one specific region to generate //background; specific shapes only appear in a target area. /*It is common to call background() near the beginning of the draw() loop to clear the contents of the window. Since pixels drawn ellipse to the window are cumulative, omitting rect() background() may result in unintended if results, especially when drawing anti-aliased mousex, mousey shapes or text. */ beginShape(), endShape() https://processing.org/reference/ frameRate . . 4. * ***** * Preferences Units Rulers: Pexels Type: Points . General Interface Sync Settings Handling Performance Cursos Transparency & Game Units & Rules Guides Plugins Type Column Size Width: 1.80 Points Add 3rd function to design your own shape. a) To create your own shape, find any reference image from the web (e.g., Google 'starfish'). b) Review the coordinate of vertices of the shape. To identify the position of vertices of the shape in Photoshop (or any other application, In Paint, click View tab), go to Photoshop menu Edit > Preference > General to switch to Pixel units. Record coordinate (x, y) of important vertices (corner points). c) To generate a polygon shape. Use begir ape() and endShap functions to group vertices together. https://processing.org/reference/beginShape .html Gutter: 12 Points 3 New Document Preset Resolutions Print Resolution: 300 Pols/Inch Explor Screen Resolution: 72 Poels/Inch . Point/Pica se PostScript (72 points/inch) Traditional (72.27 points/inch) (280, 120) 0,1403 (10, 11) (400, 1401 300, 2201 10, 2009 beginShape(); vertex (20, 20); vertex (40, 20); vertex (40, 40); vertex (60, 40); vertex (60, 60); vertex (20, 60); endShape (CLOSE) ; (220, 3209 (100, 400 5. 6. 7. save(): Append a file extension to the 8. name of the file, to indicate the file format to be used: either TIFF (.tif), TARGA (.tga), JPEG (.jpg), or PNG (.png). If 9. no extension is included in the filename, the image will save in TIFF format and .tif will be added to the name. Call your 3rd function inside draw() in a separate section. Create 4th function to load an image. To load an image, use image() function inside your 4th function. Call this function inside draw() to display its effect. Add minimum 3 image filter which can be activated when different keys are pressed. Also, incorporate random(). function to generate interesting movement (or color). Add save() function to save a single frame as an image. You must include your output image using save( ) function with your name (e.g., Lab02_LastNameInitial.png). Also, add saveFrame() function to store sequential images (screen capture) while interacting with mouse and keyboard; save("Labo2 _LastNameInitial.png"); //snapshot saveFrame("/myFrames22a/Labo2a_######.png"); my Frames22a OP Search my Frames22 10. (Optional) Review next slide to make a video. Lab02a_000 Lab02a_000 Lab02a_000 Lab02a-000 Laboa 000 Lab02a_000 001.png 002.png 003.png 004.png 005.png 006.png Labo2a_000 Lab02_000 Lab02n_000 Lab02_000 Lab02a_000 Lab02a_000 007.png 008.png 009.png 010.png 011.png 012.png 11. Compress an entire folder with all necessary images (including a reference image making a custom polygon shape), PDE file, and/or any subfolder, and save it as Lab02_yourLastnameFirstnamelnitial.zip. Labo2 000 Lab 20.000 Labo2a000 Labo2a000 Labo2a_000 Lab 20.000 013.png 014.png 015.png 016.png 017.png 018.pngStep by Step Solution
There are 3 Steps involved in it
Step: 1

Get Instant Access to Expert-Tailored Solutions
See step-by-step solutions with expert insights and AI powered tools for academic success
Step: 2

Step: 3
Ace Your Homework with AI
Get the answers you need in no time with our AI-driven, step-by-step assistance
Get Started
Database Management For Business Leaders Building And Using Data Solutions That Work For You
Authors: Larry Ruddell
1st Edition
1973630249, 978-1973630241