Question: Program 2 - Advanced Automobile Objects Please do in C++ This program is made to go off of a lab we previously did which is
Program 2 - Advanced Automobile Objects
Please do in C++
This program is made to go off of a lab we previously did which is below.
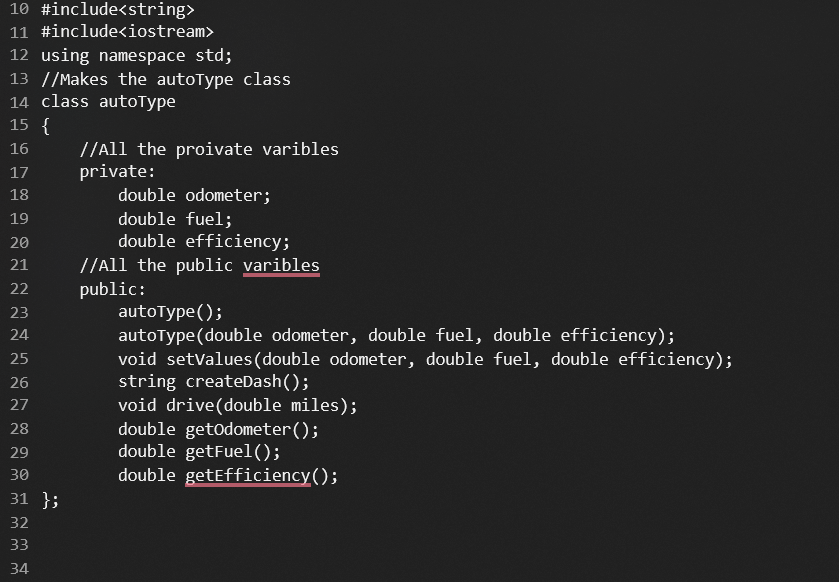
Header file:
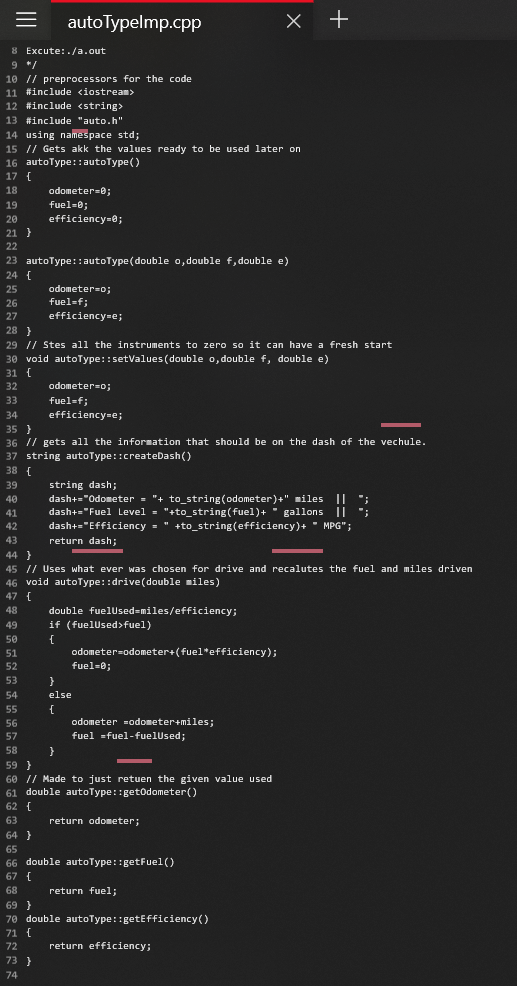
AutoTypeImp File:
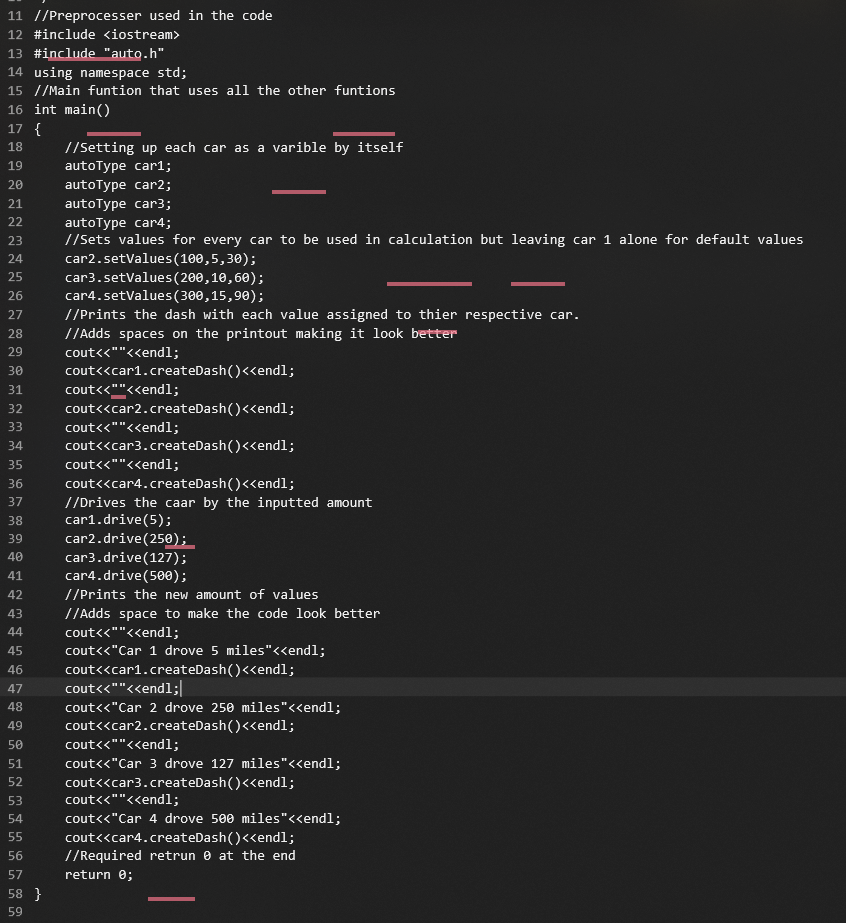
Main File:
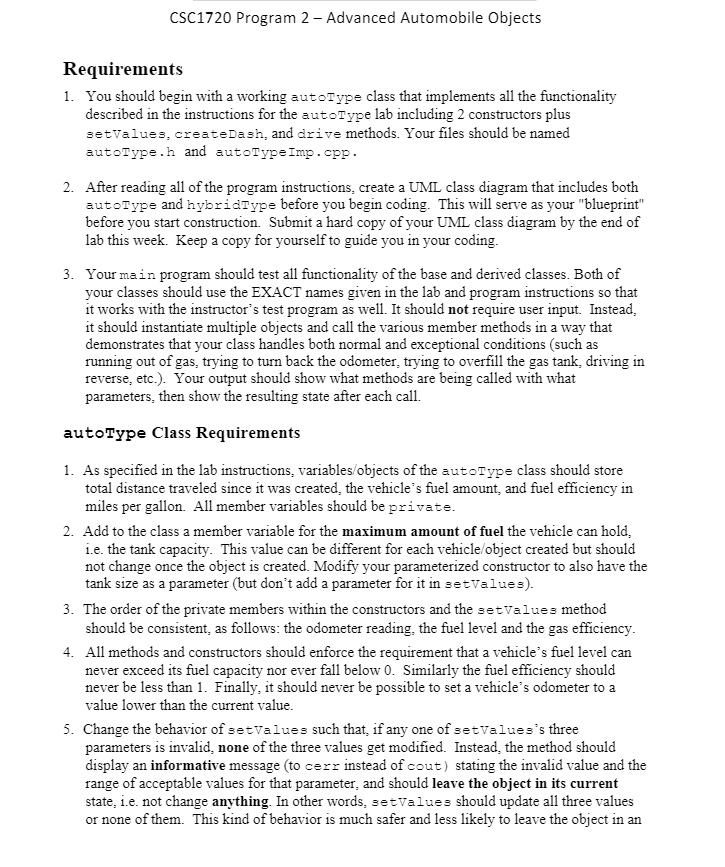
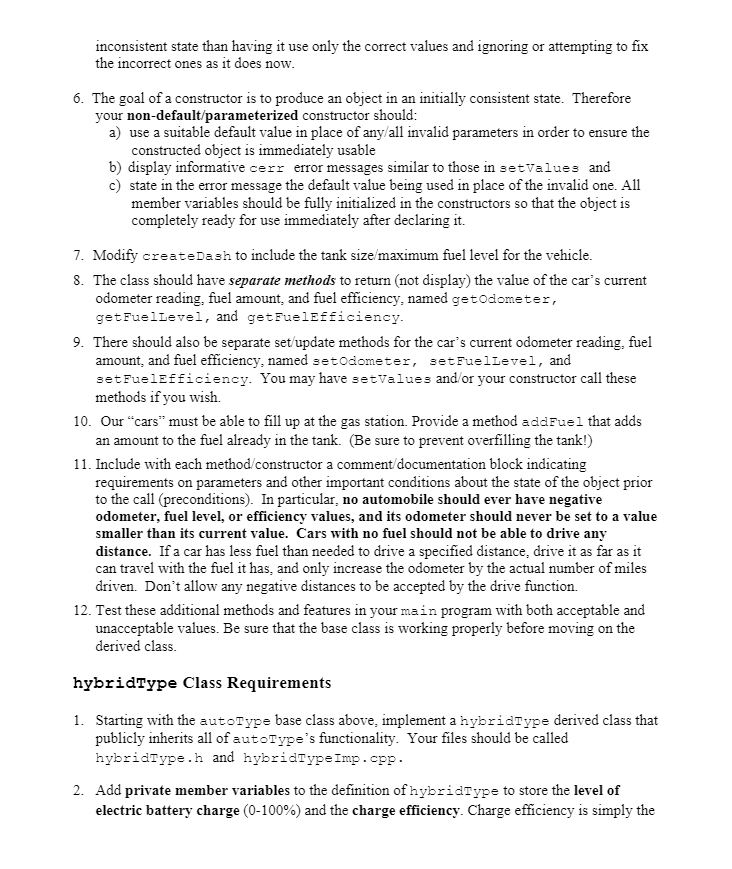
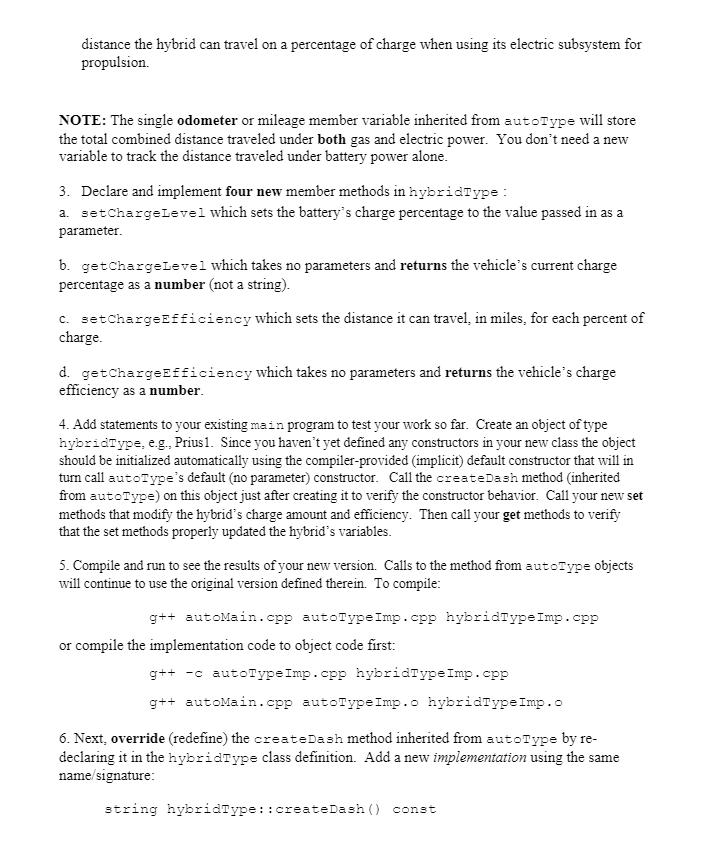
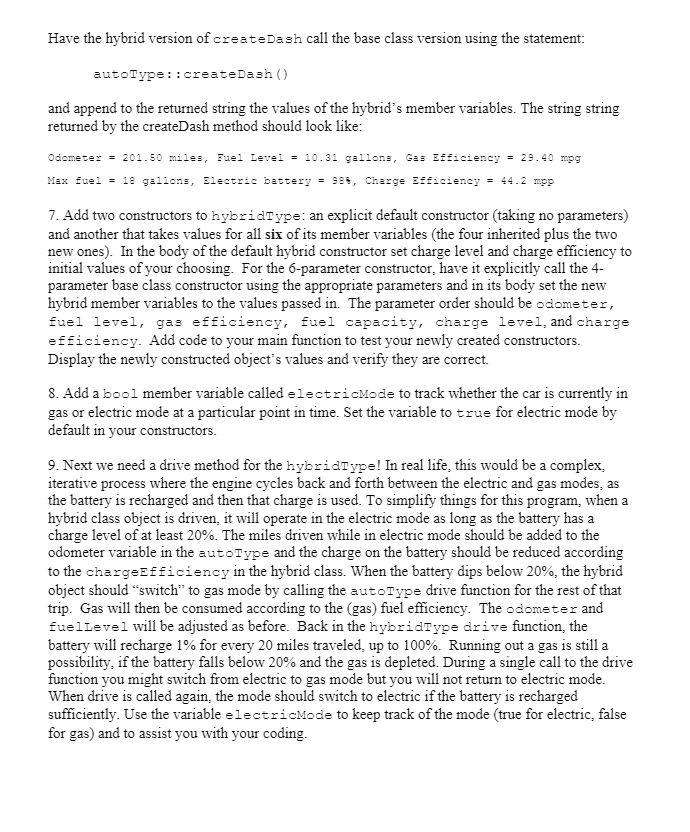
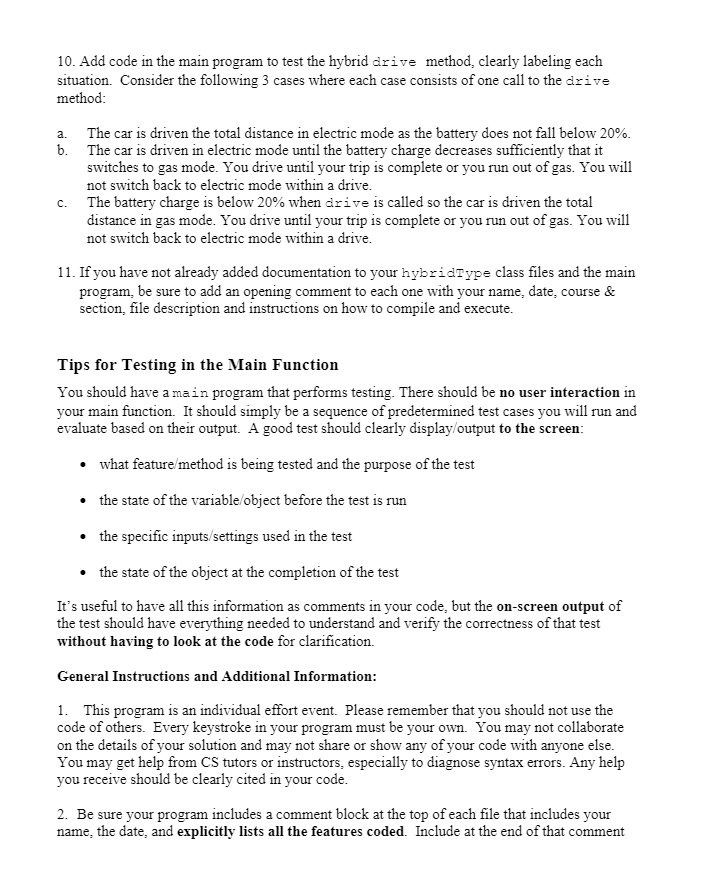
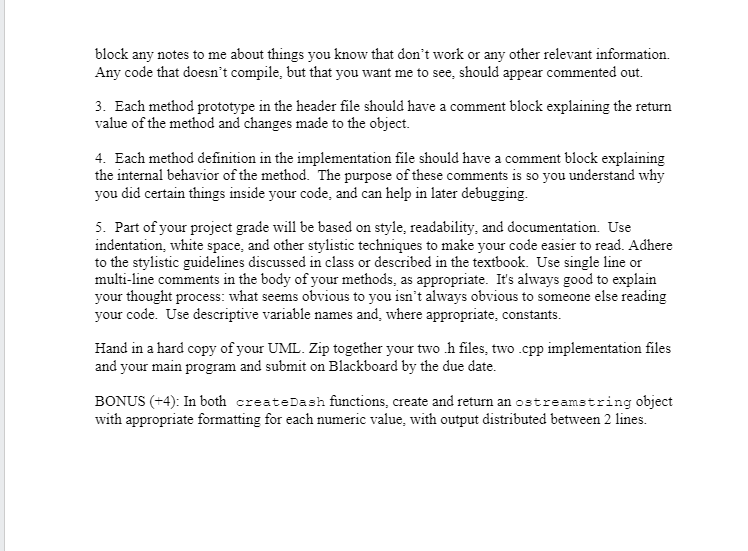
CSC1720 Program 2 - Advanced Automobile Objects Requirements 1. You should begin with a working autoType class that implements all the functionality described in the instructions for the autoType lab including 2 constructors plus setvalues, createdash, and drive methods. Your files should be named autoType.h and autoTypeImp.cpp. 2. After reading all of the program instructions, create a UML class diagram that includes both autoType and hybridType before you begin coding. This will serve as your "blueprint" before you start construction. Submit a hard copy of your UML class diagram by the end of lab this week. Keep a copy for yourself to guide you in your coding. 3. Your main program should test all functionality of the base and derived classes. Both of your classes should use the EXACT names given in the lab and program instructions so that it works with the instructor's test program as well. It should not require user input. Instead, it should instantiate multiple objects and call the various member methods in a way that demonstrates that your class handles both normal and exceptional conditions (such as running out of gas, trying to turn back the odometer, trying to overfill the gas tank, driving in reverse, etc.). Your output should show what methods are being called with what parameters, then show the resulting state after each call. autoType Class Requirements 1. As specified in the lab instructions, variables/objects of the autorype class should store total distance traveled since it was created, the vehicle's fuel amount, and fuel efficiency in miles per gallon. All member variables should be private. 2. Add to the class a member variable for the maximum amount of fuel the vehicle can hold, i.e. the tank capacity. This value can be different for each vehicle/object created but should not change once the object is created. Modify your parameterized constructor to also have the tank size as a parameter (but don't add a parameter for it in setValues). 3. The order of the private members within the constructors and the setvalues method should be consistent, as follows: the odometer reading, the fuel level and the gas efficiency. 4. All methods and constructors should enforce the requirement that a vehicle's fuel level can never exceed its fuel capacity nor ever fall below 0 . Similarly the fuel efficiency should never be less than 1. Finally, it should never be possible to set a vehicle's odometer to a value lower than the current value. 5. Change the behavior of setValues such that, if any one of setvalues's three parameters is invalid, none of the three values get modified. Instead, the method should display an informative message (to cerr instead of cout) stating the invalid value and the range of acceptable values for that parameter, and should leave the object in its current state, i.e. not change anything. In other words, setValues should update all three values or none of them. This kind of behavior is much safer and less likely to leave the object in an inconsistent state than having it use only the correct values and ignoring or attempting to fix the incorrect ones as it does now. 6. The goal of a constructor is to produce an object in an initially consistent state. Therefore your non-default/parameterized constructor should: a) use a suitable default value in place of any/all invalid parameters in order to ensure the constructed object is immediately usable b) display informative cerr error messages similar to those in setvalues and c) state in the error message the default value being used in place of the invalid one. All member variables should be fully initialized in the constructors so that the object is completely ready for use immediately after declaring it. 7. Modify createdash to include the tank size/maximum fuel level for the vehicle. 8. The class should have separate methods to return (not display) the value of the car's current odometer reading, fuel amount, and fuel efficiency, named getodometer, getFuelievel, and getFuelefficiency. 9. There should also be separate set/update methods for the car's current odometer reading, fuel amount, and fuel efficiency, named setodometer, setFuelievel, and setFuelefficiency. You may have setvalues and/or your constructor call these methods if you wish. 10. Our "cars" must be able to fill up at the gas station. Provide a method addFuel that adds an amount to the fuel already in the tank. (Be sure to prevent overfilling the tank!) 11. Include with each method/constructor a comment/documentation block indicating requirements on parameters and other important conditions about the state of the object prior to the call (preconditions). In particular, no automobile should ever have negative odometer, fuel level, or efficiency values, and its odometer should never be set to a value smaller than its current value. Cars with no fuel should not be able to drive any distance. If a car has less fuel than needed to drive a specified distance, drive it as far as it can travel with the fuel it has, and only increase the odometer by the actual number of miles driven. Don't allow any negative distances to be accepted by the drive function. 12. Test these additional methods and features in your ma in program with both acceptable and unacceptable values. Be sure that the base class is working properly before moving on the derived class. hybridType Class Requirements 1. Starting with the autorype base class above, implement a hybridType derived class that publicly inherits all of autoType's functionality. Your files should be called hybridtype.h and hybridTypeimp.cpp. 2. Add private member variables to the definition of hybridType to store the level of electric battery charge (0100%) and the charge efficiency. Charge efficiency is simply the distance the hybrid can travel on a percentage of charge when using its electric subsystem for propulsion. NOTE: The single odometer or mileage member variable inherited from auto Type will store the total combined distance traveled under both gas and electric power. You don't need a new variable to track the distance traveled under battery power alone. 3. Declare and implement four new member methods in hybridType: a. setchargeLevel which sets the battery's charge percentage to the value passed in as a parameter. b. getchargeIevel which takes no parameters and returns the vehicle's current charge percentage as a number (not a string). c. setChargeEfficiency which sets the distance it can travel, in miles, for each percent of charge. d. getChargeEfficiency which takes no parameters and returns the vehicle's charge efficiency as a number. 4. Add statements to your existing main program to test your work so far. Create an object of type hybridType, e.g., Prius1. Since you haven't yet defined any constructors in your new class the object should be initialized automatically using the compiler-provided (implicit) default constructor that will in turn call autoType's default (no parameter) constructor. Call the createdash method (inherited from autotype) on this object just after creating it to verify the constructor behavior. Call your new set methods that modify the hybrid's charge amount and efficiency. Then call your get methods to verify that the set methods properly updated the hybrid's variables. 5. Compile and run to see the results of your new version. Calls to the method from autotype objects will continue to use the original version defined therein. To compile: g++automain.cppautoTypeImp.cpphybridTypeImp.opp or compile the implementation code to object code first: g++-cautoTypeImp.cpphybridTypeImp.cppg++automain.cppautoTypeImp.ohybridTypeImp.o 6. Next, override (redefine) the createDash method inherited from autoType by redeclaring it in the hybridType class definition. Add a new implementation using the same name/signature: string hybridType: :createdash() const Have the hybrid version of createdash call the base class version using the statement: autoType: : createDash() and append to the returned string the values of the hybrid's member variables. The string string returned by the createDash method should look like: Odometer =201.50miles, Fuel Level =10.31gl1lons,GasEfficiency=29.40mpg Max fuel =18 gallons, Electric battery =984, Charge Efficiency =44.2 mpp 7. Add two constructors to hybridType: an explicit default constructor (taking no parameters) and another that takes values for all six of its member variables (the four inherited plus the two new ones). In the body of the default hybrid constructor set charge level and charge efficiency to initial values of your choosing. For the 6-parameter constructor, have it explicitly call the 4parameter base class constructor using the appropriate parameters and in its body set the new hybrid member variables to the values passed in. The parameter order should be odometer, fuel level, gas efficiency, fuel capacity, charge level, and charge efficiency. Add code to your main function to test your newly created constructors. Display the newly constructed object's values and verify they are correct. 8. Add a bool member variable called electricmode to track whether the car is currently in gas or electric mode at a particular point in time. Set the variable to true for electric mode by default in your constructors. 9. Next we need a drive method for the hybridType! In real life, this would be a complex, iterative process where the engine cycles back and forth between the electric and gas modes, as the battery is recharged and then that charge is used. To simplify things for this program, when a hybrid class object is driven, it will operate in the electric mode as long as the battery has a charge level of at least 20%. The miles driven while in electric mode should be added to the odometer variable in the autoType and the charge on the battery should be reduced according to the chargeEfficiency in the hybrid class. When the battery dips below 20%, the hybrid object should "switch" to gas mode by calling the autoType drive function for the rest of that trip. Gas will then be consumed according to the (gas) fuel efficiency. The odometer and fuellevel will be adjusted as before. Back in the hybridType drive function, the battery will recharge 1% for every 20 miles traveled, up to 100%. Running out a gas is still a possibility, if the battery falls below 20% and the gas is depleted. During a single call to the drive function you might switch from electric to gas mode but you will not return to electric mode. When drive is called again, the mode should switch to electric if the battery is recharged sufficiently. Use the variable electricmode to keep track of the mode (true for electric, false for gas) and to assist you with your coding. 10. Add code in the main program to test the hybrid drive method, clearly labeling each situation. Consider the following 3 cases where each case consists of one call to the drive method: a. The car is driven the total distance in electric mode as the battery does not fall below 20%. b. The car is driven in electric mode until the battery charge decreases sufficiently that it switches to gas mode. You drive until your trip is complete or you run out of gas. You will not switch back to electric mode within a drive. c. The battery charge is below 20% when drive is called so the car is driven the total distance in gas mode. You drive until your trip is complete or you run out of gas. You will not switch back to electric mode within a drive. 11. If you have not already added documentation to your hybridType class files and the main program, be sure to add an opening comment to each one with your name, date, course \& section, file description and instructions on how to compile and execute. Tips for Testing in the Main Function You should have a main program that performs testing. There should be no user interaction in your main function. It should simply be a sequence of predetermined test cases you will run and evaluate based on their output. A good test should clearly display/output to the screen: - what feature/method is being tested and the purpose of the test - the state of the variable/object before the test is run - the specific inputs/settings used in the test - the state of the object at the completion of the test It's useful to have all this information as comments in your code, but the on-screen output of the test should have everything needed to understand and verify the correctness of that test without having to look at the code for clarification. General Instructions and Additional Information: 1. This program is an individual effort event. Please remember that you should not use the code of others. Every keystroke in your program must be your own. You may not collaborate on the details of your solution and may not share or show any of your code with anyone else. You may get help from CS tutors or instructors, especially to diagnose syntax errors. Any help you receive should be clearly cited in your code. 2. Be sure your program includes a comment block at the top of each file that includes your name, the date, and explicitly lists all the features coded. Include at the end of that comment block any notes to me about things you know that don't work or any other relevant information. Any code that doesn't compile, but that you want me to see, should appear commented out. 3. Each method prototype in the header file should have a comment block explaining the return value of the method and changes made to the object. 4. Each method definition in the implementation file should have a comment block explaining the internal behavior of the method. The purpose of these comments is so you understand why you did certain things inside your code, and can help in later debugging. 5. Part of your project grade will be based on style, readability, and documentation. Use indentation, white space, and other stylistic techniques to make your code easier to read. Adhere to the stylistic guidelines discussed in class or described in the textbook. Use single line or multi-line comments in the body of your methods, as appropriate. It's always good to explain your thought process: what seems obvious to you isn't always obvious to someone else reading your code. Use descriptive variable names and, where appropriate, constants. Hand in a hard copy of your UML. Zip together your two . h files, two .cpp implementation files and your main program and submit on Blackboard by the due date. BONUS (+4) : In both createDash functions, create and return an ostreamstring object with appropriate formatting for each numeric value, with output distributed between 2 lines
Step by Step Solution
There are 3 Steps involved in it

Get step-by-step solutions from verified subject matter experts


