Program is in C++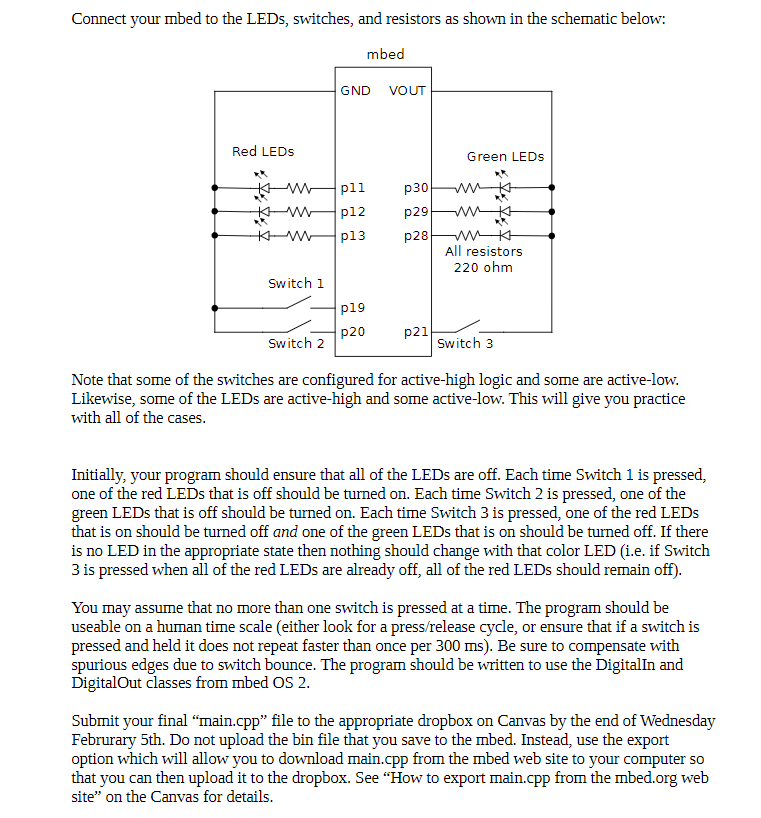
Connect your mbed to the LEDs, switches, and resistors as shown in the schematic below: mbed GND VOUT Red LEDS Green LEDs wp11 p30w W p12 p29 * W- 013 0286 All resistors 220 ohm Switch i p19 P20 p21 Switch 2 Switch 3 Note that some of the switches are configured for active-high logic and some are active-low. Likewise, some of the LEDs are active-high and some active-low. This will give you practice with all of the cases. Initially, your program should ensure that all of the LEDs are off. Each time Switch 1 is pressed, one of the red LEDs that is off should be turned on. Each time Switch 2 is pressed, one of the green LEDs that is off should be turned on. Each time Switch 3 is pressed, one of the red LEDs that is on should be turned off and one of the green LEDs that is on should be turned off. If there is no LED in the appropriate state then nothing should change with that color LED (i.e. if Switch 3 is pressed when all of the red LEDs are already off, all of the red LEDs should remain off). You may assume that no more than one switch is pressed at a time. The program should be useable on a human time scale (either look for a press/release cycle, or ensure that if a switch is pressed and held it does not repeat faster than once per 300 ms). Be sure to compensate with spurious edges due to switch bounce. The program should be written to use the Digitalin and DigitalOut classes from mbed OS 2. Submit your final "main.cpp" file to the appropriate dropbox on Canvas by the end of Wednesday Februrary 5th. Do not upload the bin file that you save to the mbed. Instead, use the export option which will allow you to download main.cpp from the mbed web site to your computer so that you can then upload it to the dropbox. See "How to export main.cpp from the mbed.org web site" on the Canvas for details. Connect your mbed to the LEDs, switches, and resistors as shown in the schematic below: mbed GND VOUT Red LEDS Green LEDs wp11 p30w W p12 p29 * W- 013 0286 All resistors 220 ohm Switch i p19 P20 p21 Switch 2 Switch 3 Note that some of the switches are configured for active-high logic and some are active-low. Likewise, some of the LEDs are active-high and some active-low. This will give you practice with all of the cases. Initially, your program should ensure that all of the LEDs are off. Each time Switch 1 is pressed, one of the red LEDs that is off should be turned on. Each time Switch 2 is pressed, one of the green LEDs that is off should be turned on. Each time Switch 3 is pressed, one of the red LEDs that is on should be turned off and one of the green LEDs that is on should be turned off. If there is no LED in the appropriate state then nothing should change with that color LED (i.e. if Switch 3 is pressed when all of the red LEDs are already off, all of the red LEDs should remain off). You may assume that no more than one switch is pressed at a time. The program should be useable on a human time scale (either look for a press/release cycle, or ensure that if a switch is pressed and held it does not repeat faster than once per 300 ms). Be sure to compensate with spurious edges due to switch bounce. The program should be written to use the Digitalin and DigitalOut classes from mbed OS 2. Submit your final "main.cpp" file to the appropriate dropbox on Canvas by the end of Wednesday Februrary 5th. Do not upload the bin file that you save to the mbed. Instead, use the export option which will allow you to download main.cpp from the mbed web site to your computer so that you can then upload it to the dropbox. See "How to export main.cpp from the mbed.org web site" on the Canvas for details