Project 1D Certification Events
Microsoft Access
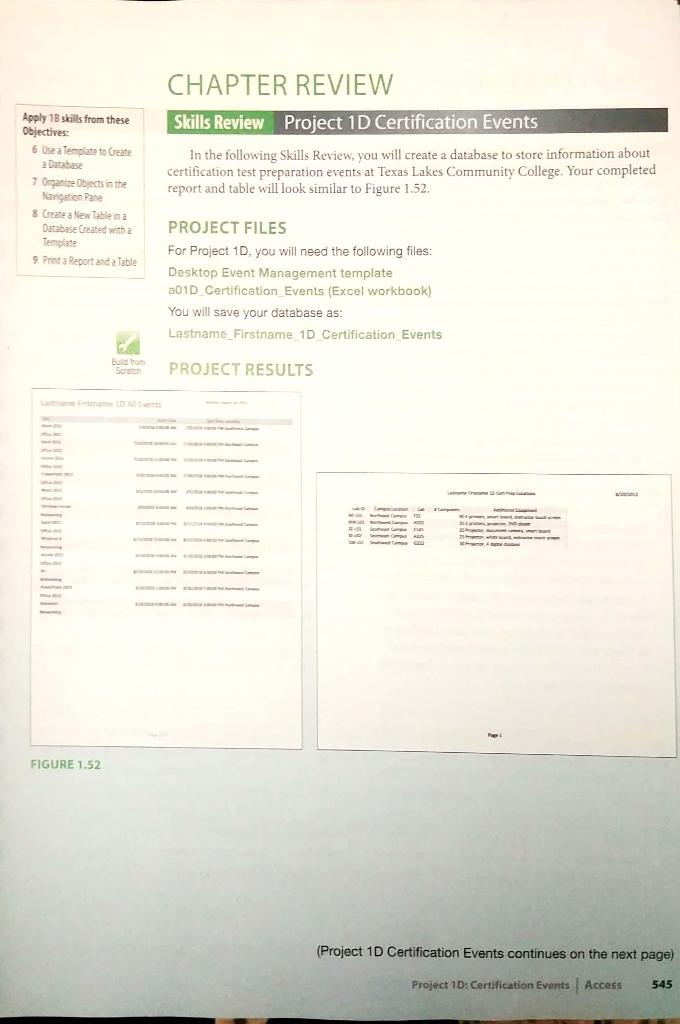
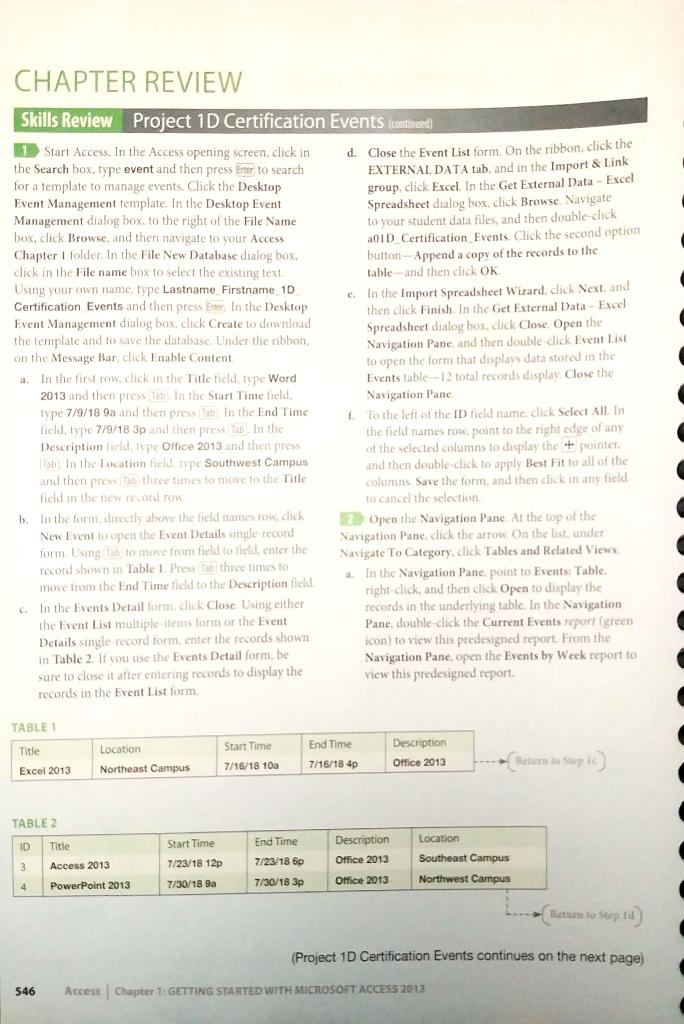
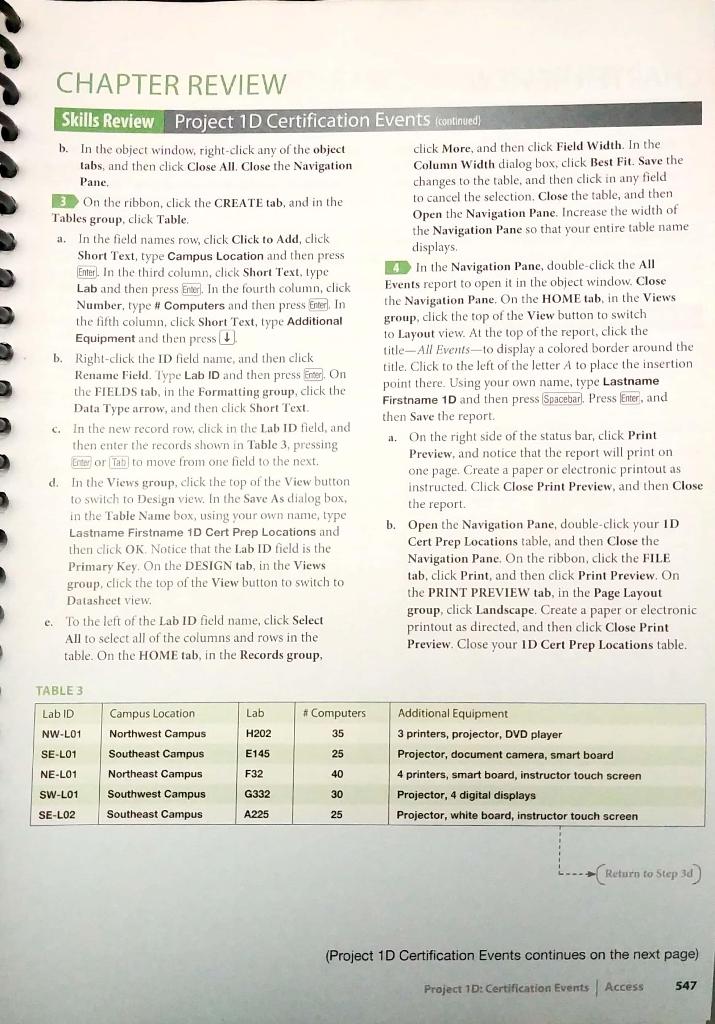

Apply 1B skills from these Objectives: 6 Use a Template 10 Greate a Database 7 Organise Objects in the Navigation Pane 8 Create a New Table in Database Created with a Template 9 Print Report and a Table CHAPTER REVIEW Skills Review Project 1D Certification Events In the following Skills Review, you will create a database to store information about certification test preparation events at Texas Lakes Community College. Your completed report and table will look similar to Figure 1.52. PROJECT FILES For Project 1D, you will need the following files: Desktop Event Management template a01D_Certification Events (Excel workbook) You will save your database as: Lastname_Firstname 1D Certification Events Sort PROJECT RESULTS DIG Week FIGURE 1.52 (Project 1D Certification Events continues on the next page) Project 1D: Certification Events | Access 545 CHAPTER REVIEW Skills Review Project 1D Certification Events (canthared 1 Start Access. In the Access opening screen, click in d. Close the Event List form. On the ribbon, click the the Search box, type event and then press Enter to search EXTERNAL DATA tab, and in the Import & Link for a template to manage events. Click the Desktop group, click Excel. In the Get External Data - Excel Event Management template. In the Desktop Event Spreadsheet dialog box, dick Browse Navigate Management dialog box, to the right of the File Name to your student data files, and then double-click box, click Browse, and then navigate to your Access a0ID Certification Events. Click the second option Chapter 1 folder. In the File New Database dialog box, dick in the File name box to select the existing text button-Append a copy of the records to the table and then click OK Using your own name type Lastname Firstname 10 Certification Events and then press Enter in the Desktop In the Import Spreadsheet Wizard, click Next, and then click Finish. In the Get External Data - Excel Event Management dialog box, click Create to download the template and to save the database. Under the ribbon Spreadsheet dialog box, click Close Open the on the Message Bar, click Enable Content Navigation Pane, and then double dick Event List to open the form that displays data stored in the 4. In the first row, click in the Title held type Word Events table-12 total records display. Close the 2013 and then press in the Start Time field. Navigation Panc type 7/9/18 9a and then press to in the End Time To the left of the ID field name click Select All In field, type 7/9/18 3p and then press Tab. In the the field names row. point to the right edge of any Description field, type Office 2013 and then press of the selected columns to display the pointer ab in the location field type Southwest Campus and then double-click to apply to all of the and then press three times to move to the Title columns. Save the form, and then click in any field field in the new record row to cancel the selection b. In the form directly above the field names row.click 2. Open the Navigation Pane. At the top of the New Livent to open the Event Details single record Navigation Pane, click the arrow. On the list, under form. Using tab to more from field to field, enter the Navigate To Category, click Tables and Related View record shown in Table 1. Press to three times to In the Navigation Pane point to Events Table move from the End Time field to the Description field right-click, and then click Open to display the In the Events Detail form, click Close Using either records in the underlying table. In the Navigation the Event List multiple items form or the Event Pane, double-click the Current Events report (green Details single record form, enter the records shown icon) to view this predesigned report. From the in Table 2. If you use the Events Detail form, be Navigation Pane open the Events by Week report to sure to close it after entering records to display the View this predesigned report. records in the Event List form 1 0 TABLE 1 Title Location Northeast Campus Start Time 7/16/18 100 End Time 7/16/184p Description Office 2013 Excel 2013 TABLE 2 ID Location Title Start Time End Time Description Office 2013 Access 2013 3 7/23/18 6p 7/23/18 12p Southeast Campus Northwest Campus 4 PowerPoint 2013 7/30/18 9a 7/30/18 3p Office 2013 Return to Sold (Project 1D Certification Events continues on the next page) 546 Access Chapter 1: GETTING STARTED WITH MICROSOFT ACCESS 2013 3 CHAPTER REVIEW Skills Review Project 1D Certification Events (continued) b. In the object window, right-click any of the object click More, and then click Field Width. In the tabs, and then click Close All. Close the Navigation Column Width dialog box, click Best Fit. Save the Pane, changes to the table, and then click in any field 3 On the ribbon, click the CREATE tab, and in the to cancel the selection. Close the table, and then Tables group, click Table Open the Navigation Pane. Increase the width of In the field names row, click Click to Add, click the Navigation Pane so that your entire table name Short Text, type Campus Location and then press displays Enter. In the third column, click Short Text, type In the Navigation Pane, double-click the All Lab and then press Enter). In the fourth column, click Events report to open it in the object window. Close Number, type # Computers and then press Enter). In the Navigation Pane. On the HOME tab, in the Views the fifth column, click Short Text, type Additional group, click the top of the View button to switch Equipment and then press to Layout view. At the top of the report, click the b. Right click the ID field name, and then click title- All Events-to display a colored border around the Rename Field. Type Lab ID and then press Enter) On title Click to the left of the letter A to place the insertion the FIELDS tab, in the Formatting group, click the point there. Using your own name, type Lastname Data Type arrow, and then click Short Text Firstname 1D and then press Spacebar). Press Enter, and then Save the report C. In the new record row, click in the Lab ID field, and then enter the records shown in Table 3. pressing a. On the right side of the status bar, click Print Eniten or Tan to move from one field to the next, Preview, and notice that the report will print on one page. Create a paper or electronic printout as d. In the Views group, click the top of the View button instructed. Click Close Print Preview, and then Close to switch to Design view. In the Save As dialog box, in the Table Name box, using your own name, type Lastname Firstname ID Cert Prep Locations and b. Open the Navigation Pane, double-click your ID then click OK. Notice that the Lab ID field is the Cert Prep Locations table, and then Close the Primary key. On the DESIGN tab, in the Views Navigation Pane. On the ribbon, click the FILE group, click the top of the View button to switch to tab, click Print, and then click Print Preview. On Datasheet view. the PRINT PREVIEW tab, in the Page Layout e. To the left of the Lab ID field name, click Select group, click Landscape. Create a paper or electronic All to select all of the columns and rows in the printout as directed, and then click Close Print table. On the HOME tab, in the Records group, Preview. Close your ID Cert Prep Locations table. the report. TABLE 3 Lab #Computers Lab ID NW-L01 SE-LO1 H202 35 E145 25 Campus Location Northwest Campus Southeast Campus Northeast Campus Southwest Campus Southeast Campus Additional Equipment 3 printers, projector, DVD player Projector, document camera, smart board 4 printers, smart board, instructor touch screen Projector, 4 digital displays Projector, white board, instructor touch screen NE-L01 F32 40 G332 30 SW-L01 SE-LO2 A225 25 --- Return to Step 30 (Project 1D Certification Events continues on the next page) Project 1D: Certification Events Access 547 CHAPTER REVIEW Skills Review Project 1D Certification Events (continued) c. Open the Navigation Pane. On the right side of the two objects-one report and one table-that are the title bar, click Close to close the database and to exit results of this project. Specifically, in this project. Access. As directed by your instructor, submit your using your own name, you created the following database and the paper or electronic printouts of the database and printouts or electronic printouts: 1. Lastname_Firstname_1D_Certification_Events 2. Lastname Firstname 1 Cert Prep Locations 3. All Events Database file Table (printout or electronic printout) Report (printout or electronic printout) END | You have completed Project 1D 548 Access Chapter 1: GETTING STARTED WITH MICROSOFT ACCESS 2011 Apply 1B skills from these Objectives: 6 Use a Template 10 Greate a Database 7 Organise Objects in the Navigation Pane 8 Create a New Table in Database Created with a Template 9 Print Report and a Table CHAPTER REVIEW Skills Review Project 1D Certification Events In the following Skills Review, you will create a database to store information about certification test preparation events at Texas Lakes Community College. Your completed report and table will look similar to Figure 1.52. PROJECT FILES For Project 1D, you will need the following files: Desktop Event Management template a01D_Certification Events (Excel workbook) You will save your database as: Lastname_Firstname 1D Certification Events Sort PROJECT RESULTS DIG Week FIGURE 1.52 (Project 1D Certification Events continues on the next page) Project 1D: Certification Events | Access 545 CHAPTER REVIEW Skills Review Project 1D Certification Events (canthared 1 Start Access. In the Access opening screen, click in d. Close the Event List form. On the ribbon, click the the Search box, type event and then press Enter to search EXTERNAL DATA tab, and in the Import & Link for a template to manage events. Click the Desktop group, click Excel. In the Get External Data - Excel Event Management template. In the Desktop Event Spreadsheet dialog box, dick Browse Navigate Management dialog box, to the right of the File Name to your student data files, and then double-click box, click Browse, and then navigate to your Access a0ID Certification Events. Click the second option Chapter 1 folder. In the File New Database dialog box, dick in the File name box to select the existing text button-Append a copy of the records to the table and then click OK Using your own name type Lastname Firstname 10 Certification Events and then press Enter in the Desktop In the Import Spreadsheet Wizard, click Next, and then click Finish. In the Get External Data - Excel Event Management dialog box, click Create to download the template and to save the database. Under the ribbon Spreadsheet dialog box, click Close Open the on the Message Bar, click Enable Content Navigation Pane, and then double dick Event List to open the form that displays data stored in the 4. In the first row, click in the Title held type Word Events table-12 total records display. Close the 2013 and then press in the Start Time field. Navigation Panc type 7/9/18 9a and then press to in the End Time To the left of the ID field name click Select All In field, type 7/9/18 3p and then press Tab. In the the field names row. point to the right edge of any Description field, type Office 2013 and then press of the selected columns to display the pointer ab in the location field type Southwest Campus and then double-click to apply to all of the and then press three times to move to the Title columns. Save the form, and then click in any field field in the new record row to cancel the selection b. In the form directly above the field names row.click 2. Open the Navigation Pane. At the top of the New Livent to open the Event Details single record Navigation Pane, click the arrow. On the list, under form. Using tab to more from field to field, enter the Navigate To Category, click Tables and Related View record shown in Table 1. Press to three times to In the Navigation Pane point to Events Table move from the End Time field to the Description field right-click, and then click Open to display the In the Events Detail form, click Close Using either records in the underlying table. In the Navigation the Event List multiple items form or the Event Pane, double-click the Current Events report (green Details single record form, enter the records shown icon) to view this predesigned report. From the in Table 2. If you use the Events Detail form, be Navigation Pane open the Events by Week report to sure to close it after entering records to display the View this predesigned report. records in the Event List form 1 0 TABLE 1 Title Location Northeast Campus Start Time 7/16/18 100 End Time 7/16/184p Description Office 2013 Excel 2013 TABLE 2 ID Location Title Start Time End Time Description Office 2013 Access 2013 3 7/23/18 6p 7/23/18 12p Southeast Campus Northwest Campus 4 PowerPoint 2013 7/30/18 9a 7/30/18 3p Office 2013 Return to Sold (Project 1D Certification Events continues on the next page) 546 Access Chapter 1: GETTING STARTED WITH MICROSOFT ACCESS 2013 3 CHAPTER REVIEW Skills Review Project 1D Certification Events (continued) b. In the object window, right-click any of the object click More, and then click Field Width. In the tabs, and then click Close All. Close the Navigation Column Width dialog box, click Best Fit. Save the Pane, changes to the table, and then click in any field 3 On the ribbon, click the CREATE tab, and in the to cancel the selection. Close the table, and then Tables group, click Table Open the Navigation Pane. Increase the width of In the field names row, click Click to Add, click the Navigation Pane so that your entire table name Short Text, type Campus Location and then press displays Enter. In the third column, click Short Text, type In the Navigation Pane, double-click the All Lab and then press Enter). In the fourth column, click Events report to open it in the object window. Close Number, type # Computers and then press Enter). In the Navigation Pane. On the HOME tab, in the Views the fifth column, click Short Text, type Additional group, click the top of the View button to switch Equipment and then press to Layout view. At the top of the report, click the b. Right click the ID field name, and then click title- All Events-to display a colored border around the Rename Field. Type Lab ID and then press Enter) On title Click to the left of the letter A to place the insertion the FIELDS tab, in the Formatting group, click the point there. Using your own name, type Lastname Data Type arrow, and then click Short Text Firstname 1D and then press Spacebar). Press Enter, and then Save the report C. In the new record row, click in the Lab ID field, and then enter the records shown in Table 3. pressing a. On the right side of the status bar, click Print Eniten or Tan to move from one field to the next, Preview, and notice that the report will print on one page. Create a paper or electronic printout as d. In the Views group, click the top of the View button instructed. Click Close Print Preview, and then Close to switch to Design view. In the Save As dialog box, in the Table Name box, using your own name, type Lastname Firstname ID Cert Prep Locations and b. Open the Navigation Pane, double-click your ID then click OK. Notice that the Lab ID field is the Cert Prep Locations table, and then Close the Primary key. On the DESIGN tab, in the Views Navigation Pane. On the ribbon, click the FILE group, click the top of the View button to switch to tab, click Print, and then click Print Preview. On Datasheet view. the PRINT PREVIEW tab, in the Page Layout e. To the left of the Lab ID field name, click Select group, click Landscape. Create a paper or electronic All to select all of the columns and rows in the printout as directed, and then click Close Print table. On the HOME tab, in the Records group, Preview. Close your ID Cert Prep Locations table. the report. TABLE 3 Lab #Computers Lab ID NW-L01 SE-LO1 H202 35 E145 25 Campus Location Northwest Campus Southeast Campus Northeast Campus Southwest Campus Southeast Campus Additional Equipment 3 printers, projector, DVD player Projector, document camera, smart board 4 printers, smart board, instructor touch screen Projector, 4 digital displays Projector, white board, instructor touch screen NE-L01 F32 40 G332 30 SW-L01 SE-LO2 A225 25 --- Return to Step 30 (Project 1D Certification Events continues on the next page) Project 1D: Certification Events Access 547 CHAPTER REVIEW Skills Review Project 1D Certification Events (continued) c. Open the Navigation Pane. On the right side of the two objects-one report and one table-that are the title bar, click Close to close the database and to exit results of this project. Specifically, in this project. Access. As directed by your instructor, submit your using your own name, you created the following database and the paper or electronic printouts of the database and printouts or electronic printouts: 1. Lastname_Firstname_1D_Certification_Events 2. Lastname Firstname 1 Cert Prep Locations 3. All Events Database file Table (printout or electronic printout) Report (printout or electronic printout) END | You have completed Project 1D 548 Access Chapter 1: GETTING STARTED WITH MICROSOFT ACCESS 2011