

Question: PYTHON PLEASE NO FOR LOOPS OR LISTS, I included the graphics file referenced at the end of the post. In this programming assignment, you will
PYTHON PLEASE NO FOR LOOPS OR LISTS, I included the graphics file referenced at the end of the post.
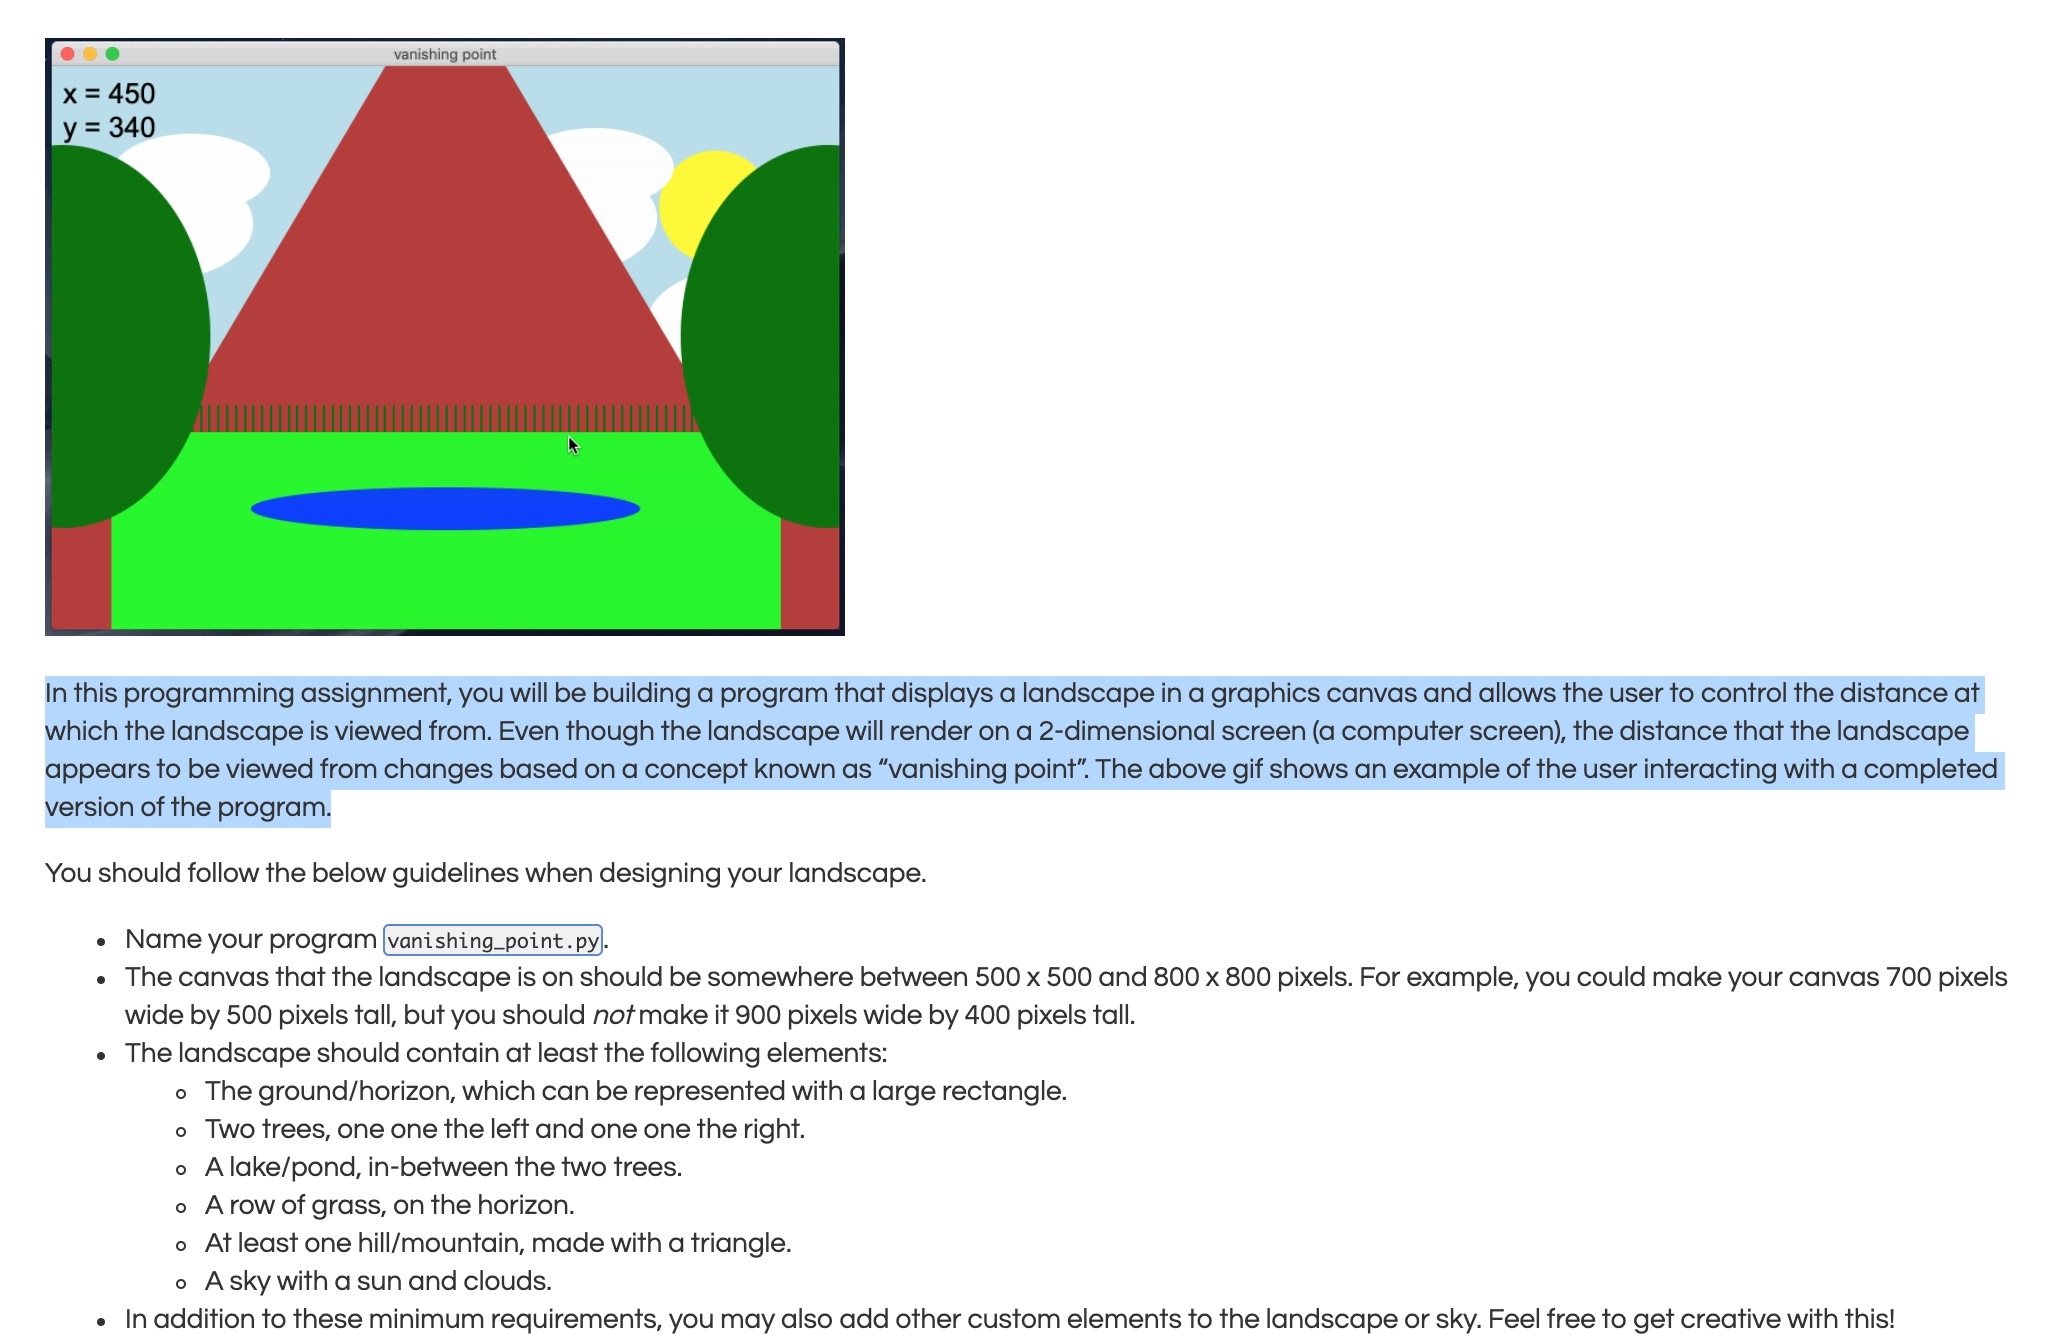
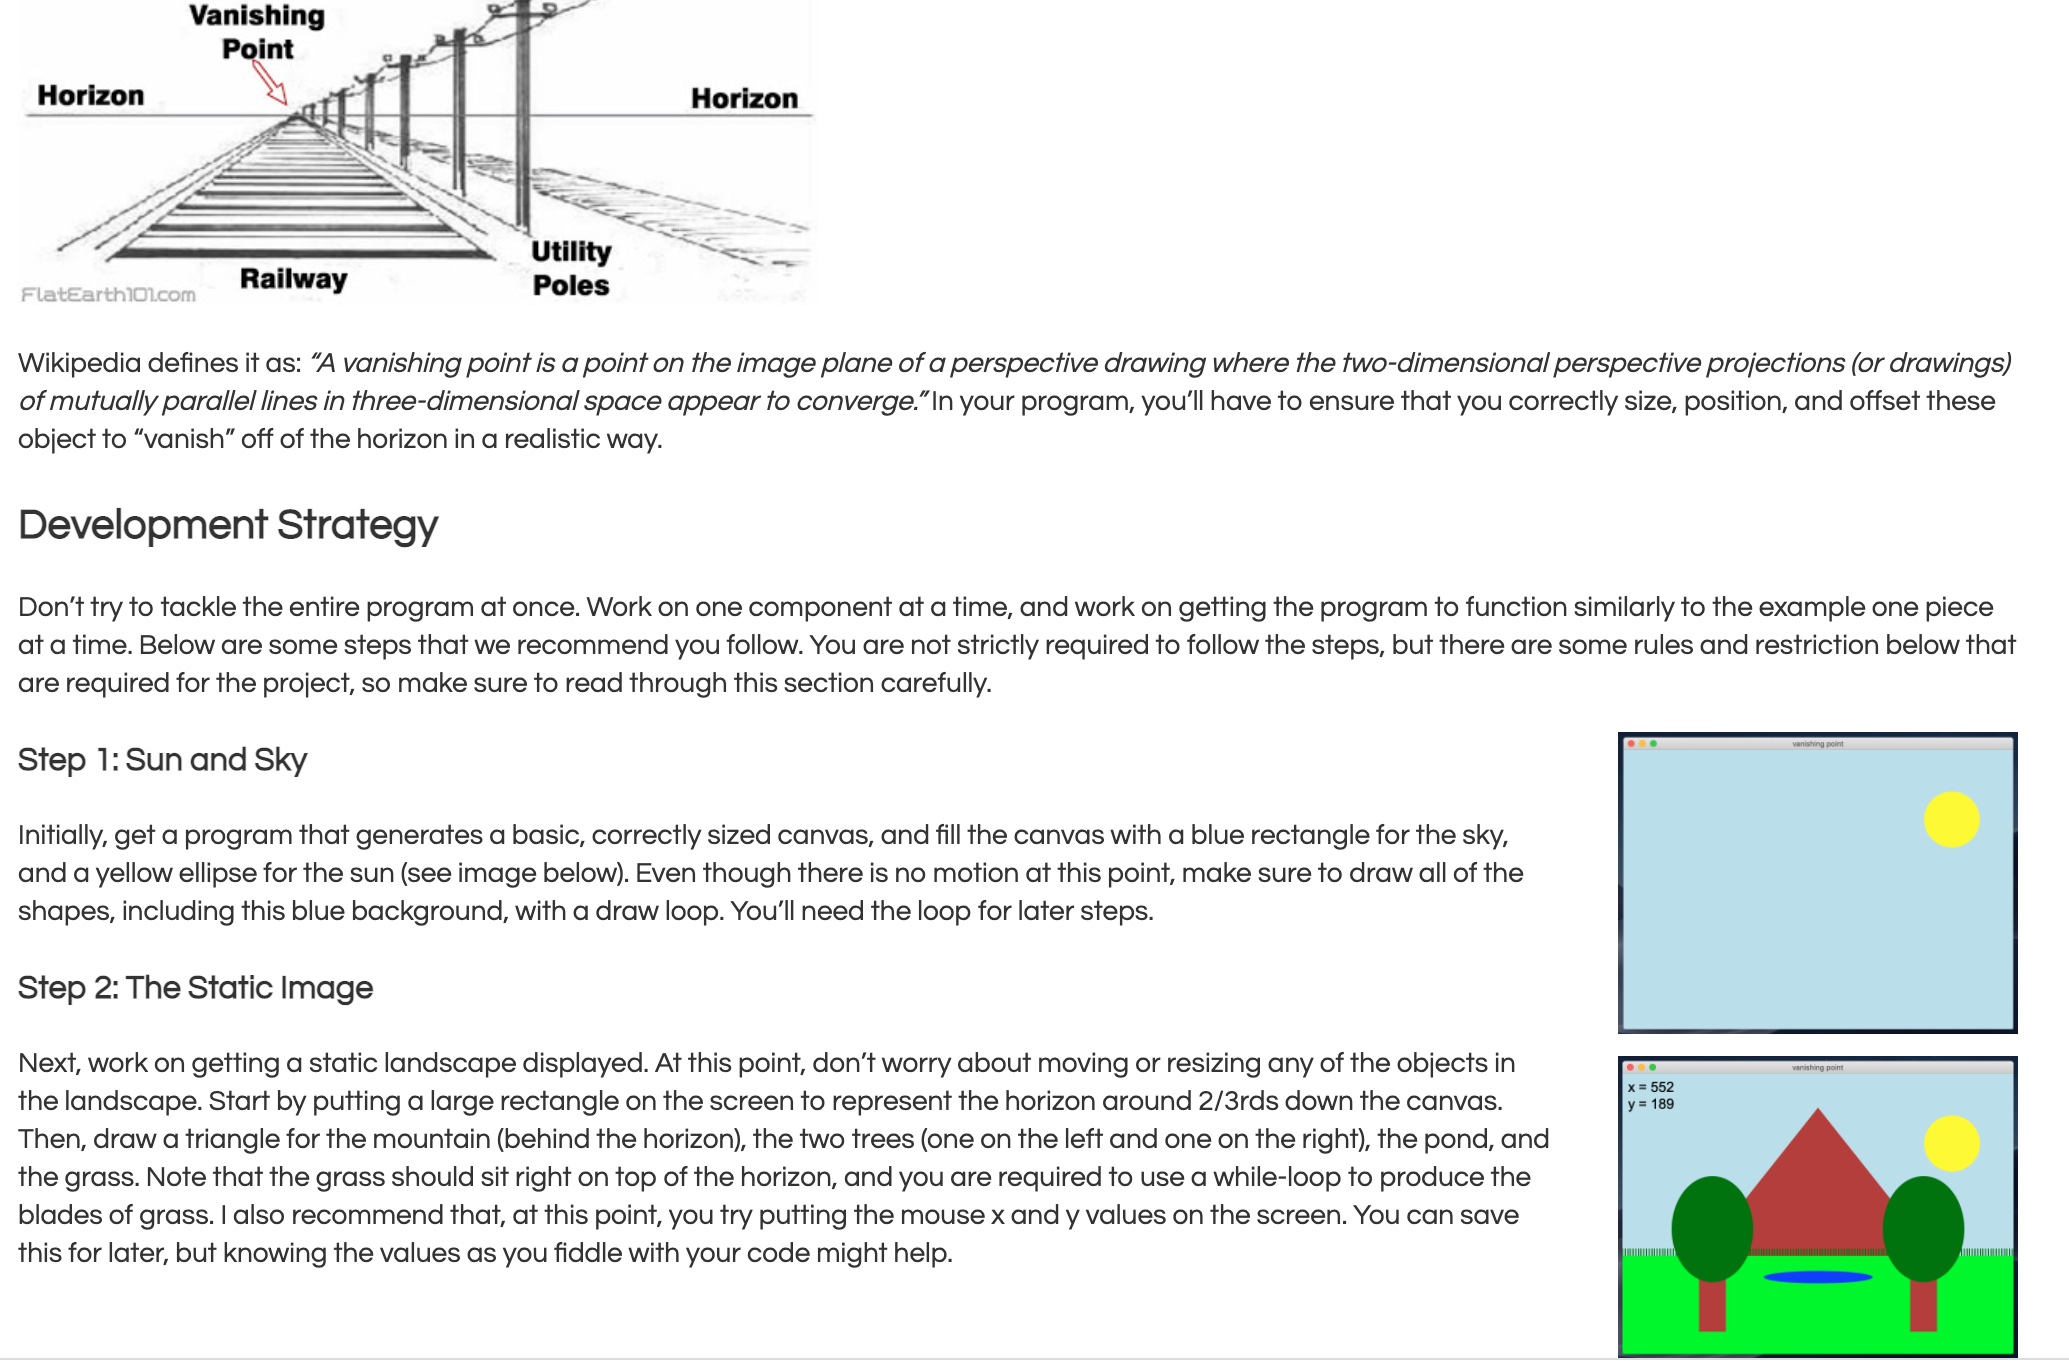
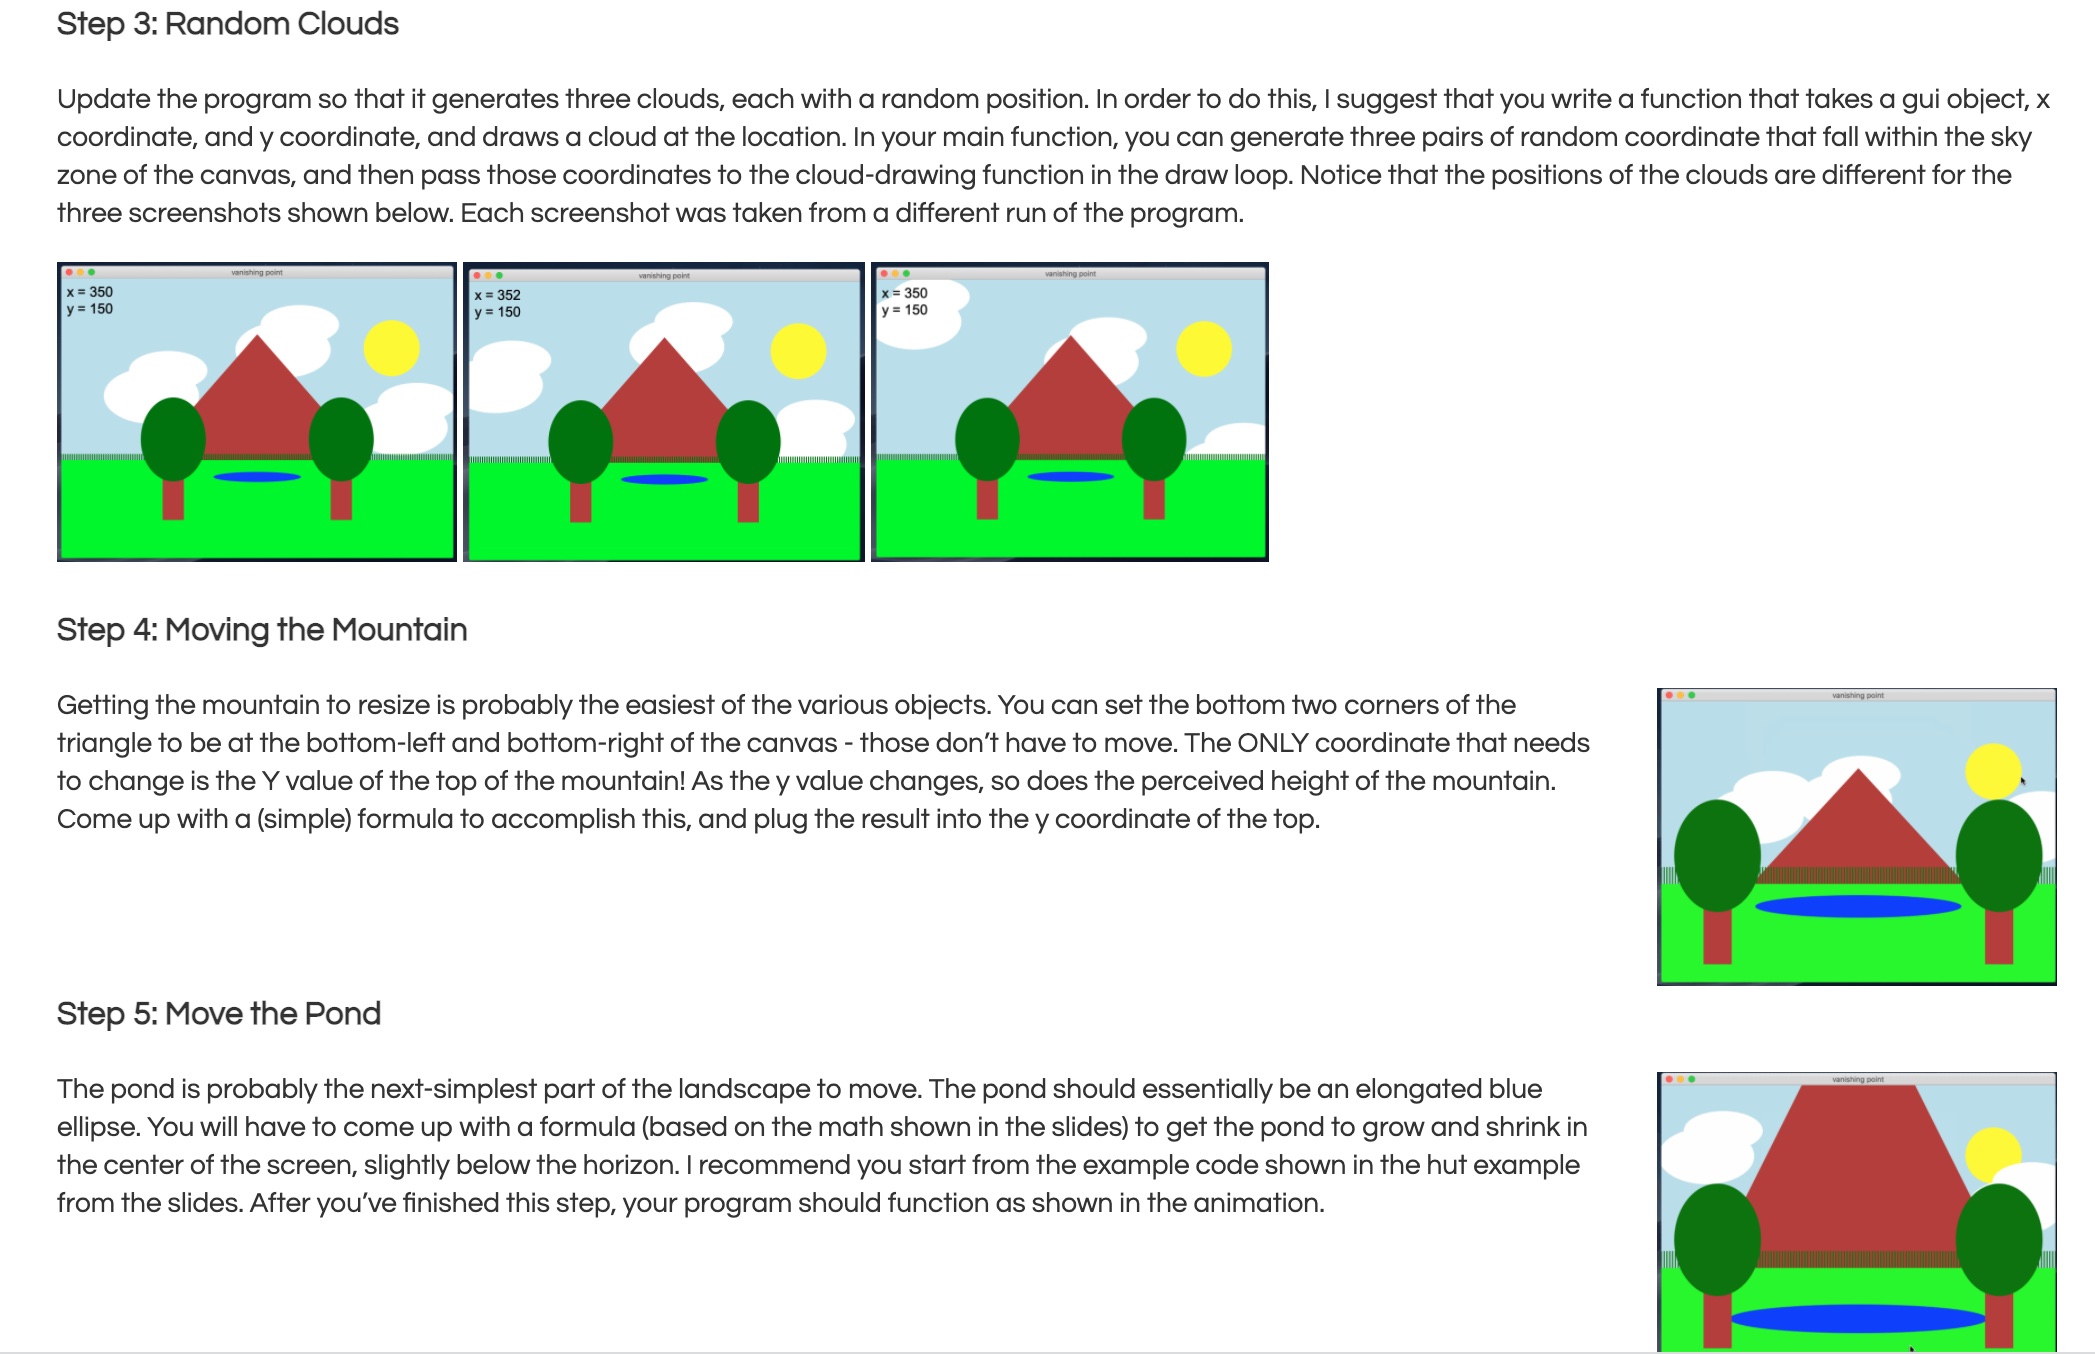
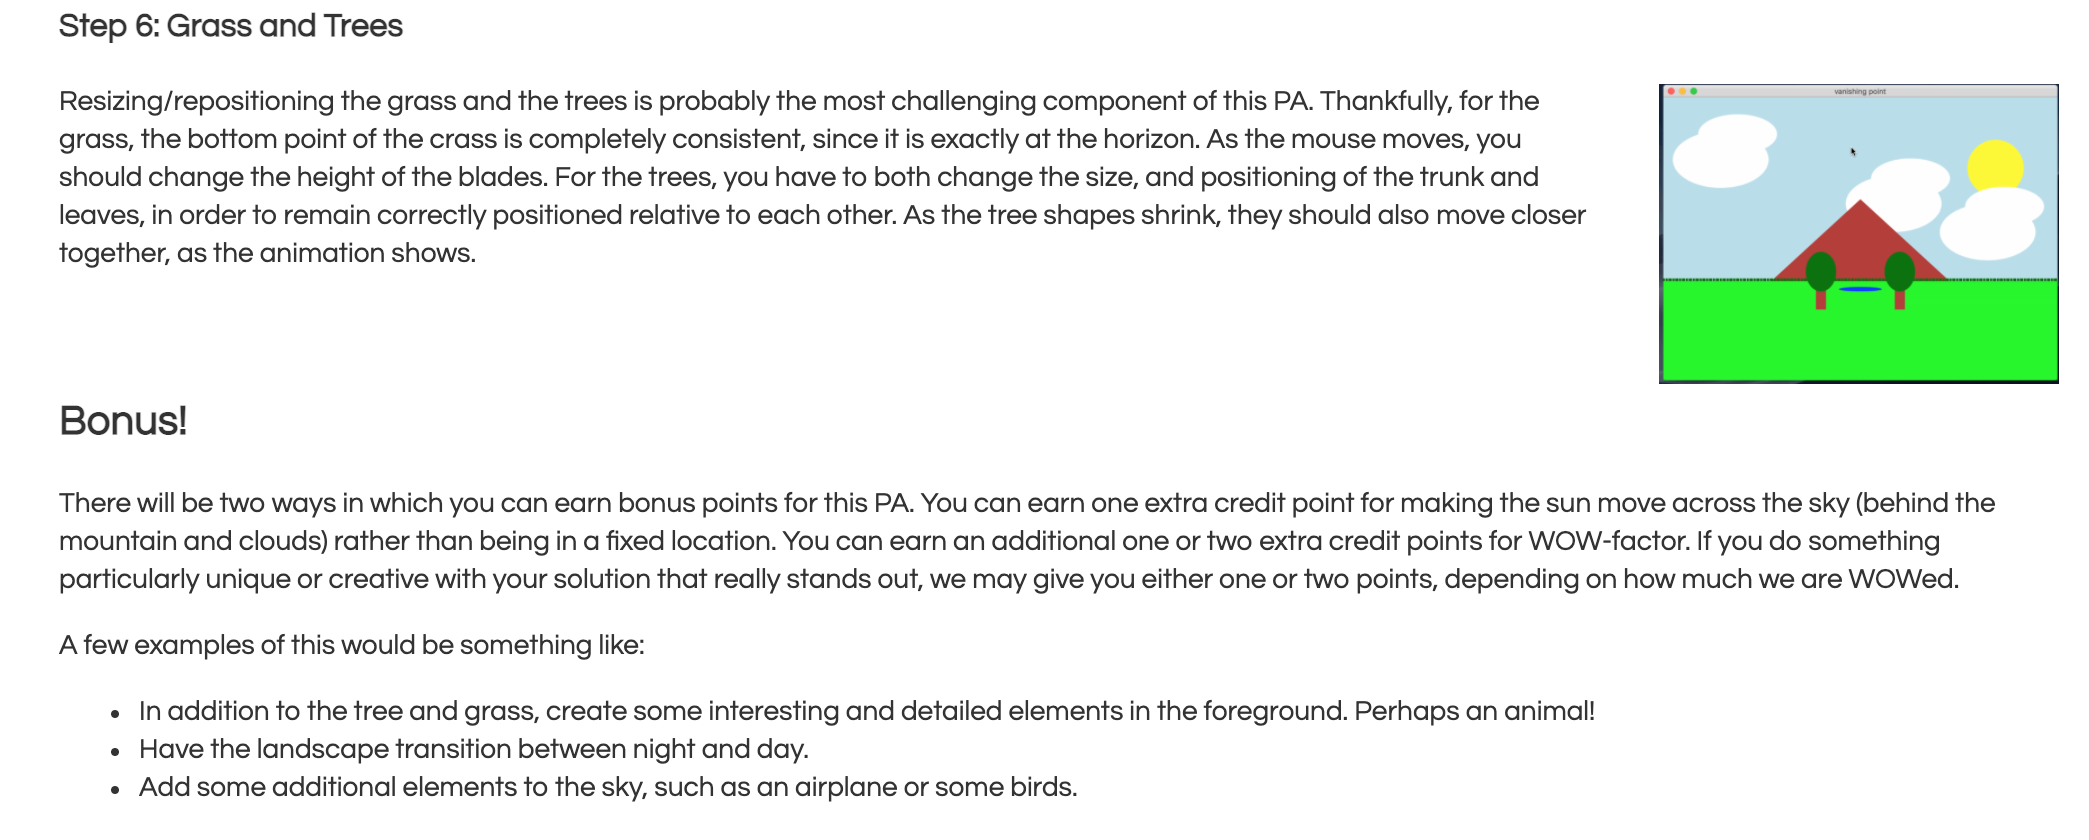
In this programming assignment, you will be building a program that displays a landscape in a graphics canvas and allows the user to control the distance at which the landscape is viewed from. Even though the landscape will render on a 2-dimensional screen (a computer screen), the distance that the landscape appears to be viewed from changes based on a concept known as "vanishing point". The above git shows an example of the user interacting with a completed version of the program. You should follow the below guidelines when designing your landscape. - Nameyour program vanishing_point.py. - The canvas that the landscape is on should be somewhere between 500 x 500 and 800 x 800 pixels. For example, you could make your canvas 700 pixels wide by 500 pixels tall, but you should not make it 900 pixels wide by 400 pixels tall. . The landscape should contain at least the following elements: 0 The ground/horizon, which can be represented with a large rectangle. 0 Two trees, one one the left and one one the right. a A lake/pond, in-between the two trees. 0 A row of grass, on the horizon. 0 At least one hill/mountain, made with a triangle. 0 A sky with a sun and clouds. . In addition to these minimum requirements, you may also add other custom elements to the landscape or sky. Feel free to get creative with this! - The size and position of the trees, pond, grass, and mountain should be adiusted as the mouse is moved. Specically, as the mouse moves up and down (the y axis) the perceived distance that the landscape is viewed from should be changed. You will have to do some math, using the coordinate, to correctly size and position these shapes as the mouse moves. . There should be at least three clouds in the sky, and each cloud should be made up of at least two ellipses. The position of the clouds should be chosen randomly. When the program is stopped and restarted, the position of the clouds should (potentially) change. . You should put the x and y coordinates of the mouse on the screen in the top corner. Having these coordinates on the screen (specically, the y coordinate) can help you determine what the coordinate is at any given time, and might help you think through the math and offsets more clearly as you work to position and size the shapes correctly. All of the graphics should be displayed using the module, available on the class website. Remember to put in the same directory as _. You can refer to the slides from class if you forgot how to work with the module. This program does not take any input values from the command-line, and does not need to print anything on the command-line either. Also, there will be not autograder tests on Gradescope for this. The TAs will grade submissions by trying to run your programs. Thus, you should be careful to make sure your program behaves very similar to the examples that are shown on this spec. Program Structure This program must follow the style guidelines from the class website. You should also structure all of the code into functions. The only code that is allowed to not be in a function are your statements and a call to -. You should create a function for each visual component / category in the program. For example, you might create one function to draw the sky, another function to draw the grass, another for the two trees, etc. I recommend that you put the draw loop in main, and call the other functions from there. Vanishing Point As you can see in the example, the distance of the trees/mountains/pond/grass changes based on the position of the mouse, specically the vertical position. When the mouse moves up the distance increases, and when moves down it decreases. As the obiects move farther and farther away, they eventually reach a point where they (nearly) vanish on the horizon. This is due to how our human visual perception works, and its an idea most of us are very familiar with. obiects appear smaller the farther away they are, and obiects can reach a distance at which they are so far away that they vanish from our perception! This is related to the concept of a vanishing point. The image below gives a visual representation of what a vanishing point is in practice. FlatEarth'lD'lcom a." u" MOI Wikipedia denes it as: '34 vanishing point is a point on the image plane of a perspective drawing where the two-dimensional perspective profections (or drawings) of mufuallyparallel lines in three-dimensional space appear to converge.\"|n your program, you'll have to ensure that you correctly size, position, and offset these obiect to "vanish\" off of the horizon in a realistic way. Development Strategy Don't try to tackle the entire program at once. Work on one component at a time, and work on getting the program to function similarly to the example one piece at a time. Below are some steps that we recommend you follow. You are not strictly required to follow the steps, but there are some rules and restriction below that are required for the proiect, so make sure to read through this section carefully. Step 1: Sun and Sky Initially, get a program that generates a basic, correctly sized canvas, and ll the canvas with a blue rectangle for the sky, and a yellow ellipse for the sun (see image below). Even though there is no motion at this point, make sure to draw all of the shapes, including this blue background, with a draw loop. You'll need the loop for later steps. Step 2: The Static Image Next, work on getting a static landscape displayed. At this point, don't worry about moving or resizing any of the obiects in the landscape. Start by putting a large rectangle on the screen to represent the horizon around 2/3rds down the canvas. Then, draw a triangle for the mountain (behind the horizon), the two trees (one on the left and one on the right), the pond, and the grass. Note that the grass should sit right on top of the horizon, and you are required to use a while-loop to produce the blades of grass. I also recommend that, at this point, you try putting the mouse x and y values on the screen. You can save this for later, but knowing the values as you ddle with your code might help. Step 3: Random Clouds Update the program so that it generates three clouds, each with a random position. In order to do this, | suggest that you write a function that takes a gui obiect, x coordinate, and y coordinate, and draws a cloud at the location. In your main function, you can generate three pairs of random coordinate that fall within the sky zone of the canvas, and then pass those coordinates to the cloud-drawing function in the draw loop. Notice that the positions of the clouds are different for the three screenshots shown below. Each screenshot was taken from a different run of the program. Step 4: Moving the Mountain Getting the mountain to resize is probably the easiest of the various objects. You can set the bottom two corners of the triangle to be at the bottom-left and bottom-right of the canvas - those don't have to move. The ON LY coordinate that needs to change is the Y value of the top of the mountain! As the y value changes, so does the perceived height of the mountain. Come up with a (simple) formula to accomplish this, and plug the result into the y coordinate of the top. Step 5: Move the Pond The pond is probably the next-simplest part of the landscape to move. The pond should essentially be an elongated blue ellipse. You will have to come up with a formula (based on the math shown in the slides) to get the pond to grow and shrink in the center of the screen, slightly below the horizon. I recommend you start from the example code shown in the hut example from the slides. After you've nished this step, your program should function as shown in the animation. Step 6: Grass and Trees Resizing/ repositioning the grass and the trees is probably the most challenging component of this PA. Thankfully, for the grass, the bottom point of the crass is completely consistent, since it is exactly at the horizon. As the mouse moves, you should change the height of the blades. For the trees, you have to both change the size, and positioning of the trunk and leaves, in order to remain correctly positioned relative to each other. As the tree shapes shrink, they should also move closer together, as the animation shows. Bonus! There will be two ways in which you can earn bonus points for this PA. You can earn one extra credit point for making the sun move across the sky (behind the mountain and clouds) rather than being in a xed location. You can earn an additional one or two extra credit points for WOW-factor. If you do something particularly unique or creative with your solution that really stands out, we may give you either one or two points, depending on how much we are WOWed. A few examples of this would be something like: . In addition to the tree and grass, create some interesting and detailed elements in the foreground. Perhaps an animal! . Have the landscape transition between night and day. . Add some additional elements to the sky, such as an airplane or some birds
Step by Step Solution
There are 3 Steps involved in it

Get step-by-step solutions from verified subject matter experts