Q: The student mixed up their observations. After reading the lab determine which observation fits with which part of the procedure and explain why. A complete explanation of why you chose the observation is required for full credit.

THIS IS THE DATA PROVIDED BELOW:
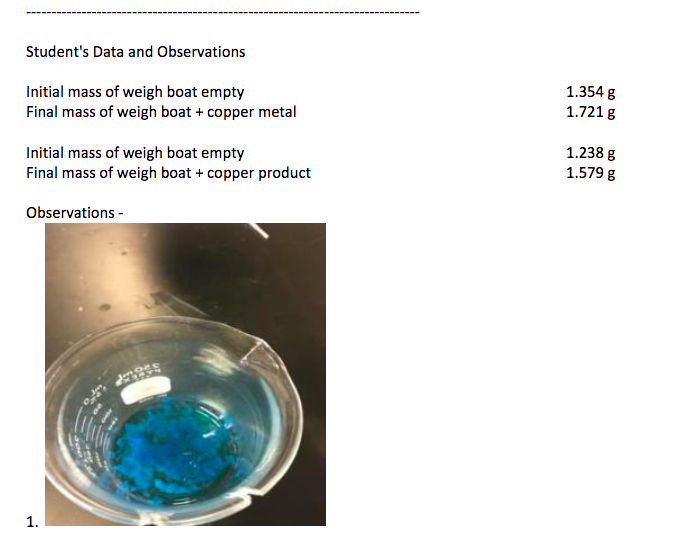
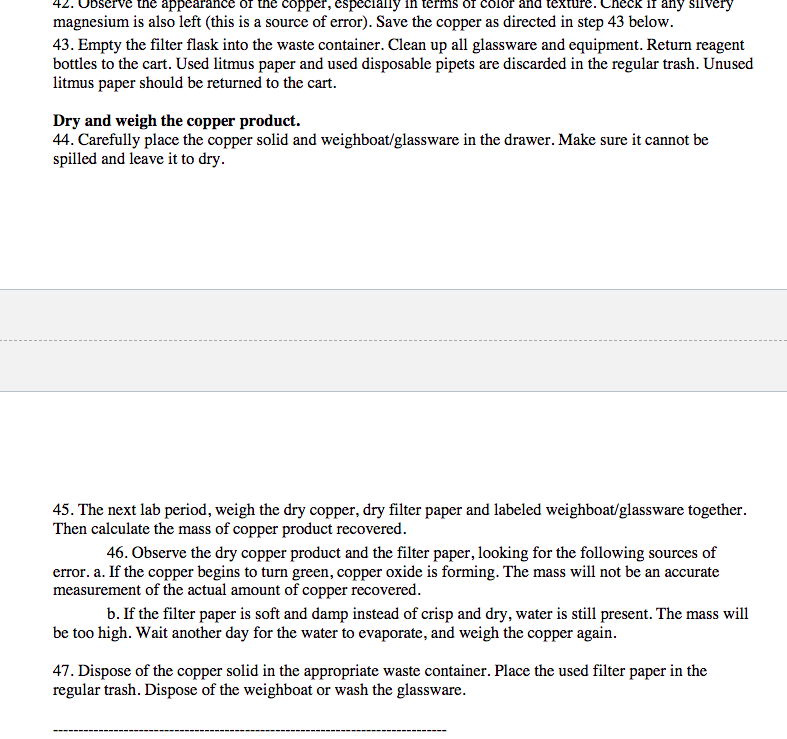
Data is found ABOVE observations:
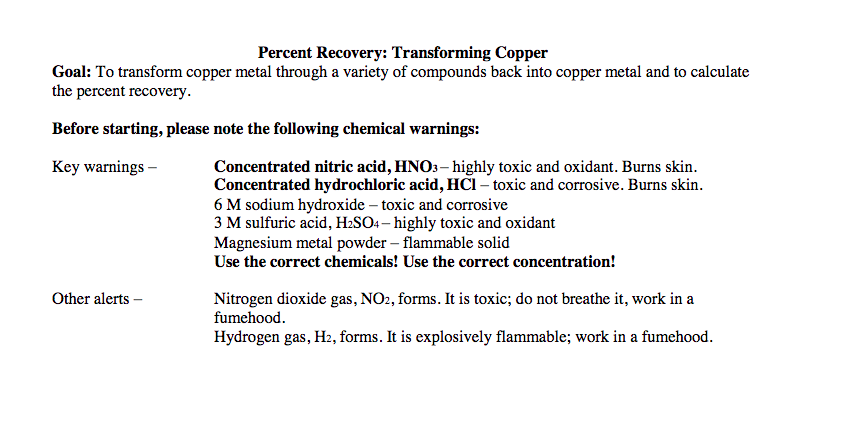
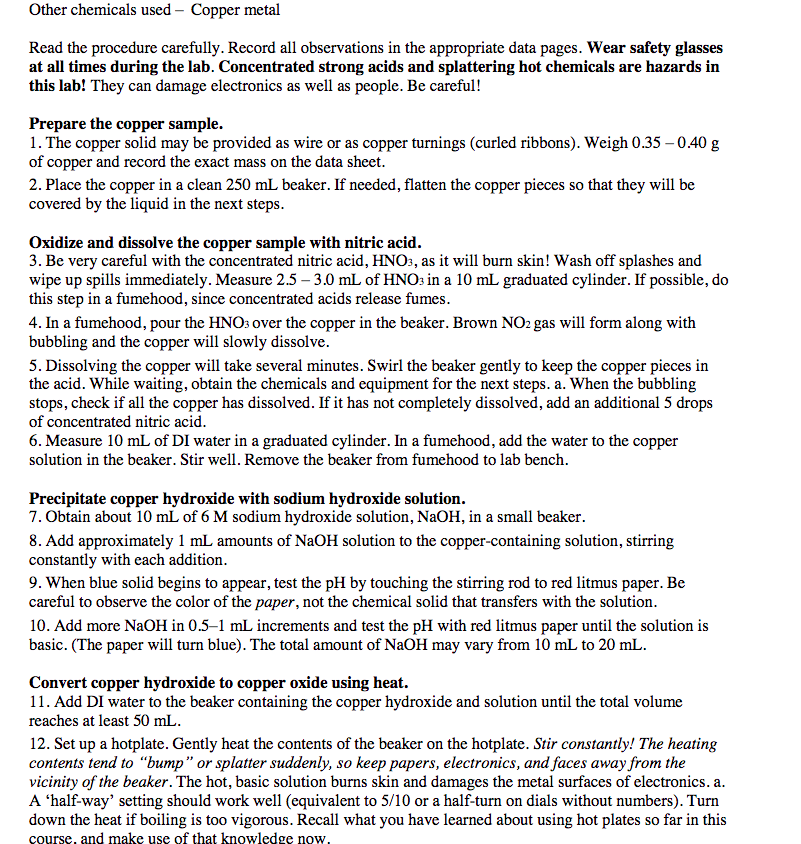
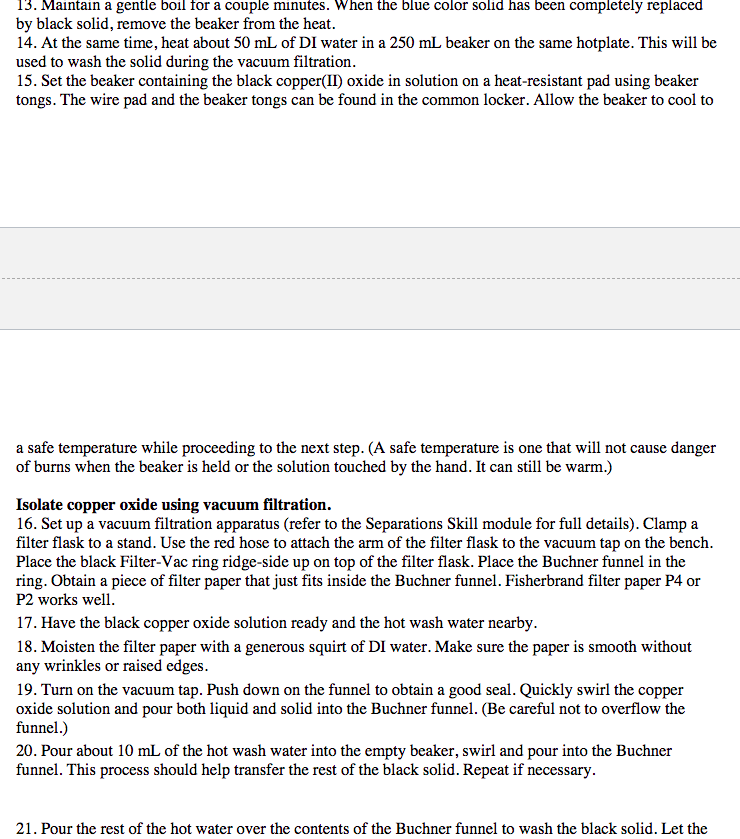
Percent Recovery: Transforming Copper Goal: To transform copper metal through a variety of compounds back into copper metal and to calculate the percent recovery. Before starting, please note the following chemical warnings: Key warnings- Concentrated nitric acid, HNO3 highly toxic and oxidant. Burns skin. Concentrated hydrochloric acid, HCI - toxic and corrosive. Burns skin. 6 M sodium hydroxide - toxic and corrosive 3 M sulfuric acid, H2SO4 - highly toxic and oxidant Magnesium metal powder flammable solid Use the correct chemicals! Use the correct concentration! Nitrogen dioxide gas, NO2, forms. It is toxic; do not breathe it, work in a fumehood. Hydrogen gas, H2, forms. It is explosively flammable; work in a fumehood. Other alerts - Other chemicals used - Copper metal Read the procedure carefully. Record all observations in the appropriate data pages. Wear safety glasses at all times during the lab. Concentrated strong acids and splattering hot chemicals are hazards in this lab! They can damage electronics as well as people. Be careful! Prepare the copper sample. 1. The copper solid may be provided as wire or as copper turnings (curled ribbons). Weigh 0.35 -0.40 g of copper and record the exact mass on the data sheet. 2. Place the copper in a clean 250 mL beaker. If needed, flatten the copper pieces so that they will be covered by the liquid in the next steps. Oxidize and dissolve the copper sample with nitric acid. 3. Be very careful with the concentrated nitric acid, HNO3, as it will burn skin! Wash off splashes and wipe up spills immediately. Measure 2.5 3.0 mL of HNO3 in a 10 mL graduated cylinder. If possible, do this step in a fumehood, since concentrated acids release fumes. 4. In a fumehood, pour the HNO3 over the copper in the beaker. Brown NO2 gas will form along with bubbling and the copper will slowly dissolve. 5. Dissolving the copper will take several minutes. Swirl the beaker gently to keep the copper pieces in the acid. While waiting, obtain the chemicals and equipment for the next steps. a. When the bubbling stops, check if all the copper has dissolved. If it has not completely dissolved, add an additional 5 drops of concentrated nitric acid. 6. Measure 10 mL of DI water in a graduated cylinder. In a fumehood, add the water to the copper solution in the beaker. Stir well. Remove the beaker from fumehood to lab bench. Precipitate copper hydroxide with sodium hydroxide solution. 7. Obtain about 10 mL of 6 M sodium hydroxide solution, NaOH, in a small beaker. 8. Add approximately 1 mL amounts of NaOH solution to the copper-containing solution, stirring constantly with each addition. 9. When blue solid begins to appear, test the pH by touching the stirring rod to red litmus paper. Be careful to observe the color of the paper, not the chemical solid that transfers with the solution. 10. Add more NaOH in 0.5-1 mL increments and test the pH with red litmus paper until the solution is basic. (The paper will turn blue). The total amount of NaOH may vary from 10 mL to 20 mL. Convert copper hydroxide to copper oxide using heat. 11. Add DI water to the beaker containing the copper hydroxide and solution until the total volume reaches at least 50 mL. 12. Set up a hotplate. Gently heat the contents of the beaker on the hotplate. Stir constantly! The heating contents tend to "bump" or splatter suddenly, so keep papers, electronics, and faces away from the vicinity of the beaker. The hot, basic solution burns skin and damages the metal surfaces of electronics.a. A half-way' setting should work well (equivalent to 5/10 or a half-turn on dials without numbers). Turn down the heat if boiling is too vigorous. Recall what you have learned about using hot plates so far in this course, and make use of that knowledge now. 13. Maintain a gentle boil for a couple minutes. When the blue color solid has been completely replaced by black solid, remove the beaker from the heat. 14. At the same time, heat about 50 mL of DI water in a 250 mL beaker on the same hotplate. This will be used to wash the solid during the vacuum filtration. 15. Set the beaker containing the black copper(II) oxide in solution on a heat-resistant pad using beaker tongs. The wire pad and the beaker tongs can be found in the common locker. Allow the beaker to cool to a safe temperature while proceeding to the next step. (A safe temperature is one that will not cause danger of burns when the beaker is held or the solution touched by the hand. It can still be warm.) Isolate copper oxide using vacuum filtration. 16. Set up a vacuum filtration apparatus (refer to the Separations Skill module for full details). Clamp a filter flask to a stand. Use the red hose to attach the arm of the filter flask to the vacuum tap on the bench. Place the black Filter-Vac ring ridge-side up on top of the filter flask. Place the Buchner funnel in the ring. Obtain a piece of filter paper that just fits inside the Buchner funnel. Fisherbrand filter paper P4 or P2 works well. 17. Have the black copper oxide solution ready and the hot wash water nearby. 18. Moisten the filter paper with a generous squirt of DI water. Make sure the paper is smooth without any wrinkles or raised edges. 19. Turn on the vacuum tap. Push down on the funnel to obtain a good seal. Quickly swirl the copper oxide solution and pour both liquid and solid into the Buchner funnel. (Be careful not to overflow the funnel.) 20. Pour about 10 mL of the hot wash water into the empty beaker, swirl and pour into the Buchner funnel. This process should help transfer the rest of the black solid. Repeat if necessary. 21. Pour the rest of the hot water over the contents of the Buchner funnel to wash the black solid. Let the 21. Pour the rest of the hot water over the contents of the Buchner funnel to wash the black solid. Let the vacuum continue to pull for a minute after all the liquid runs through to help dry the solid a little. Turn off the vacuum at the tap. 22. Examine the solution in the filter flask. If it is colorless, proceed to the next step. If it is dark or has many black particles in it, then the filtration failed and should be repeated with a fresh piece of filter paper. Check that the filter paper did not shift, wrinkle or lift up at the edge; this is usually where the problem originates. 23. Remove the Buchner funnel. Empty the filter flask into the waste container. Dissolve copper oxide using sulfuric acid. 24. Use a metal microspatula to lift the filter paper and slide it out of the Buchner funnel into a clean 250 ml beaker. Scrape the edges of the funnel to remove and transfer the maximum amount of black solid. 25. Measure 10 mL of 3 M sulfuric acid, H2SO4, in a clean graduated cylinder. 26. Pour the sulfuric acid over the black solid and filter paper. Swirl gently but be careful not to damage the paper. The black solid should dissolve into blue solution in a couple minutes. 27. When all the solid has dissolved, gently lift the filter paper by grasping the edge with the forceps. Rinse the paper with DI water, allowing the water to drip into the beaker, until all the light blue color is washed off the paper back into the solution. a. After rinsing, the used filter paper is placed in the trash can. 28. Add DI water until the total volume in the beaker is about 30 mL. Reduce the copper(II) cation to copper solid with magnesium metal. 29. Weigh about 0.7 -0.9 g of magnesium powder. 30. Do the following Step 31 and Step 32 in the fumehood. Do not hold the lower part of the beaker - it will get very hot! Do not stir with a glass rod. Instead, grasp the beaker rim with the fingertips and swirl the contents once in a gentle circular motion. Try to keep the new-formed copper in large clumps because this simplifies the vacuum filtration and optimizes the final percent recovery. 42. UD terms of CO ve the appearance copper, especially any silvery magnesium is also left (this is a source of error). Save the copper as directed in step 43 below. 43. Empty the filter flask into the waste container. Clean up all glassware and equipment. Return reagent bottles to the cart. Used litmus paper and used disposable pipets are discarded in the regular trash. Unused litmus paper should be returned to the cart. Dry and weigh the copper product. 44. Carefully place the copper solid and weighboat/glassware in the drawer. Make sure it cannot be spilled and leave it to dry. 45. The next lab period, weigh the dry copper, dry filter paper and labeled weighboat glassware together. Then calculate the mass of copper product recovered. 46. Observe the dry copper product and the filter paper, looking for the following sources of error. a. If the copper begins to turn green, copper oxide is forming. The mass will not be an accurate measurement of the actual amount of copper recovered. b. If the filter paper is soft and damp instead of crisp and dry, water is still present. The mass will be too high. Wait another day for the water to evaporate, and weigh the copper again. 47. Dispose of the copper solid in the appropriate waste container. Place the used filter paper in the regular trash. Dispose of the weighboat or wash the glassware. Student's Data and Observations Initial mass of weigh boat empty Final mass of weigh boat + copper metal 1.354 g 1.721 g Initial mass of weigh boat empty Final mass of weigh boat + copper product 1.238 g 1.5798 Observations - lille 1. 2. 3. . 4