Question
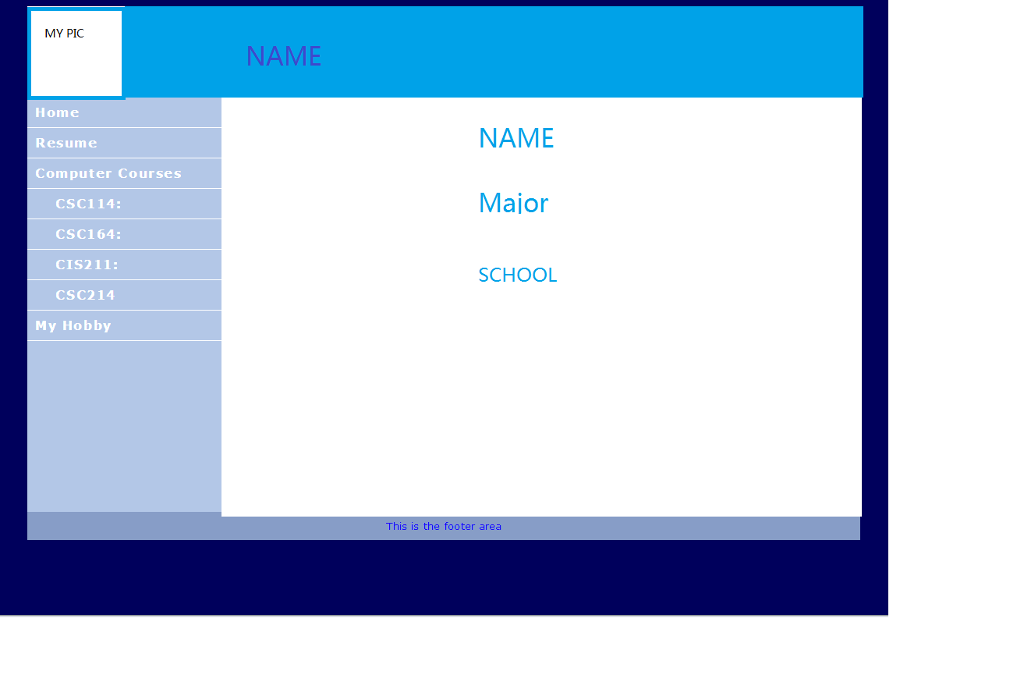
Resources: Index.html has the following structure Please use your own picture instead of mine; Find from the web for the previous and next arrow signs.
Resources:
Index.html has the following structure
Please use your own picture instead of mine;
Find from the web for the previous and next arrow signs.
The complete css file content is attached in the end. (name it navLab.css)
How
Create a folder named navLab;
You are going to do this lab step by step, so under navLab you will create some folders named step1, step2, and step3...etc.
Start with step1, what you need to do are:
i.Display it with proper layout.
ii.Add the header text with your picture.
iii.Think of some navigation list such as Home, My profile, and anything you would like to have it included. Dont forget that you must have a link to this course that would display all assignments for this course.
iv.Add the introductory texts to the main page.
v.Add some meaningful data to the footer area.
vi.Refer to the attached CSS file, only add the needed styles.
vii.In this step, you only need to put things in proper places.
-----------------------------------
The CSS file (Note: not all styles have been used)
* { box-sizing: border-box; }
body { background-color: #00005D; font-family: Verdana, Arial, sans-serif; }
figure { border-style:solid; border-width:2px;}
figcaption {text-align:center; font-family:"Arial Black", Gadget, sans-serif}
#wrapper { margin: 0 auto; width: 95%;
min-width: 960px; max-width: 1600px;
background-color: #B3C7E6; color: #0000ff; }
header { background-color: #869DC7; color: #00005D;
font-size: 120%; padding: 10px 10px 10px 250px;
background-repeat: no-repeat; background-image: url(my.png); }
main { background-color: #ffffff; color: #000000;
padding: 20px 30px;
display: block; overflow: auto; }
footer { font-size: 80%;
text-align: center; padding: 10px;
background-color: #869DC7; clear: both;}
h2 { color: #869DC7; font-family: Arial, sans-serif; }
p { line-height: 1.5em; }
ol {line-height: 1.5em; }
#floatright { float: right; margin: 10px; }
nav { float: left;
width: 250px; font-weight: bold; letter-spacing: 0.1em; }
nav ul { list-style-type: none; margin: 0; padding: 0; }
nav a { text-decoration: none; padding: 10px;
display: block; background-color: #B3C7E6;
border-bottom: 1px solid #FFFFFF; }
nav a:link { color: #FFFFFF; }
nav a:visited { color: #EAEAEA; }
nav a:hover { color: #869DC7;
background-color: #EAEAEA; }
----------------
Example
-----------

MY PIC NAME Home Resume Computer Courses NAME Major CSC114: CSC164: CIS211: CSC214 SCHOOL My Hobby This is the footer area
Step by Step Solution
There are 3 Steps involved in it
Step: 1

Get Instant Access to Expert-Tailored Solutions
See step-by-step solutions with expert insights and AI powered tools for academic success
Step: 2

Step: 3

Ace Your Homework with AI
Get the answers you need in no time with our AI-driven, step-by-step assistance
Get Started


