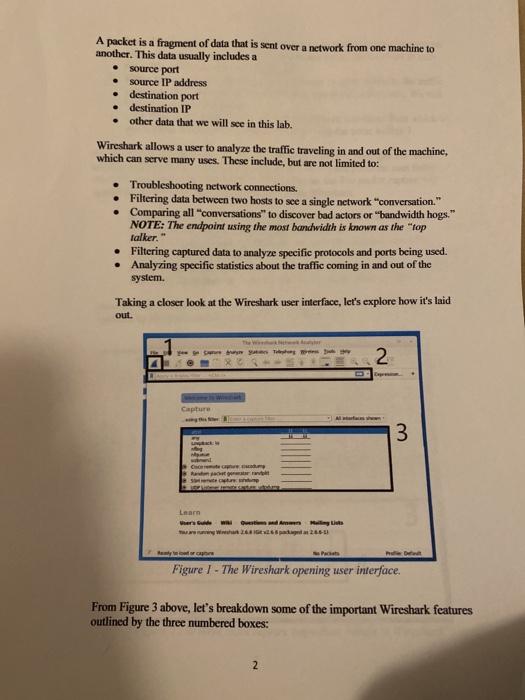
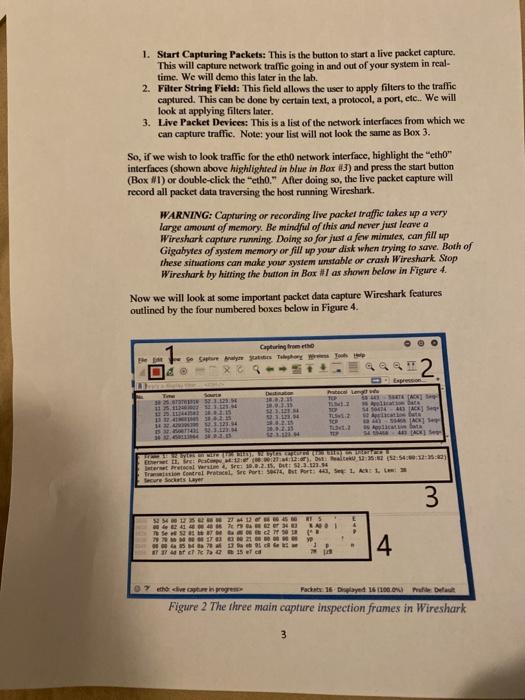
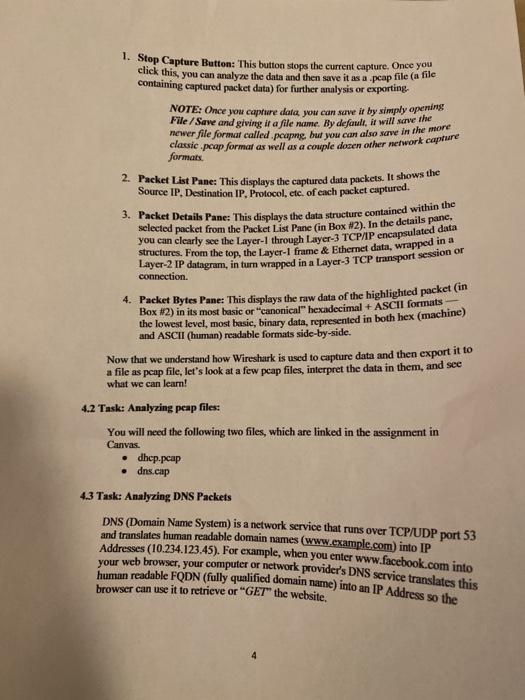
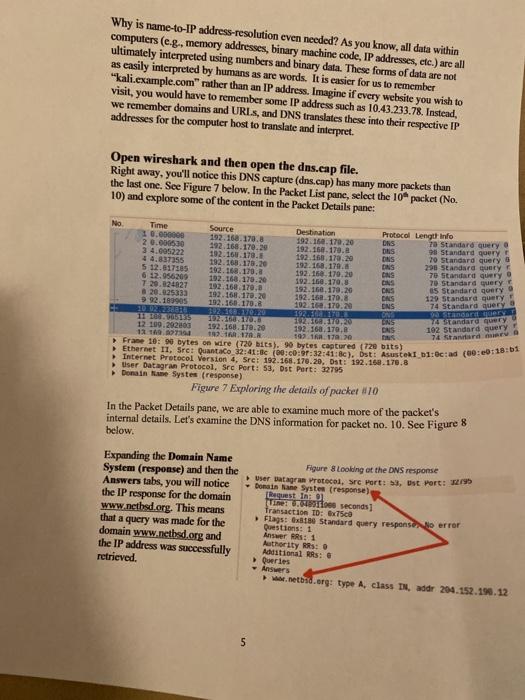
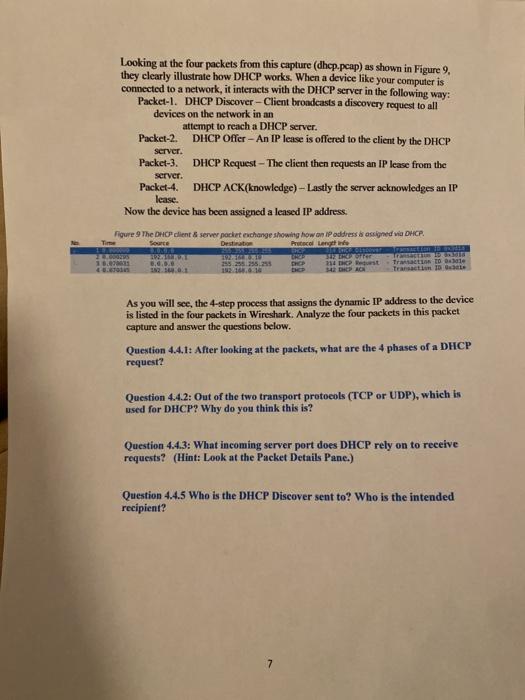
Screen shot of the 4 panes you see when you run the dns.cap file in Wireshark. Question 4.3.1: In Packet No. 28, what is the Source Port of the UDP data? (Hint: What does UDP stand for?) Question 4.3.2: In Packet No. 5, what URL was queried for DNS information? Question 4.3.3 What port does DNS listen on? Screen shot of the 4 panes you see when you run the dhcp.pcap file in Wireshark. Question 4.4.1: After looking at the packets, what are the 4 phases of a DHCP request? Question 4.4.2: Out of the two transport protocols (TCP or UDP), which is used for DHCP? Why do you think this is? Question 4.4.3: What incoming server port does DHCP rely on to receive requests? (Hint: Look at the Packet Details Pane.) Question 44.5 Who is the DHCP Discover sent to? Who is the intended recipient? 10 point Wireshark Assignment 1. Overview Wireshark is an open source application freely available on the Internet that allows you to capture packets as they appear at the network adaptor card. This means that you will be able to see all header information on the packet from each of the OSI layers. (Normally these headers are stripped off so that the only portion remaining is the data payload.) You will use the software to view complete packets and locate cach layer's header, from the physical layer to the application layer. Doing so will help you to better understand network traffic and identify things that are out of order." In this exercise, the student will Install Wireshark Perform a review a live capture Analyze packet capture files. 2. Resources required For this lab, you will need a single computer with an Internet connection and the Wireshark program installed. 3. Task: Download Wireshark Go to www.wireshark.org and download it to your workstation. Once downloaded, you can install the software and accept all defaults. The program includes a helper program called WinPcap, which will install after Wireshark is installed. Go to the Windows start menu type Wireshark. Right click and select "run as administrator." Wireshark will now open on your desktop. 4. Tasks 4.1 Task: Getting familiar with Wireshark by observing live capture Wireshark is a powerful analysis tool that allows you to not only capture network and device packets, but to analyze them too. A packet is a fragment of data that is sent over a network from one machine to another. This data usually includes a source port source IP address destination port destination IP other data that we will see in this lab. . Wireshark allows a user to analyze the traffic traveling in and out of the machine, which can serve many uses. These include, but are not limited to: Troubleshooting network connections. Filtering data between two hosts to see a single network conversation." Comparing all conversations" to discover bad actors or "bandwidth hogs." NOTE: The endpoint using the most bandwidth is known as the top falker, Filtering captured data to analyze specific protocols and ports being used. Analyzing specific statistics about the traffic coming in and out of the system. Taking a closer look at the Wireshark user interface, let's explore how it's laid out. yan 2 Capture 3 a re When Bundested Figure 1 - The Wireshark opening user interface. From Figure 3 above, let's breakdown some of the important Wireshark features outlined by the three numbered boxes: 2 1. Start Capturing Packets: This is the button to start a live packet capture. This will capture network trallic going in and out of your system in real- time. We will demo this later in the lab. 2. Filter String Field: This field allows the user to apply filters to the traffic captured. This can be done by certain text, a protocol, a port, etc. We will look at applying filters later. 3. Live Packet Devices: This is a list of the network interfaces from which we can capture traffic. Note: your list will not look the same as Box 3. So, if we wish to look traffic for the etho network interface, highlight the "eto" interfaces (shown above highlighted in blue in Box 13) and press the start button (Box 1) or double-click the "etho." After doing so, the live packet capture will record all packet data traversing the host running Wireshark. WARNING: Capturing or recording live packet traffic takes up a very large amount of memory. Be mindful of this and never just leave a Wireshark caprire running Doing so for just a few minutes, can fill up Gigabytes of system memory or fill up your disk when trying to save. Both of these situations can make your system unstable or crash Wireshark Stop Wireshark by hitting the button in Box #I as shown below in Figure 4. Now we will look at some important packet data capture Wireshark features outlined by the four numbered boxes below in Figure 4. 1 Capturing from r Tips X 9412 unson 38 18.01.18 11 11.15 DI 102 HOW 111.14 i wa TLS12 10 . SETEA LACE SAMA Art 202.11 GURU El PC :), NU 15:25 tert metal are 10.0.2.15. Dut 2015 Transmision Control Panel Se Port: 30674, Ost Port 4, S1, A1 > Sects Layer 3 GODERE 4 ATT che diven pre Fack 16 Delayed 1611000W Det Figure 2 The three main capture inspection frames in Wireshark 3 1. Stop Capture Button: This button stops the current capture. Once you click this, you can analyze the data and then save it as a peap file (a file containing captured packet data) for further analysis or exporting. NOTE: Once you capture data you can save ir by simply opening File / Save and giving it a file name. By default, it will serve the newer file format called .pcape but you can also serve in the more classic pcap format as well as a couple dozen other network capture formats 2. Packet List Pane: This displays the captured data packets. It shows the Source IP. Destination IP, Protocol, etc. of each packet captured. 3. Packet Details Pane: This displays the data structure contained within the selected packet from the Packet List Pane (in Box #2). In the details pane. You can clearly see the Layer-1 through Layer-3 TCP/IP encapsulated data structures. From the top, the Layer-1 frame & Ethernet data, wrapped in a Layer-2 IP datagram, in turn wrapped in a Layer-3 TCP transport session or connection. 4. Packet Bytes Pane: This displays the raw data of the highlighted packet (in Box #2) in its most basic or "canonical" hexadecimal + ASCII formats the lowest level, most besie, binary data, represented in both hex (machine) and ASCII (human) readable formats side-by-side. Now that we understand how Wireshark is used to capture data and then export it to a file as peap file, let's look at a few pcap files, interpret the data in them, and see what we can learn! 4.2 Task: Analyzing peap files: You will need the following two files, which are linked in the assignment in Canvas. dhep.pcap dns.cap 4.3 Task: Analyzing DNS Packets DNS (Domain Name System) is a network service that runs over TCP/UDP port 53 and translates human readable domain names (www.example.com) into IP Addresses (10.234.123.45). For example, when you enter www.facebook.com into your web browser, your computer or network provider's DNS service translates this human readable FQDN (fully qualified domain name) into an IP Address so the browser can use it to retrieve or "GET" the website, Why is name-to-IP address-resolution even needed? As you know, all data within computers (e-g.. memory addresses, binary machine code, IP addresses, etc.) are all ultimately interpreted using numbers and binary data. These forms of data are not as easily interpreted by humans as are words. It is easier for us to remember "kali.example.com" rather than an IP address. Imagine if every website you wish to visit, you would have to remember some IP address such as 10.43.233.78. Instead, we remember domains and URLs, and DNS translates these into their respective IP addresses for the computer host to translate and interpret. Open wireshark and then open the dns.cap file. Right away, you'll notice this DNS capture (dns.cap) has many more packets than the last one. See Figure 7 below. In the Packet List pane, select the 10% packet (No. 10) and explore some of the content in the Packet Details pane: 192.168 20.025332 92.181005 DRES No Time Source 1 0.000000 Destination 192.168.170.0 Protocol Length Info 2 0.000530 192.168.170.29 192.168.170.20 DNS 70 Standard query 192.168.178.5 192.168.170. OS 28 Standard query 44.837355 192.168.178.20 192.168.178.20 ONS 20 Standard query 5 12.017185 192.168.170.0 192.168.178. EINS 295 Standard query 6 12.956209 20 ENS 192.168.178.20 70 Standard query 7 20.824027 192.168.170.0 192.168.170.0 70 Standard query us Standard query 192.168.170.24 . 1700 CAS 129 Standard query 192 1170 US BULELE 74 Standard query TOURS 2. ER VERGEERRY 12 109.292800 192.168.17.20 192.168.170.0 74 Harvard query 110129 192.168.170. ONS 1217 102 Standard query 1923 17. 1921 1920 Frane 10: 90 bytes on ware (720 bits). 9 bytes captured (720 bits) 11. 32 D1:0c:ad (60:e0:18:13 Internet Protocol Version 4, Sre: 192.168.170.20, Dst: 192.168.178.8 User Datagram Protocol, Sre Port: 53, Ost Part: 32795 Domain Name Systes (response) Figure 7 Exploring the details of pucket 10 In the Packet Details pane, we are able to examine much more of the packet's internal details. Let's examine the DNS information for packet no. 10. See Figure 8 below. 74 Standard Expanding the Domain Name System (response) and then the Answers tabs, you will notice the IP response for the domain www.nethsd.org. This means that a query was made for the domain www.nethsd.org and the IP address was successfully retrieved. Figure 8 Looking at the DNS response - Domain Name Systes response) User ataran Protocol, Src port: 53 Ust Port: 129 Requestino The seconds transaction ID: 75c0 Flags: x8180 Standard query response error Questions: 1 Answer ARS: 1 Authority : Additional Res: Queries - Answers www.etbad.org: type A class IN, addr 204.152.190.12 5 Question 4.3.1: In Packet No. 28, what is the Source Port of the UDP data? (Hint: What does UDP stand for?) Question 4.3.2: In Packet No. 5, what URL was queried for DNS information? Question 4.3.3 What port does DNS listen on? 4.4 Task: Analyzing DHCP Previously, we discussed what IP addresses are and what role they play in a network. Now we are going to discuss how a device gets configured with an IP address on the network. There are two methods for a system getting an IP address: 1. Statie IPs - Some devices allow you to manually set an IP address in the network settings of the device. This requires a user to log into their device, configure the IP address to match the LAN settings, and save the IP address for future sessions. Static IP addresses are suitable for devices that you want to have constant (unchanging) IP settings such as a printer, a web server, or a file server. Generically speaking, statie IP addresses are mostly used on servers and infrastructure devices that should not (or cannot) change IPs. 2 Dynamic IPs - Devices can also have IPs automatically assigned via DHCP (dynamic host configuration protocol), which automatically assigns IP addresses from dynamic IP address pools, pre-configured by the network administrators to allow devices (mostly human client hosts). DHCP- assigned IPs tend to be less prone to human error as they are automatically assigned when a device connects to a LAN (local area network). DHCP- based IP configurations are much more common on LANs than static IPs, and are used almost exclusively on WiFi networks. Let's take a closer look at what DHCP traffic looks like on a local network. Close down any Wireshark instances. Launch Wireshark and open the dhcp-peap 6 Looking at the four packets from this capture (dhep.pcap) as shown in Figure 9, they clearly illustrate how DHCP works. When a device like your computer is connected to a network, it interacts with the DHCP server in the following way: Packet-1. DHCP Discover - Client broadcasts a discovery request to all devices on the network in an attempt to reach a DHCP server. Packet-2 DHCP Offer - An IP lease is offered to the client by the DHCP server. Packet-3 DHCP Request - The client then requests an IP lease from the server. Packet-4. DHCP ACK(knowledge) - Lastly the server acknowledges an IP lease. Now the device has been assigned a leased IP address. Figure 9 The DHCP client & server pocket exchange showing how on IP address assigned a DHCP. DONALD Time Source Destination Pricel Lang SERIE DHCP 24 st 15. 3.0.0.0 255.255.2552 TITUS Transaction De Transact ID As you will see, the 4-step process that assigns the dynamic IP address to the device is listed in the four packets in Wireshark. Analyze the four packets in this packet capture and answer the questions below. Question 4.4.1: After looking at the packets, what are the 4 phases of a DHCP request? Question 4.4.2: Out of the two transport protocols (TCP or UDP), which is used for DHCP? Why do you think this is? Question 4.4.3: What incoming server port does DHCP rely on to receive requests? (Hint: Look at the Packet Details Pane.) Question 4.4.5 Who is the DHCP Discover sent to? Who is the intended recipient? Screen shot of the 4 panes you see when you run the dns.cap file in Wireshark. Question 4.3.1: In Packet No. 28, what is the Source Port of the UDP data? (Hint: What does UDP stand for?) Question 4.3.2: In Packet No. 5, what URL was queried for DNS information? Question 4.3.3 What port does DNS listen on? Screen shot of the 4 panes you see when you run the dhcp.pcap file in Wireshark. Question 4.4.1: After looking at the packets, what are the 4 phases of a DHCP request? Question 4.4.2: Out of the two transport protocols (TCP or UDP), which is used for DHCP? Why do you think this is? Question 4.4.3: What incoming server port does DHCP rely on to receive requests? (Hint: Look at the Packet Details Pane.) Question 44.5 Who is the DHCP Discover sent to? Who is the intended recipient? 10 point Wireshark Assignment 1. Overview Wireshark is an open source application freely available on the Internet that allows you to capture packets as they appear at the network adaptor card. This means that you will be able to see all header information on the packet from each of the OSI layers. (Normally these headers are stripped off so that the only portion remaining is the data payload.) You will use the software to view complete packets and locate cach layer's header, from the physical layer to the application layer. Doing so will help you to better understand network traffic and identify things that are out of order." In this exercise, the student will Install Wireshark Perform a review a live capture Analyze packet capture files. 2. Resources required For this lab, you will need a single computer with an Internet connection and the Wireshark program installed. 3. Task: Download Wireshark Go to www.wireshark.org and download it to your workstation. Once downloaded, you can install the software and accept all defaults. The program includes a helper program called WinPcap, which will install after Wireshark is installed. Go to the Windows start menu type Wireshark. Right click and select "run as administrator." Wireshark will now open on your desktop. 4. Tasks 4.1 Task: Getting familiar with Wireshark by observing live capture Wireshark is a powerful analysis tool that allows you to not only capture network and device packets, but to analyze them too. A packet is a fragment of data that is sent over a network from one machine to another. This data usually includes a source port source IP address destination port destination IP other data that we will see in this lab. . Wireshark allows a user to analyze the traffic traveling in and out of the machine, which can serve many uses. These include, but are not limited to: Troubleshooting network connections. Filtering data between two hosts to see a single network conversation." Comparing all conversations" to discover bad actors or "bandwidth hogs." NOTE: The endpoint using the most bandwidth is known as the top falker, Filtering captured data to analyze specific protocols and ports being used. Analyzing specific statistics about the traffic coming in and out of the system. Taking a closer look at the Wireshark user interface, let's explore how it's laid out. yan 2 Capture 3 a re When Bundested Figure 1 - The Wireshark opening user interface. From Figure 3 above, let's breakdown some of the important Wireshark features outlined by the three numbered boxes: 2 1. Start Capturing Packets: This is the button to start a live packet capture. This will capture network trallic going in and out of your system in real- time. We will demo this later in the lab. 2. Filter String Field: This field allows the user to apply filters to the traffic captured. This can be done by certain text, a protocol, a port, etc. We will look at applying filters later. 3. Live Packet Devices: This is a list of the network interfaces from which we can capture traffic. Note: your list will not look the same as Box 3. So, if we wish to look traffic for the etho network interface, highlight the "eto" interfaces (shown above highlighted in blue in Box 13) and press the start button (Box 1) or double-click the "etho." After doing so, the live packet capture will record all packet data traversing the host running Wireshark. WARNING: Capturing or recording live packet traffic takes up a very large amount of memory. Be mindful of this and never just leave a Wireshark caprire running Doing so for just a few minutes, can fill up Gigabytes of system memory or fill up your disk when trying to save. Both of these situations can make your system unstable or crash Wireshark Stop Wireshark by hitting the button in Box #I as shown below in Figure 4. Now we will look at some important packet data capture Wireshark features outlined by the four numbered boxes below in Figure 4. 1 Capturing from r Tips X 9412 unson 38 18.01.18 11 11.15 DI 102 HOW 111.14 i wa TLS12 10 . SETEA LACE SAMA Art 202.11 GURU El PC :), NU 15:25 tert metal are 10.0.2.15. Dut 2015 Transmision Control Panel Se Port: 30674, Ost Port 4, S1, A1 > Sects Layer 3 GODERE 4 ATT che diven pre Fack 16 Delayed 1611000W Det Figure 2 The three main capture inspection frames in Wireshark 3 1. Stop Capture Button: This button stops the current capture. Once you click this, you can analyze the data and then save it as a peap file (a file containing captured packet data) for further analysis or exporting. NOTE: Once you capture data you can save ir by simply opening File / Save and giving it a file name. By default, it will serve the newer file format called .pcape but you can also serve in the more classic pcap format as well as a couple dozen other network capture formats 2. Packet List Pane: This displays the captured data packets. It shows the Source IP. Destination IP, Protocol, etc. of each packet captured. 3. Packet Details Pane: This displays the data structure contained within the selected packet from the Packet List Pane (in Box #2). In the details pane. You can clearly see the Layer-1 through Layer-3 TCP/IP encapsulated data structures. From the top, the Layer-1 frame & Ethernet data, wrapped in a Layer-2 IP datagram, in turn wrapped in a Layer-3 TCP transport session or connection. 4. Packet Bytes Pane: This displays the raw data of the highlighted packet (in Box #2) in its most basic or "canonical" hexadecimal + ASCII formats the lowest level, most besie, binary data, represented in both hex (machine) and ASCII (human) readable formats side-by-side. Now that we understand how Wireshark is used to capture data and then export it to a file as peap file, let's look at a few pcap files, interpret the data in them, and see what we can learn! 4.2 Task: Analyzing peap files: You will need the following two files, which are linked in the assignment in Canvas. dhep.pcap dns.cap 4.3 Task: Analyzing DNS Packets DNS (Domain Name System) is a network service that runs over TCP/UDP port 53 and translates human readable domain names (www.example.com) into IP Addresses (10.234.123.45). For example, when you enter www.facebook.com into your web browser, your computer or network provider's DNS service translates this human readable FQDN (fully qualified domain name) into an IP Address so the browser can use it to retrieve or "GET" the website, Why is name-to-IP address-resolution even needed? As you know, all data within computers (e-g.. memory addresses, binary machine code, IP addresses, etc.) are all ultimately interpreted using numbers and binary data. These forms of data are not as easily interpreted by humans as are words. It is easier for us to remember "kali.example.com" rather than an IP address. Imagine if every website you wish to visit, you would have to remember some IP address such as 10.43.233.78. Instead, we remember domains and URLs, and DNS translates these into their respective IP addresses for the computer host to translate and interpret. Open wireshark and then open the dns.cap file. Right away, you'll notice this DNS capture (dns.cap) has many more packets than the last one. See Figure 7 below. In the Packet List pane, select the 10% packet (No. 10) and explore some of the content in the Packet Details pane: 192.168 20.025332 92.181005 DRES No Time Source 1 0.000000 Destination 192.168.170.0 Protocol Length Info 2 0.000530 192.168.170.29 192.168.170.20 DNS 70 Standard query 192.168.178.5 192.168.170. OS 28 Standard query 44.837355 192.168.178.20 192.168.178.20 ONS 20 Standard query 5 12.017185 192.168.170.0 192.168.178. EINS 295 Standard query 6 12.956209 20 ENS 192.168.178.20 70 Standard query 7 20.824027 192.168.170.0 192.168.170.0 70 Standard query us Standard query 192.168.170.24 . 1700 CAS 129 Standard query 192 1170 US BULELE 74 Standard query TOURS 2. ER VERGEERRY 12 109.292800 192.168.17.20 192.168.170.0 74 Harvard query 110129 192.168.170. ONS 1217 102 Standard query 1923 17. 1921 1920 Frane 10: 90 bytes on ware (720 bits). 9 bytes captured (720 bits) 11. 32 D1:0c:ad (60:e0:18:13 Internet Protocol Version 4, Sre: 192.168.170.20, Dst: 192.168.178.8 User Datagram Protocol, Sre Port: 53, Ost Part: 32795 Domain Name Systes (response) Figure 7 Exploring the details of pucket 10 In the Packet Details pane, we are able to examine much more of the packet's internal details. Let's examine the DNS information for packet no. 10. See Figure 8 below. 74 Standard Expanding the Domain Name System (response) and then the Answers tabs, you will notice the IP response for the domain www.nethsd.org. This means that a query was made for the domain www.nethsd.org and the IP address was successfully retrieved. Figure 8 Looking at the DNS response - Domain Name Systes response) User ataran Protocol, Src port: 53 Ust Port: 129 Requestino The seconds transaction ID: 75c0 Flags: x8180 Standard query response error Questions: 1 Answer ARS: 1 Authority : Additional Res: Queries - Answers www.etbad.org: type A class IN, addr 204.152.190.12 5 Question 4.3.1: In Packet No. 28, what is the Source Port of the UDP data? (Hint: What does UDP stand for?) Question 4.3.2: In Packet No. 5, what URL was queried for DNS information? Question 4.3.3 What port does DNS listen on? 4.4 Task: Analyzing DHCP Previously, we discussed what IP addresses are and what role they play in a network. Now we are going to discuss how a device gets configured with an IP address on the network. There are two methods for a system getting an IP address: 1. Statie IPs - Some devices allow you to manually set an IP address in the network settings of the device. This requires a user to log into their device, configure the IP address to match the LAN settings, and save the IP address for future sessions. Static IP addresses are suitable for devices that you want to have constant (unchanging) IP settings such as a printer, a web server, or a file server. Generically speaking, statie IP addresses are mostly used on servers and infrastructure devices that should not (or cannot) change IPs. 2 Dynamic IPs - Devices can also have IPs automatically assigned via DHCP (dynamic host configuration protocol), which automatically assigns IP addresses from dynamic IP address pools, pre-configured by the network administrators to allow devices (mostly human client hosts). DHCP- assigned IPs tend to be less prone to human error as they are automatically assigned when a device connects to a LAN (local area network). DHCP- based IP configurations are much more common on LANs than static IPs, and are used almost exclusively on WiFi networks. Let's take a closer look at what DHCP traffic looks like on a local network. Close down any Wireshark instances. Launch Wireshark and open the dhcp-peap 6 Looking at the four packets from this capture (dhep.pcap) as shown in Figure 9, they clearly illustrate how DHCP works. When a device like your computer is connected to a network, it interacts with the DHCP server in the following way: Packet-1. DHCP Discover - Client broadcasts a discovery request to all devices on the network in an attempt to reach a DHCP server. Packet-2 DHCP Offer - An IP lease is offered to the client by the DHCP server. Packet-3 DHCP Request - The client then requests an IP lease from the server. Packet-4. DHCP ACK(knowledge) - Lastly the server acknowledges an IP lease. Now the device has been assigned a leased IP address. Figure 9 The DHCP client & server pocket exchange showing how on IP address assigned a DHCP. DONALD Time Source Destination Pricel Lang SERIE DHCP 24 st 15. 3.0.0.0 255.255.2552 TITUS Transaction De Transact ID As you will see, the 4-step process that assigns the dynamic IP address to the device is listed in the four packets in Wireshark. Analyze the four packets in this packet capture and answer the questions below. Question 4.4.1: After looking at the packets, what are the 4 phases of a DHCP request? Question 4.4.2: Out of the two transport protocols (TCP or UDP), which is used for DHCP? Why do you think this is? Question 4.4.3: What incoming server port does DHCP rely on to receive requests? (Hint: Look at the Packet Details Pane.) Question 4.4.5 Who is the DHCP Discover sent to? Who is the intended recipient