 Show using openGL
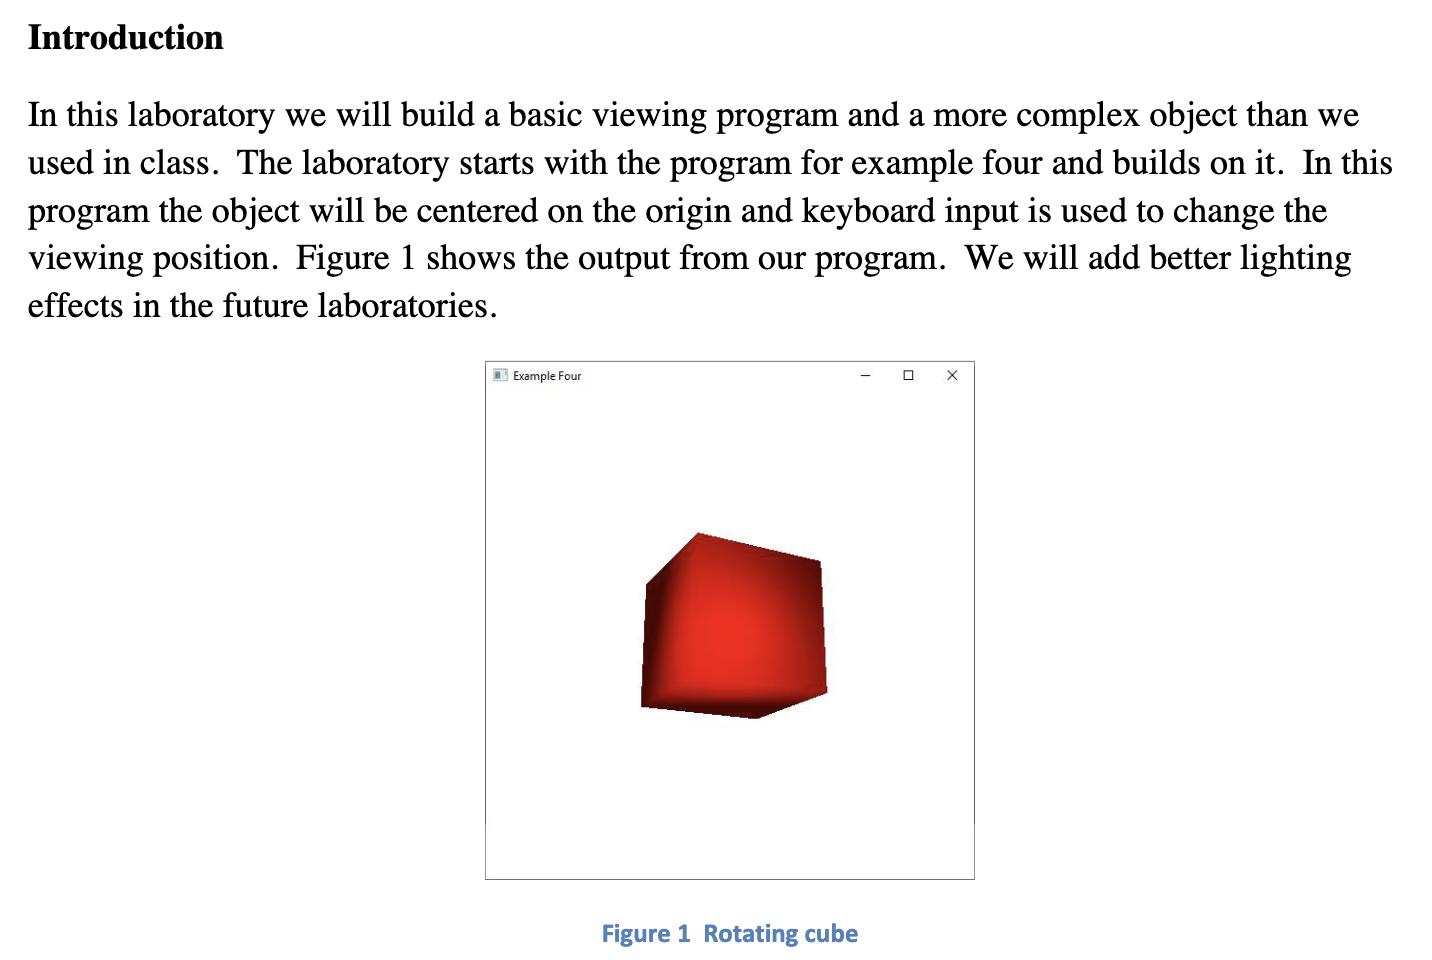
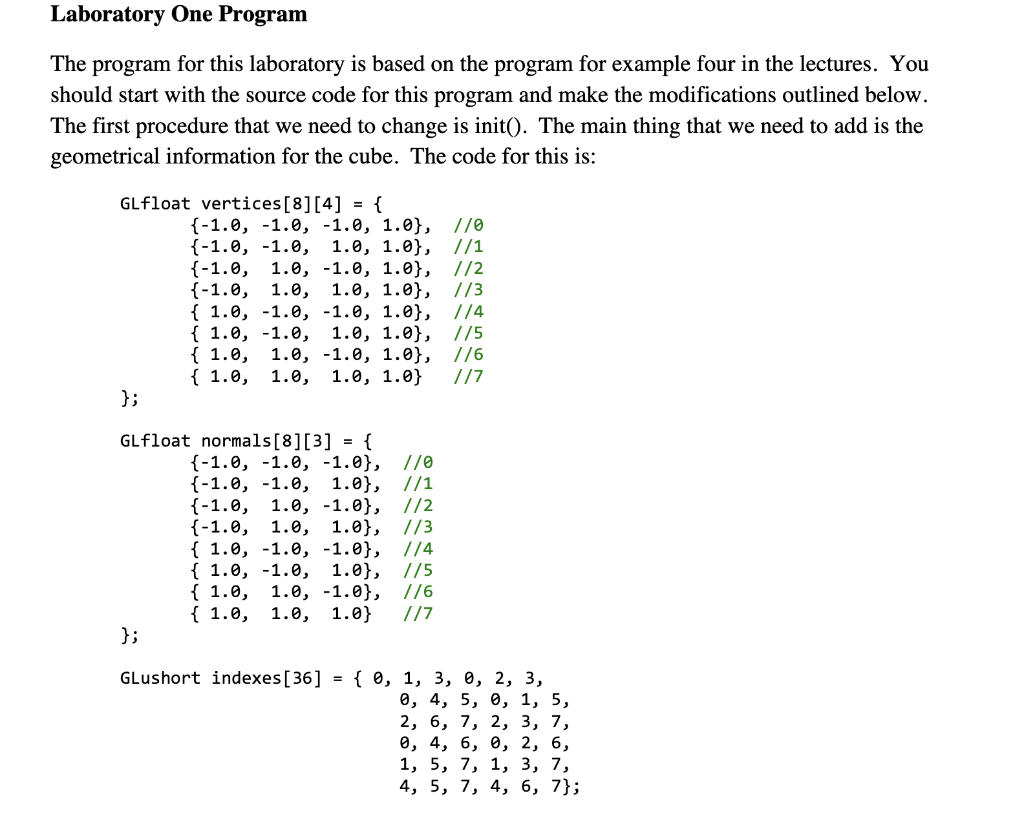
Introduction In this laboratory we will build a basic viewing program and a more complex object than we used in class. The laboratory starts with the program for example four and builds on it. In this program the object will be centered on the origin and keyboard input is used to change the viewing position. Figure 1 shows the output from our program. We will add better lighting effects in the future laboratories. Figure 1 Rotating cube You may have noticed that the example programs from class didn't include any files for OpenGL. There was no gl.h file or something similar to that. Most libraries have explicit include files and OpenGL used this technique in the earlier versions. As early as OpenGL 1.1 it was realized that there needed to be some way of extending OpenGL to support new hardware functionality. The OpenGL standard is designed and approved by a committee, so it doesn't always respond rapidly to hardware advances. Without a way of supporting new hardware OpenGL would die as a standard. The solution to this problem was the introduction of extensions. An extension is a set of constants and procedures that support a new feature or addition to OpenGL. A standard mechanism for retrieving the address of the new procedures from the driver was introduced in OpenGL 1.1 along with a naming convention for extensions. Organizations could request new extension names, which included the name of the company. There are also EXT extensions which are part of the OpenGL standard and ARB extensions that are supported by the OpenGL ARB (the organization that approves OpenGL standards). Over the years some extensions have made it into the core OpenGL standard. At the present time there are now over 700 extensions. Thus, we need a library for managing the extensions, and glew is one of those libraries. As OpenGL evolved it became difficult to keep the gl.h and OpenGL libraries up to date on different platforms. These files were typically owned by the operating system, so they couldn't be updated without cooperation from the OS vendor. As OpenGL started to evolve rapidly this became a major problem. The hardware vendors could release new drivers, but couldn't update gl.h and the OpenGL libraries, so the new features were essentially unavailable to developers. The solution to this problem was to have libraries like glew handle all of the OpenGL declarations. They query the driver to determine the versions of OpenGL that it supports along with the extensions so they can be made available to our program. To use glew in this way all we need to do is include glew.h in our program and make sure we call glewInit() at the right place in our program. Laboratory One Program The program for this laboratory is based on the program for example four in the lectures. You should start with the source code for this program and make the modifications outlined below. The first procedure that we need to change is init(). The main thing that we need to add is the geometrical information for the cube. The code for this is: This replaces the code that we had for the triangle. The vertex and fragment programs for this lab are the same as the ones for example four, so we can leave the code that compiles them. Our vertices now have four components, so we need to modify the call to glVertexAttribPointer in the following way: glVertexAttribPointer(vPosition, 4, GL_FLOAT, GL_FALSE, 0, ); Next we need to make two small changes to the display() procedure. Since we now have a true 3D model we need to use the depth buffer. In the display() procedure we now need to clear the depth buffer each time we draw the object, which is part of our modified call to glClear: glClear(GL_COLOR_BUFFER_BIT | GL_DEPTH_BUFFER_BIT); The second thing we need to do is change the glDrawElements call so it draws the correct number of triangles. The modified statement is: g1DrawElements(GL_TRIANGLES, 36, GL_UNSIGNED_SHORT, NULL); The last thing we need to do is make a few modifications to the main procedure. First, we need to enable the depth buffer using the following statement: glEnable(GL_DEPTH_TEST); I placed this statement just before the call to glClearColor, but it can appear any time after the window has been constructed. Finally, we need to do some initialization for our navigation technique. We need to have three global variables, theta, phi and r of type double. They should be declared at the start of the program. We then need to add the following statements to our main procedure to correctly initialize these variables: eyex=0.0;eyey=10.0eyez=0.0;theta=1.5;phi=1.5r=10.0 These are all the changes that we need to make to our program. Make sure that you have the correct include and library paths for the libraries used in the program. Use the example 4 program as a model for the setting up the include file locations and libraries for your program. Also remember to copy the dll's to the new debug folder