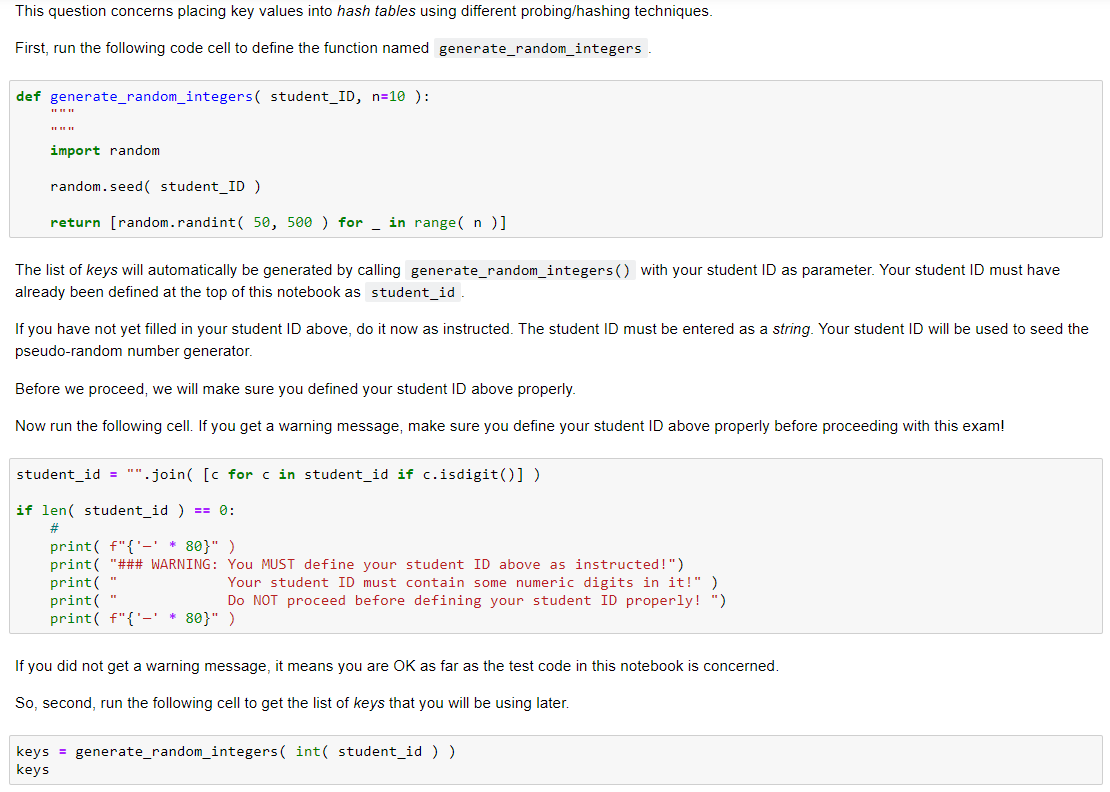

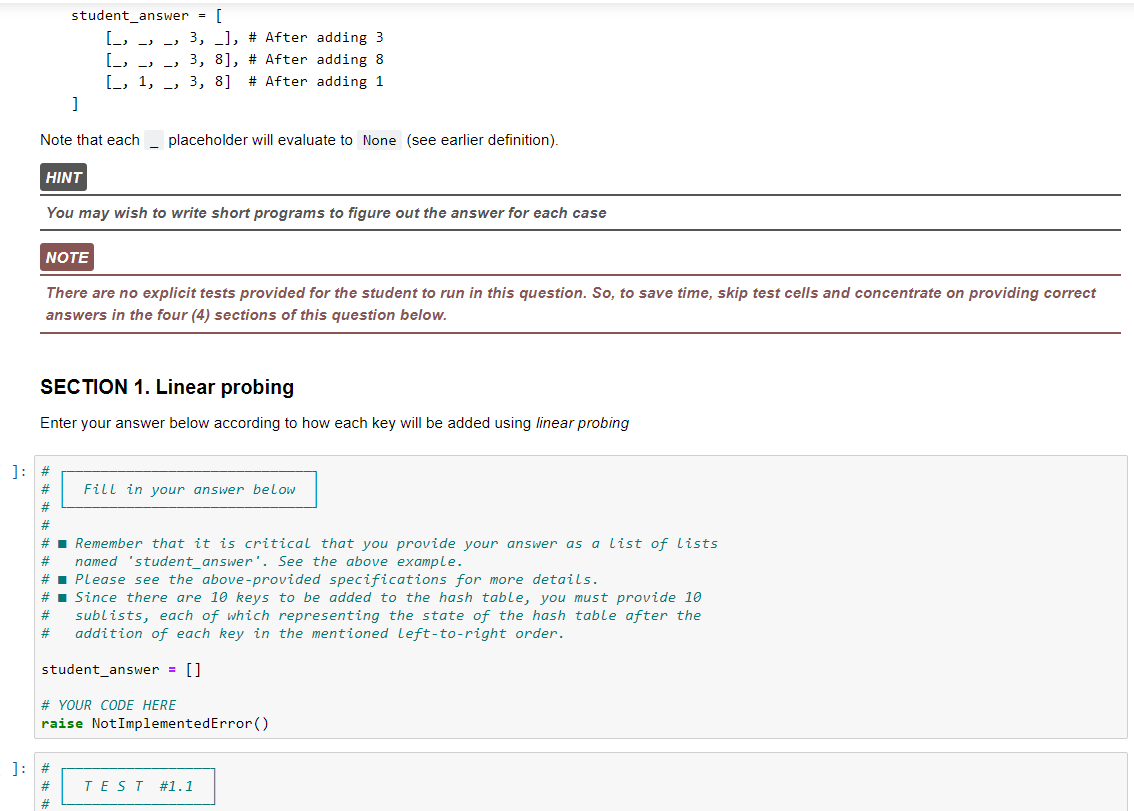
This question concerns placing key values into hash tables using different probing/hashing techniques. First, run the following code cell to define the function named generate_random_integers. def generate_random_integers( student_ID, n=10 ): import random random.seed student_ID ) return [random.randint( 50, 500 ) for in range(n)] The list of keys will automatically be generated by calling generate_random_integers() with your student ID as parameter. Your student ID must have already been defined at the top of this notebook as student_id If you have not yet filled in your student ID above, do it now as instructed. The student ID must be entered as a string. Your student ID will be used to seed the pseudo-random number generator. Before we proceed, we will make sure you defined your student ID above properly. Now run the following cell. If you get a warning message, make sure you define your student ID above properly before proceeding with this exam! student_id = "".join( [c for c in student_id if c.isdigit] ) if len( student_id ) == 0: # print( f"{'-' * 80}" ) print( "### WARNING: You MUST define your student ID above as instructed!") print(" Your student ID must contain some numeric digits in it!" ) print - Do NOT proceed before defining your student ID properly! ") print( f"{'-' * 80}" ) If you did not get a warning message, it means you are OK as far as the test code in this notebook is concerned. So, second, run the following cell to get the list of keys that you will be using later. keys = generate_random_integers( int( student_id ) ) keys Third, use the following parameters until you are instructed otherwise. Now run the following cell to define M and cthe definition for is for convenience. M = 13 P = 8 C = 3 = None Fourth, you will be adding each of the keys in keys into the hash table one by one, from left to right, as we always did in lectures. For each of the following probing/hashing approaches, you will specify a single list of lists named student_answer , in which each sublist will specify the state of the M-long array after adding each key value: Linear probing: new_hash_value = (original_hash_value + i) % M Modified linear probing: new_hash_value = (original_hash_value + i * c) % M Quadratic probing: new_hash_value = (original_hash_value + i**2) % M Double hashing: hp = lambda key: 1 + key % P new_hash_value = (original_hash_value + i * hp( key )) % M The formula for computing the slot index for each approach has been given above. The original hash value, original_hash_value , is computed by the formula key % M For example, say, there are 3 keys, [3, 8, 1] , to be entered with a hash table of size 5 (M=5 ) using linear probing. You can use (or None ) to specify available slots in the hash table, because doing so will be easier visually for you as you create your answer. So, as answer, you may specify: student_answer = [ [_ - - 3, 1, # After adding 3 [_, -, -, 3, 8], # After adding 8 [_, 1, 2, 3, 8] # After adding 1 ] Note that each placeholder will evaluate to None (see earlier definition). HINT You may wish to write short programs to figure out the answer for each case NOTE There are no explicit tests provided for the student to run in this question. So, to save time, skip test cells and concentrate on providing correct answers in the four (4) sections of this question below. SECTION 1. Linear probing Enter your answer below according to how each key will be added using linear probing ]: # # Fill in your answer below # # # # Remember that it is critical that you provide your answer as a list of Lists named 'student_answer'. See the above example. # Please see the above-provided specifications for more details. #. Since there are 10 keys to be added to the hash table, you must provide 10 sublists, each of which representing the state of the hash table after the addition of each key in the mentioned Left-to-right order. # # student answer = [] # YOUR CODE HERE raise Not ImplementedError() ]: # # TEST #1.1 # No explicit tests available for the student to run! # . Please check your work carefully! : # # # # TEST #1.2 # No explicit tests available for the student to run! # Please check your work carefully! # # TEST #1.3 # # No explicit tests available for the student to run! # . Please check your work carefully! # TEST #1.4 # # # No explicit tests available for the student to run! # Please check your work carefully! : # TEST #1.5 # # # # No explicit tests available for the student to run! # . Please check your work carefully! SECTION 2. Modified linear probing Enter your answer below according to how each key will be added using modified linear probing Fill in your answer below # # I Remember that it is critical that you provide your answer as a list of lists named 'student_answer' # Please see the above-provided specifications for more details. # . Since there are 10 keys to be added to the hash table, you must provide 10 sublists, each of which representing the state of the hash table after the addition of each key in the mentioned Left-to-right order. # # student_answer = [] # YOUR CODE HERE raise NotImplementedError() # # TEST #2.1 # # No explicit tests available for the student to run! # Please check your work carefully! # # TEST #2.2 # # # No explicit tests available for the student to run! # Please check your work carefully! # # TEST #2.3 # # # No explicit tests available for the student to run! # Please check your work carefully! # TEST #2.4 # # # # No explicit tests available for the student to run! # Please check your work carefully! # TEST #2.5 # # # No explicit tests available for the student to run! # Please check your work carefully! SECTION 3. Quadratic probing Enter your answer below according to how each key will be added using quadratic probing : # # Fill in your answer below # # Remember that it is critical that you provide your answer as a list of lists named 'student_answer' # . Please see the above-provided specifications for more details. # . Since there are 10 keys to be added to the hash table, you must provide 10 sublists, each of which representing the state of the hash table after the addition of each key in the mentioned Left-to-right order. # # student_answer = [] # YOUR CODE HERE raise Not ImplementedError() # # # TEST #3.1 # # No explicit tests available for the student to run! # Please check your work carefully! : # # TEST #3.2 # # # No explicit tests available for the student to run! # No explicit tests available for the student to run! # Please check your work carefully! 1: # # TEST #3.3 # # No explicit tests available for the student to run! # . Please check your work carefully! 1: # TEST #3.4 # # No explicit tests available for the student to run! # . Please check your work carefully! ]: # # TEST #3.5 # No explicit tests available for the student to run! # Please check your work carefully! SECTION 4. Double hashing Enter your answer below according to how each key will be added using double hashing 1: # Fill in your answer below # # Remember that it is critical that you provide your answer as a list of Lists named 'student_answer' # Please see the above-provided specifications for more details. # Since there are 10 keys to be added to the hash table, you must provide 10 sublists, each of which representing the state of the hash table after the addition of each key in the mentioned Left-to-right order. # # student answer = [] # YOUR CODE HERE raise NotImplementedError() # TEST #4.1 # # # No explicit tests available for the student to run! # Please check your work carefully! 1: # # TEST #4.2 # # # No explicit tests available for the student to run! # . Please check your work carefully! : # # TEST #4.3 # # # No explicit tests available for the student to run! # . Please check your work carefully! : # # TEST #4.4 # # # No explicit tests available for the student to run! # Please check your work carefully! : # # TEST #4.5 # # # No explicit tests available for the student to run! # Please check your work carefully! This question concerns placing key values into hash tables using different probing/hashing techniques. First, run the following code cell to define the function named generate_random_integers. def generate_random_integers( student_ID, n=10 ): import random random.seed student_ID ) return [random.randint( 50, 500 ) for in range(n)] The list of keys will automatically be generated by calling generate_random_integers() with your student ID as parameter. Your student ID must have already been defined at the top of this notebook as student_id If you have not yet filled in your student ID above, do it now as instructed. The student ID must be entered as a string. Your student ID will be used to seed the pseudo-random number generator. Before we proceed, we will make sure you defined your student ID above properly. Now run the following cell. If you get a warning message, make sure you define your student ID above properly before proceeding with this exam! student_id = "".join( [c for c in student_id if c.isdigit] ) if len( student_id ) == 0: # print( f"{'-' * 80}" ) print( "### WARNING: You MUST define your student ID above as instructed!") print(" Your student ID must contain some numeric digits in it!" ) print - Do NOT proceed before defining your student ID properly! ") print( f"{'-' * 80}" ) If you did not get a warning message, it means you are OK as far as the test code in this notebook is concerned. So, second, run the following cell to get the list of keys that you will be using later. keys = generate_random_integers( int( student_id ) ) keys Third, use the following parameters until you are instructed otherwise. Now run the following cell to define M and cthe definition for is for convenience. M = 13 P = 8 C = 3 = None Fourth, you will be adding each of the keys in keys into the hash table one by one, from left to right, as we always did in lectures. For each of the following probing/hashing approaches, you will specify a single list of lists named student_answer , in which each sublist will specify the state of the M-long array after adding each key value: Linear probing: new_hash_value = (original_hash_value + i) % M Modified linear probing: new_hash_value = (original_hash_value + i * c) % M Quadratic probing: new_hash_value = (original_hash_value + i**2) % M Double hashing: hp = lambda key: 1 + key % P new_hash_value = (original_hash_value + i * hp( key )) % M The formula for computing the slot index for each approach has been given above. The original hash value, original_hash_value , is computed by the formula key % M For example, say, there are 3 keys, [3, 8, 1] , to be entered with a hash table of size 5 (M=5 ) using linear probing. You can use (or None ) to specify available slots in the hash table, because doing so will be easier visually for you as you create your answer. So, as answer, you may specify: student_answer = [ [_ - - 3, 1, # After adding 3 [_, -, -, 3, 8], # After adding 8 [_, 1, 2, 3, 8] # After adding 1 ] Note that each placeholder will evaluate to None (see earlier definition). HINT You may wish to write short programs to figure out the answer for each case NOTE There are no explicit tests provided for the student to run in this question. So, to save time, skip test cells and concentrate on providing correct answers in the four (4) sections of this question below. SECTION 1. Linear probing Enter your answer below according to how each key will be added using linear probing ]: # # Fill in your answer below # # # # Remember that it is critical that you provide your answer as a list of Lists named 'student_answer'. See the above example. # Please see the above-provided specifications for more details. #. Since there are 10 keys to be added to the hash table, you must provide 10 sublists, each of which representing the state of the hash table after the addition of each key in the mentioned Left-to-right order. # # student answer = [] # YOUR CODE HERE raise Not ImplementedError() ]: # # TEST #1.1 # No explicit tests available for the student to run! # . Please check your work carefully! : # # # # TEST #1.2 # No explicit tests available for the student to run! # Please check your work carefully! # # TEST #1.3 # # No explicit tests available for the student to run! # . Please check your work carefully! # TEST #1.4 # # # No explicit tests available for the student to run! # Please check your work carefully! : # TEST #1.5 # # # # No explicit tests available for the student to run! # . Please check your work carefully! SECTION 2. Modified linear probing Enter your answer below according to how each key will be added using modified linear probing Fill in your answer below # # I Remember that it is critical that you provide your answer as a list of lists named 'student_answer' # Please see the above-provided specifications for more details. # . Since there are 10 keys to be added to the hash table, you must provide 10 sublists, each of which representing the state of the hash table after the addition of each key in the mentioned Left-to-right order. # # student_answer = [] # YOUR CODE HERE raise NotImplementedError() # # TEST #2.1 # # No explicit tests available for the student to run! # Please check your work carefully! # # TEST #2.2 # # # No explicit tests available for the student to run! # Please check your work carefully! # # TEST #2.3 # # # No explicit tests available for the student to run! # Please check your work carefully! # TEST #2.4 # # # # No explicit tests available for the student to run! # Please check your work carefully! # TEST #2.5 # # # No explicit tests available for the student to run! # Please check your work carefully! SECTION 3. Quadratic probing Enter your answer below according to how each key will be added using quadratic probing : # # Fill in your answer below # # Remember that it is critical that you provide your answer as a list of lists named 'student_answer' # . Please see the above-provided specifications for more details. # . Since there are 10 keys to be added to the hash table, you must provide 10 sublists, each of which representing the state of the hash table after the addition of each key in the mentioned Left-to-right order. # # student_answer = [] # YOUR CODE HERE raise Not ImplementedError() # # # TEST #3.1 # # No explicit tests available for the student to run! # Please check your work carefully! : # # TEST #3.2 # # # No explicit tests available for the student to run! # No explicit tests available for the student to run! # Please check your work carefully! 1: # # TEST #3.3 # # No explicit tests available for the student to run! # . Please check your work carefully! 1: # TEST #3.4 # # No explicit tests available for the student to run! # . Please check your work carefully! ]: # # TEST #3.5 # No explicit tests available for the student to run! # Please check your work carefully! SECTION 4. Double hashing Enter your answer below according to how each key will be added using double hashing 1: # Fill in your answer below # # Remember that it is critical that you provide your answer as a list of Lists named 'student_answer' # Please see the above-provided specifications for more details. # Since there are 10 keys to be added to the hash table, you must provide 10 sublists, each of which representing the state of the hash table after the addition of each key in the mentioned Left-to-right order. # # student answer = [] # YOUR CODE HERE raise NotImplementedError() # TEST #4.1 # # # No explicit tests available for the student to run! # Please check your work carefully! 1: # # TEST #4.2 # # # No explicit tests available for the student to run! # . Please check your work carefully! : # # TEST #4.3 # # # No explicit tests available for the student to run! # . Please check your work carefully! : # # TEST #4.4 # # # No explicit tests available for the student to run! # Please check your work carefully! : # # TEST #4.5 # # # No explicit tests available for the student to run! # Please check your work carefully