

Answered step by step
Verified Expert Solution
Question
1 Approved Answer
Unix Debian yes please provide a detailed doc with screenshots (just how you enter the commands) Instructions Part I: Install and explore vim editor The
Unix Debian
yes please provide a detailed doc with screenshots (just how you enter the commands)
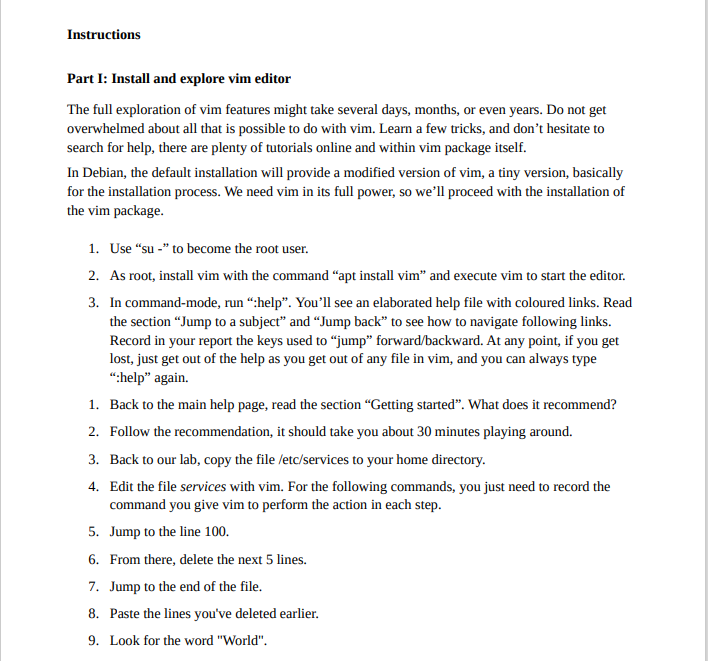
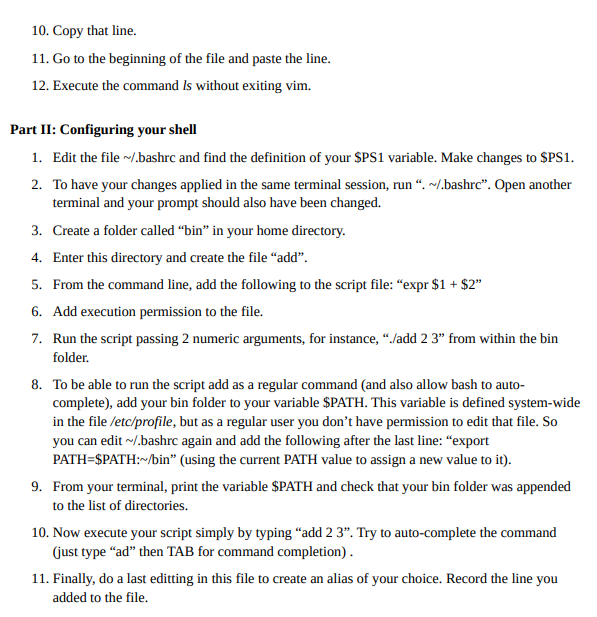
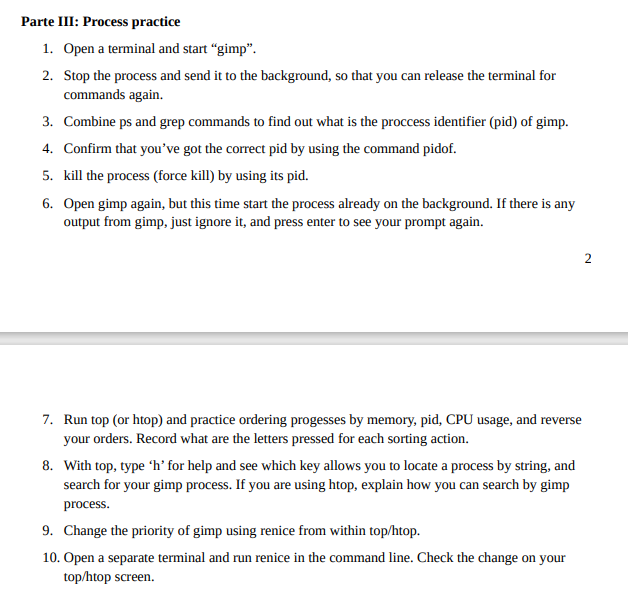
Instructions Part I: Install and explore vim editor The full exploration of vim features might take several days, months, or even years. Do not get overwhelmed about all that is possible to do with vim. Learn a few tricks, and don't hesitate to search for help, there are plenty of tutorials online and within vim package itself. In Debian, the default installation will provide a modified version of vim, a tiny version, basically for the installation process. We need vim in its full power, so we'll proceed with the installation of the vim package. 1. Use "su -" to become the root user. 2. As root, install vim with the command "apt install vim" and execute vim to start the editor. 3. In command-mode, run:help. You'll see an elaborated help file with coloured links. Read the section "Jump to a subject" and "Jump back" to see how to navigate following links. Record in your report the keys used to "jump" forward/backward. At any point, if you get lost, just get out of the help as you get out of any file in vim, and you can always type "help" again. 1. Back to the main help page, read the section Getting started. What does it recommend? 2. Follow the recommendation, it should take you about 30 minutes playing around. 3. Back to our lab, copy the file /etc/services to your home directory. 4. Edit the file services with vim. For the following commands, you just need to record the command you give vim to perform the action in each step. 5. Jump to the line 100. 6. From there, delete the next 5 lines. 7. Jump to the end of the file. 8. Paste the lines you've deleted earlier. 9. Look for the word "World". 10. Copy that line. 11. Go to the beginning of the file and paste the line. 12. Execute the command Is without exiting vim. Part II: Configuring your shell 1. Edit the file / bashrc and find the definition of your $PS1 variable. Make changes to $PS1. 2. To have your changes applied in the same terminal session, run. /.bashrc. Open another terminal and your prompt should also have been changed. 3. Create a folder called "bin" in your home directory. 4. Enter this directory and create the file "add". 5. From the command line, add the following to the script file: "expr $1 + $2" 6. Add execution permission to the file. 7. Run the script passing 2 numeric arguments, for instance, "./add 2 3" from within the bin folder. 8. To be able to run the script add as a regular command (and also allow bash to auto- complete), add your bin folder to your variable $PATH. This variable is defined system-wide in the file /etc/profile, but as a regular user you don't have permission to edit that file. So you can edit bashrc again and add the following after the last line: export PATH=$PATH:-/bin" (using the current PATH value to assign a new value to it). 9. From your terminal, print the variable $PATH and check that your bin folder was appended to the list of directories. 10. Now execute your script simply by typing add 2 3". Try to auto-complete the command (just type "ad" then TAB for command completion). 11. Finally, do a last editting in this file to create an alias of your choice. Record the line you added to the file. Parte III: Process practice 1. Open a terminal and start gimp. 2. Stop the process and send it to the background, so that you can release the terminal for commands again. 3. Combine ps and grep commands to find out what is the proccess identifier (pid) of gimp. 4. Confirm that you've got the correct pid by using the command pidof. 5. kill the process (force kill) by using its pid. 6. Open gimp again, but this time start the process already on the background. If there is any output from gimp, just ignore it, and press enter to see your prompt again. 7. Run top (or htop) and practice ordering progesses by memory, pid, CPU usage, and reverse your orders. Record what are the letters pressed for each sorting action. 8. With top, type 'h' for help and see which key allows you to locate a process by string, and search for your gimp process. If you are using htop, explain how you can search by gimp process. 9. Change the priority of gimp using renice from within top/htop. 10. Open a separate terminal and run renice in the command line. Check the change on your top/htop screen. Instructions Part I: Install and explore vim editor The full exploration of vim features might take several days, months, or even years. Do not get overwhelmed about all that is possible to do with vim. Learn a few tricks, and don't hesitate to search for help, there are plenty of tutorials online and within vim package itself. In Debian, the default installation will provide a modified version of vim, a tiny version, basically for the installation process. We need vim in its full power, so we'll proceed with the installation of the vim package. 1. Use "su -" to become the root user. 2. As root, install vim with the command "apt install vim" and execute vim to start the editor. 3. In command-mode, run:help. You'll see an elaborated help file with coloured links. Read the section "Jump to a subject" and "Jump back" to see how to navigate following links. Record in your report the keys used to "jump" forward/backward. At any point, if you get lost, just get out of the help as you get out of any file in vim, and you can always type "help" again. 1. Back to the main help page, read the section Getting started. What does it recommend? 2. Follow the recommendation, it should take you about 30 minutes playing around. 3. Back to our lab, copy the file /etc/services to your home directory. 4. Edit the file services with vim. For the following commands, you just need to record the command you give vim to perform the action in each step. 5. Jump to the line 100. 6. From there, delete the next 5 lines. 7. Jump to the end of the file. 8. Paste the lines you've deleted earlier. 9. Look for the word "World". 10. Copy that line. 11. Go to the beginning of the file and paste the line. 12. Execute the command Is without exiting vim. Part II: Configuring your shell 1. Edit the file / bashrc and find the definition of your $PS1 variable. Make changes to $PS1. 2. To have your changes applied in the same terminal session, run. /.bashrc. Open another terminal and your prompt should also have been changed. 3. Create a folder called "bin" in your home directory. 4. Enter this directory and create the file "add". 5. From the command line, add the following to the script file: "expr $1 + $2" 6. Add execution permission to the file. 7. Run the script passing 2 numeric arguments, for instance, "./add 2 3" from within the bin folder. 8. To be able to run the script add as a regular command (and also allow bash to auto- complete), add your bin folder to your variable $PATH. This variable is defined system-wide in the file /etc/profile, but as a regular user you don't have permission to edit that file. So you can edit bashrc again and add the following after the last line: export PATH=$PATH:-/bin" (using the current PATH value to assign a new value to it). 9. From your terminal, print the variable $PATH and check that your bin folder was appended to the list of directories. 10. Now execute your script simply by typing add 2 3". Try to auto-complete the command (just type "ad" then TAB for command completion). 11. Finally, do a last editting in this file to create an alias of your choice. Record the line you added to the file. Parte III: Process practice 1. Open a terminal and start gimp. 2. Stop the process and send it to the background, so that you can release the terminal for commands again. 3. Combine ps and grep commands to find out what is the proccess identifier (pid) of gimp. 4. Confirm that you've got the correct pid by using the command pidof. 5. kill the process (force kill) by using its pid. 6. Open gimp again, but this time start the process already on the background. If there is any output from gimp, just ignore it, and press enter to see your prompt again. 7. Run top (or htop) and practice ordering progesses by memory, pid, CPU usage, and reverse your orders. Record what are the letters pressed for each sorting action. 8. With top, type 'h' for help and see which key allows you to locate a process by string, and search for your gimp process. If you are using htop, explain how you can search by gimp process. 9. Change the priority of gimp using renice from within top/htop. 10. Open a separate terminal and run renice in the command line. Check the change on your top/htop screen Step by Step Solution
There are 3 Steps involved in it
Step: 1

Get Instant Access to Expert-Tailored Solutions
See step-by-step solutions with expert insights and AI powered tools for academic success
Step: 2

Step: 3
Ace Your Homework with AI
Get the answers you need in no time with our AI-driven, step-by-step assistance
Get Started
Microsoft Word 365 2022 Beginners Guide A Comprehensive User Guide For Beginners And Seniors With Tips And Tricks To Master Word 365
Authors: Howard J Wall
1st Edition
B0B1MGTGQ5, 979-8829667160