

Answered step by step
Verified Expert Solution
Question
1 Approved Answer
use android studio show all steps After clicking android Studio's icon, follow the following steps to create a new project on Android Studio: 1. Click

use android studio
show all steps
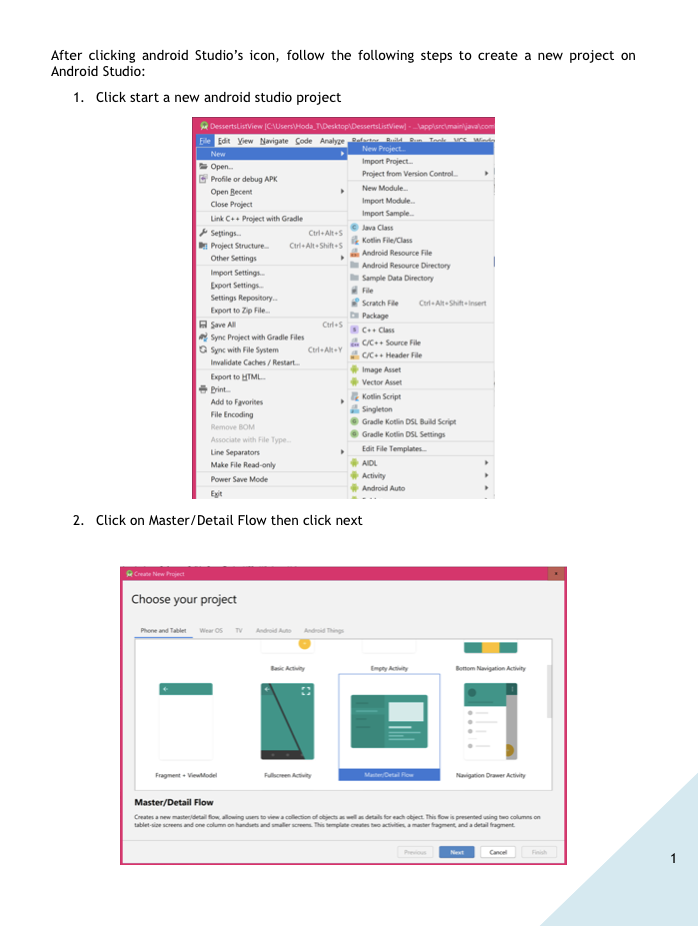
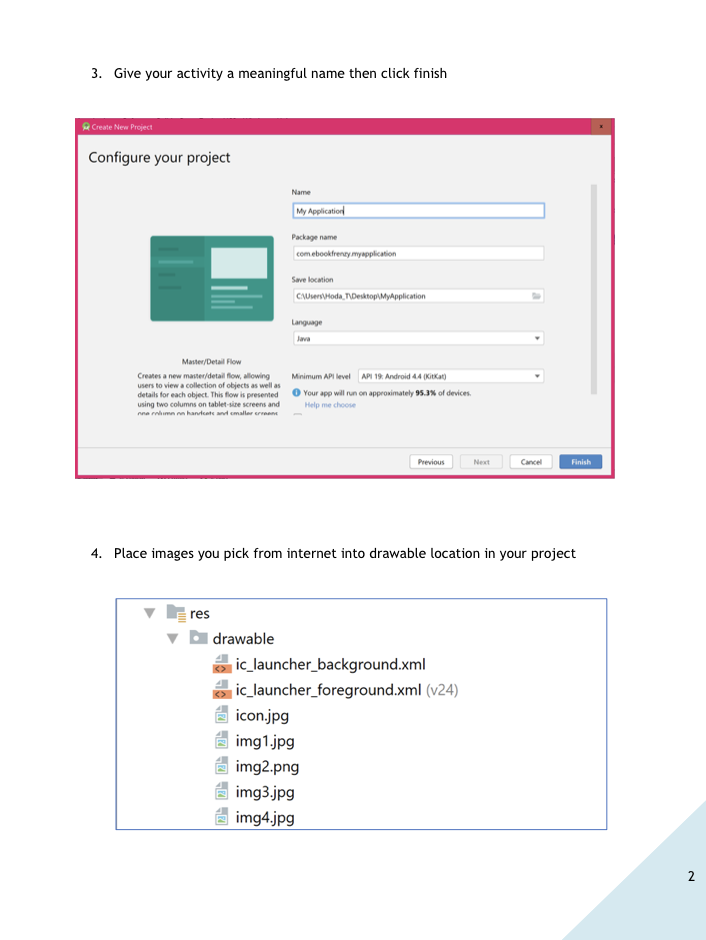
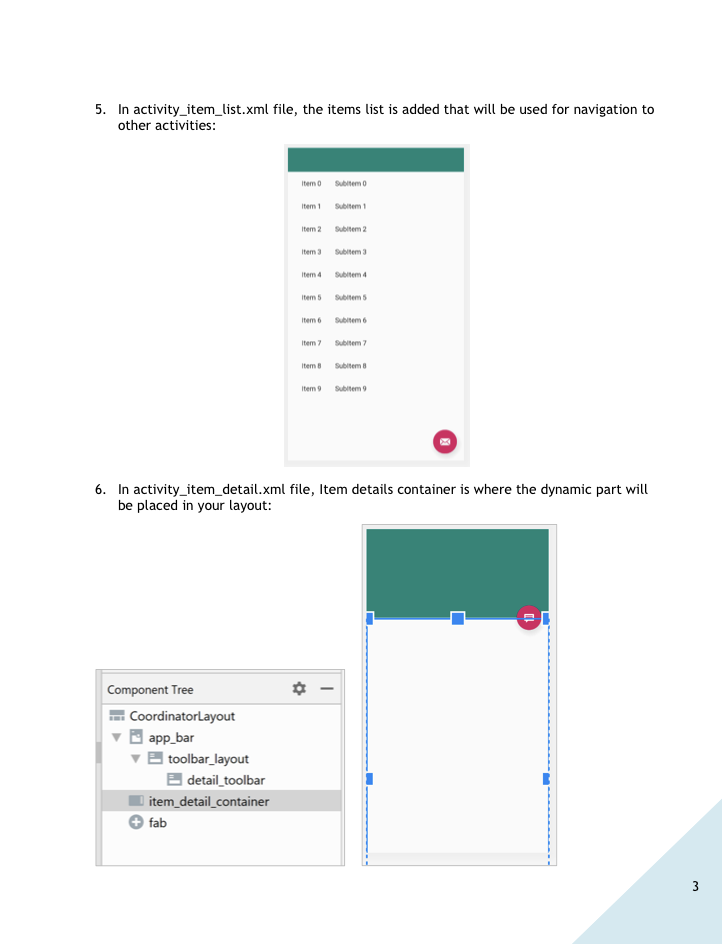
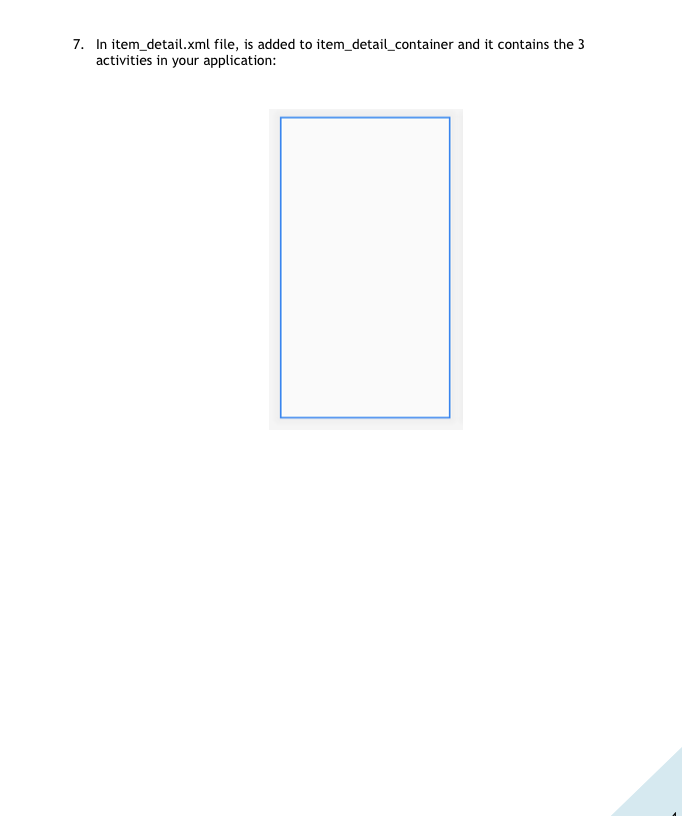
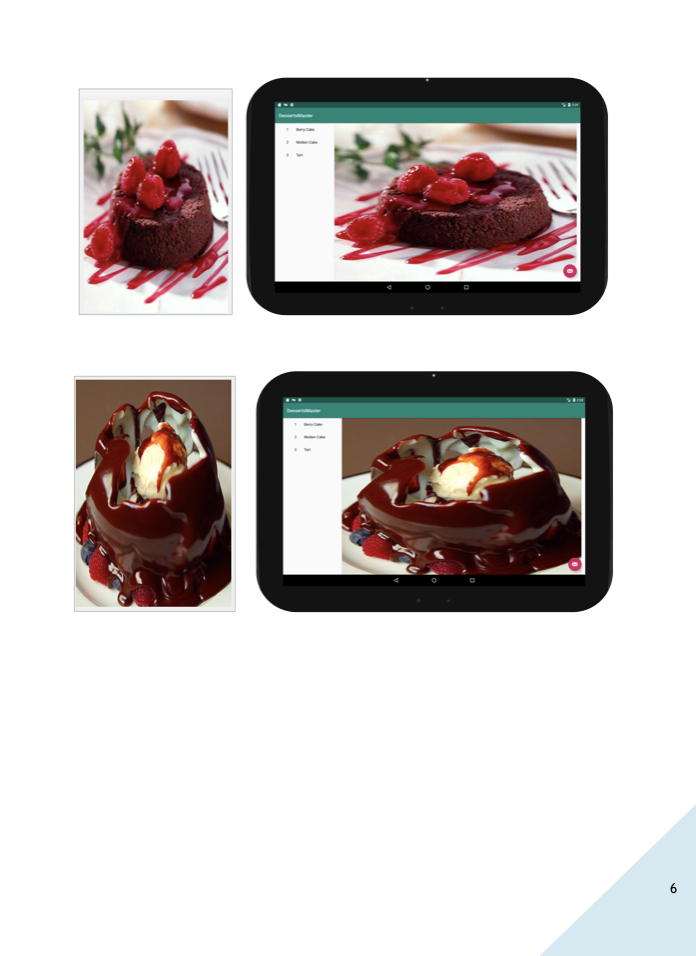
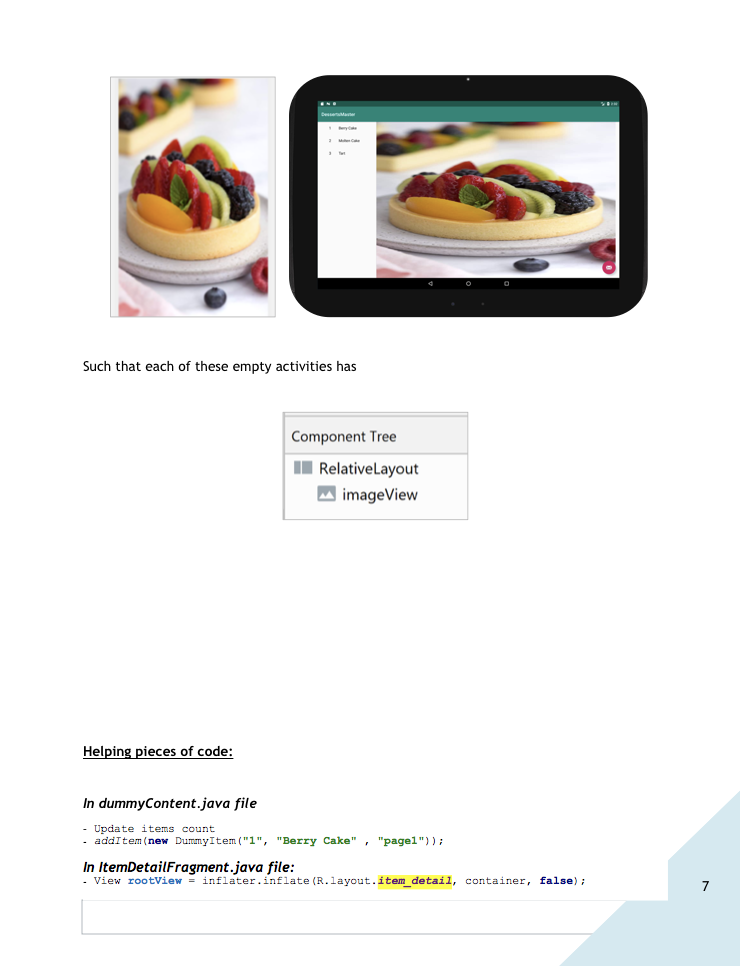
After clicking android Studio's icon, follow the following steps to create a new project on Android Studio: 1. Click start a new android studio project DessertsListView C:\Users/Hoda_T\Desktop DessertsListView] - Lapplis main java com Eile Edit View Navigate Code Analyzer New Project New Import Project Open Project from Version Control Profile or debug APK Open Becent New Module. Close Project Import Module Import Sample Link C++ Project with Gradle Java Class Setings Ctrl Altes Kotlin File/Class D Project Structure Ctrl+Alte Shites Android Resource File Other Settings Android Resource Directory Import Settings Sample Data Directory Export Settings Settings Repository Scratch Fe Cut Alt Shinsert Export to Zip File s Package Save All Carles C. Class Sync Project with Gradle Files C/C++ Source File Sync with File System CuteAlty C/C Header File Invalidate Caches/Restart Image Asset Export to HTML Vector Asset Print Add to Favorites Kotlin Script Singleton File Encoding Gradie Kotlin DSL Build Script Remove BOM Gradle Kotiin DSL Settings Associate with File Type Line Separators Edit File Templates Make File Read-only AIDI Power Save Mode Activity Android Auto 2. Click on Master/Detail Flow then click next Create New Project Choose your project Phone and Tablet Wear OSTV Add Ency Bottom Navigation Activity FragmentViewodel Fullscreency Navigation Drawer Activity Master/Detail Flow Create a new material flow allowing users to view collection of the details for each object. This flow is presented using two columns on tablet-se screen and one column on hands and fragment detail fragment Cancel 1 3. Give your activity a meaningful name then click finish Create New Project Configure your project Name My Application Package name com ebooktrenayyapplication Save location CsersHodaT\Desktop\MyApplication Language ve Master/Detail Flow Creates a new master/detail flow, allowing Minimum API level API 19. Android 4.4 (KitKat) users to view a collection of objects as well as details for each object. This flow is presented your app will run on approximately 9.3% of devices. using two columns on tablet sine screens and Help me choose na mim nn handicate almaller crman Previous Next Cancel Finish 4. Place images you pick from internet into drawable location in your project res drawable ic_launcher_background.xml ic_launcher_foreground.xml (v24) icon.jpg img1.jpg img2.png img3.jpg img4.jpg 2 5. In activity_item_list.xml file, the items list is added that will be used for navigation to other activities: Item 0 Subtemo Subitem 1 Item 2 Subitem 2 Item Subitem Item 4 items Sitems item 6 Subitem 6 item Subitem 7 Item Subitem 8 Item 9 Subitem 6. In activity_item_detail.xml file, Item details container is where the dynamic part will be placed in your layout: 1) - Component Tree CoordinatorLayout app_bar toolbar_layout detail_toolbar item_detail_container fab 3 7. In item_detail.xml file, is added to item_detail_container and it contains the 3 activities in your application: Exercise 1: Desserts Catalog Design a master detail application that contains 3 items as shown below: Desserts Master as The application has 3 more empty activities to which items navigate to using if .. if statements follows: 5 Such that each of these empty activities has Component Tree RelativeLayout imageView Helping pieces of code: In dummyContent.java file - Update items count - addItem(new Durrmy Item("1", "Berry Cake", "page1")); In ItemDetailFragment.java file: - View rootView = inflater. inflate (R.layout.item_detail, container, false); 7 - if (mItem.id.equals("1")) { rootView = inflater. inflate (R.layout.XMLScreenName, container, false); } Answer: Emulator Screenshots (All screens): Dummy content file (changes only): ItemDetailFragment file: After clicking android Studio's icon, follow the following steps to create a new project on Android Studio: 1. Click start a new android studio project DessertsListView C:\Users/Hoda_T\Desktop DessertsListView] - Lapplis main java com Eile Edit View Navigate Code Analyzer New Project New Import Project Open Project from Version Control Profile or debug APK Open Becent New Module. Close Project Import Module Import Sample Link C++ Project with Gradle Java Class Setings Ctrl Altes Kotlin File/Class D Project Structure Ctrl+Alte Shites Android Resource File Other Settings Android Resource Directory Import Settings Sample Data Directory Export Settings Settings Repository Scratch Fe Cut Alt Shinsert Export to Zip File s Package Save All Carles C. Class Sync Project with Gradle Files C/C++ Source File Sync with File System CuteAlty C/C Header File Invalidate Caches/Restart Image Asset Export to HTML Vector Asset Print Add to Favorites Kotlin Script Singleton File Encoding Gradie Kotlin DSL Build Script Remove BOM Gradle Kotiin DSL Settings Associate with File Type Line Separators Edit File Templates Make File Read-only AIDI Power Save Mode Activity Android Auto 2. Click on Master/Detail Flow then click next Create New Project Choose your project Phone and Tablet Wear OSTV Add Ency Bottom Navigation Activity FragmentViewodel Fullscreency Navigation Drawer Activity Master/Detail Flow Create a new material flow allowing users to view collection of the details for each object. This flow is presented using two columns on tablet-se screen and one column on hands and fragment detail fragment Cancel 1 3. Give your activity a meaningful name then click finish Create New Project Configure your project Name My Application Package name com ebooktrenayyapplication Save location CsersHodaT\Desktop\MyApplication Language ve Master/Detail Flow Creates a new master/detail flow, allowing Minimum API level API 19. Android 4.4 (KitKat) users to view a collection of objects as well as details for each object. This flow is presented your app will run on approximately 9.3% of devices. using two columns on tablet sine screens and Help me choose na mim nn handicate almaller crman Previous Next Cancel Finish 4. Place images you pick from internet into drawable location in your project res drawable ic_launcher_background.xml ic_launcher_foreground.xml (v24) icon.jpg img1.jpg img2.png img3.jpg img4.jpg 2 5. In activity_item_list.xml file, the items list is added that will be used for navigation to other activities: Item 0 Subtemo Subitem 1 Item 2 Subitem 2 Item Subitem Item 4 items Sitems item 6 Subitem 6 item Subitem 7 Item Subitem 8 Item 9 Subitem 6. In activity_item_detail.xml file, Item details container is where the dynamic part will be placed in your layout: 1) - Component Tree CoordinatorLayout app_bar toolbar_layout detail_toolbar item_detail_container fab 3 7. In item_detail.xml file, is added to item_detail_container and it contains the 3 activities in your application: Exercise 1: Desserts Catalog Design a master detail application that contains 3 items as shown below: Desserts Master as The application has 3 more empty activities to which items navigate to using if .. if statements follows: 5 Such that each of these empty activities has Component Tree RelativeLayout imageView Helping pieces of code: In dummyContent.java file - Update items count - addItem(new Durrmy Item("1", "Berry Cake", "page1")); In ItemDetailFragment.java file: - View rootView = inflater. inflate (R.layout.item_detail, container, false); 7 - if (mItem.id.equals("1")) { rootView = inflater. inflate (R.layout.XMLScreenName, container, false); } Answer: Emulator Screenshots (All screens): Dummy content file (changes only): ItemDetailFragment fileStep by Step Solution
There are 3 Steps involved in it
Step: 1

Get Instant Access to Expert-Tailored Solutions
See step-by-step solutions with expert insights and AI powered tools for academic success
Step: 2

Step: 3
Ace Your Homework with AI
Get the answers you need in no time with our AI-driven, step-by-step assistance
Get Started
Machine Learning And Knowledge Discovery In Databases European Conference Ecml Pkdd 2016 Riva Del Garda Italy September 19 23 2016 Proceedings Part 3 Lnai 9853
Authors: Bettina Berendt ,Bjorn Bringmann ,Elisa Fromont ,Gemma Garriga ,Pauli Miettinen ,Nikolaj Tatti ,Volker Tresp
1st Edition
3319461303, 978-3319461304