Question
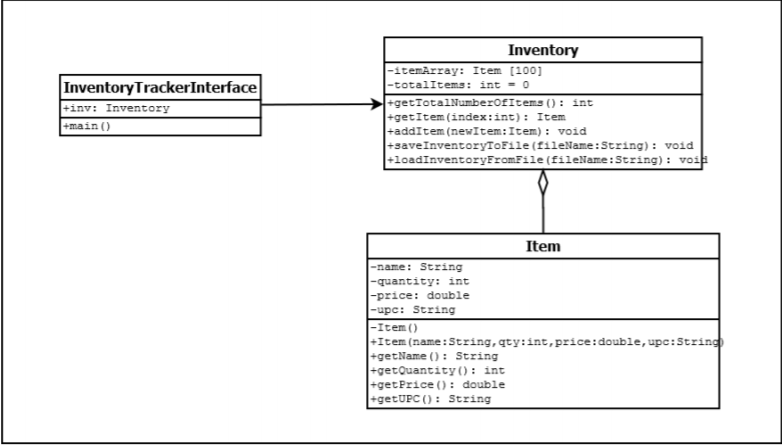
Use the UML Diagram above and create 3 classes 1. Milestone 1 Create the InventoryTrackerInterface Class (5 pts) In this case, just create the shell

Use the UML Diagram above and create 3 classes
1. Milestone 1 Create the InventoryTrackerInterface Class (5 pts) In this case, just create the shell of the class, and add the main method, but do not fill anything in just yet.
2. Milestone 2 Create the Item class and fill in the code (10 pts) The Item class is pretty easy to create. You will notice that the default construction (no parameters) is private. This is to prevent any other classes from creating an instance without specifying the 4 attributes through the second/public constructor listed. The getName(), getQuantity(), getPrice(), and getUPC() methods simply return the attributes name, quantity, price, and upc respectively. Once you have created the Item class, use the main method in the InventoryTrackerInterface to test out the Item class. If you are certain the Item class and all its methods are working perfectly, move on to the next milestone.
3. Milestone 3 Create the Inventory Class, its attributes, and the getTotalNumberOfItems() method (5 pts) In this milestone you will create the Inventory class and add the attributes. Additionally you will create the getTotalNumberOfItems() method which simply returns the totalItems attribute. Once again you should test out this milestone and by creating an instance in main. If you are sure it is working, move on to the next milestone.
4. Milestone 4 Create methods getItem and addItemToInventory (20 pts) In this milestone you will create the getItem() and addItem() methods. The getItem() method takes a parameter called index that represents an item in the itemArray array. Heres the catch though, while the itemArray has 100 spots (0-99), you will probably have a lot less stored. This is why we have the totalItems attribute. It will keep track of how many items have been added to the array. So as an error check, if index is less than 0, or it is greater than or equal to totalItems return null. If not, go ahead and return itemArray[index]. It is important to note that this will not remove the item from the array. In fact this entire inventory system will not support removing items once they have been added. The addItem() take an instance of Item as a parameter called newItem. We need to check to make sure that this is in fact an instance of Item before we add it to the array. We can do this by checking if the newItem is equal to null. If it is, print out a message saying Item not added. If newItem is not null you can add the item to the end of the array. It just so happens that totalItems is the index of the next empty position, so we can get away with doing this: itemArray[totalItems] = newItem; Since we just added a new item to the array, we are going to have to also update totalItems.(in other words, add 1 to it). At this point you should test out both methods by adding an item, getting that item and then printing out the contents of that item to make sure everything is working correctly. Again you can do this in main. 100% sure its done?
5. Milestone 5 Create Methods saveInventoryToFile and loadInventoryFromFile (20 pts) In this milestone you will create the saveInventoryToFile method and loadInventoryFromFile method. Use the PrintWriter class to write your inventory to a text file. This means for each process in your array, print the name, quantity, price, and upc (all on different lines I recommend). You can test to see if this is working correctly by looking at the at the text file you tried creating. If you are sure the method is working, try implementing the loadInventoryFromFile method. This method will instead read in all the inventory information (if the file exists!) into the programs array. Test this method by running the program and immediately running this file. Then try to print out the inventory.
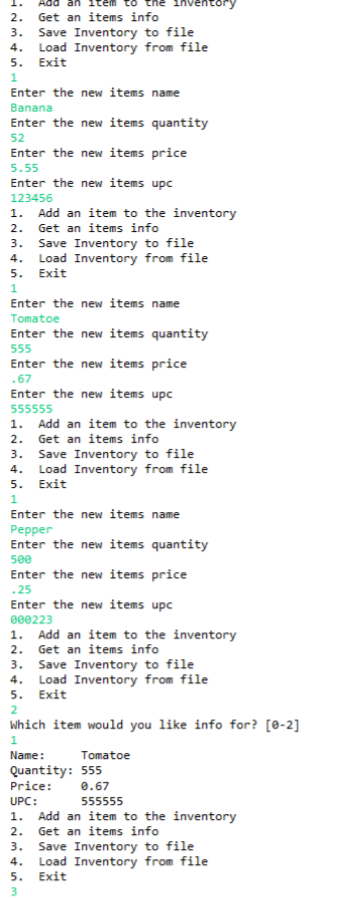
6. Milestone 6 Create loop interface with user (10 pts) This is essentially the final milestone. This will go inside main. Each time the loop iterates (loops) you will display a menu to the user (see the example of the program running I provided below) and allow them to enter a choice. Based on the choice you will perform that action (which associates directly to a method for the most part). If the user enters in 5 (exit) the loop will stop looping and the program will end. To figure out which of the 5 options the user chose you should use a SWITCH structure (not a bunch of if statements). Some of the options 1 and 2 will require you to get more information from the user
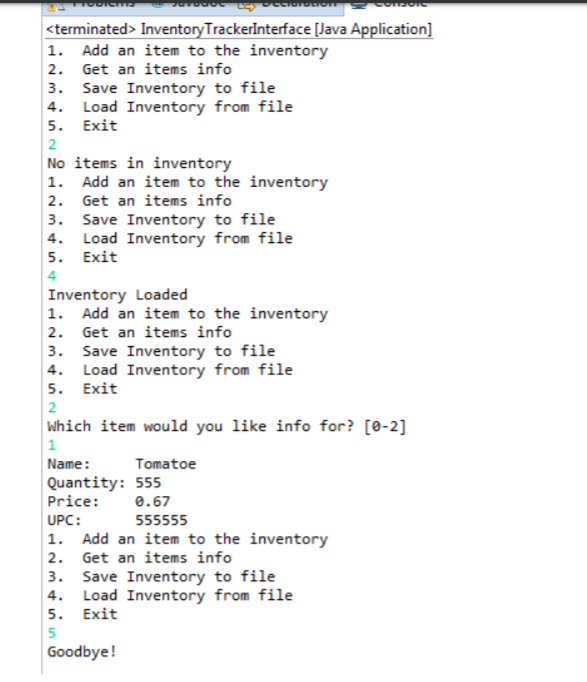
This is how the program should look on first and second run.


Step by Step Solution
There are 3 Steps involved in it
Step: 1

Get Instant Access to Expert-Tailored Solutions
See step-by-step solutions with expert insights and AI powered tools for academic success
Step: 2

Step: 3

Ace Your Homework with AI
Get the answers you need in no time with our AI-driven, step-by-step assistance
Get Started


