

Question
Workshop Entering and Organizing tasks on MSProject 5 pts weight. 1. This exercise is taken from the book of Paul E. Harris. It covers exercises
Workshop Entering and Organizing tasks on MSProject 5 pts weight. 1. This exercise is taken from the book of Paul E. Harris. It covers exercises from Ch1 to 8. You will learn how to enter tasks of a project and organize them on MSproject. If you are not a good computer person you may get some help from the book itself or from your project team members. You will do the same kind of work for your own project too, starting from next week. 2. Use the columns to enter the Name and Duration of the tasks as below. The Estimate and Schedule will be completed by site personnel who work 6 days/ week. Add new calendar as 6 Day Cal and edit it for 6 days including Saturdays using Resource Calendars. Assign the 6Day Working Week calendar using the Task Information Form Advanced tab to Tasks 8 and Task 9. Doubleclick on the task to open this form and select the Advanced tab, Calendar drop down box to assign the Task Calendar. 3. A task will become a milestone when assigned zero duration. Make project start date 02 Jan 2019 from Project > Project Information
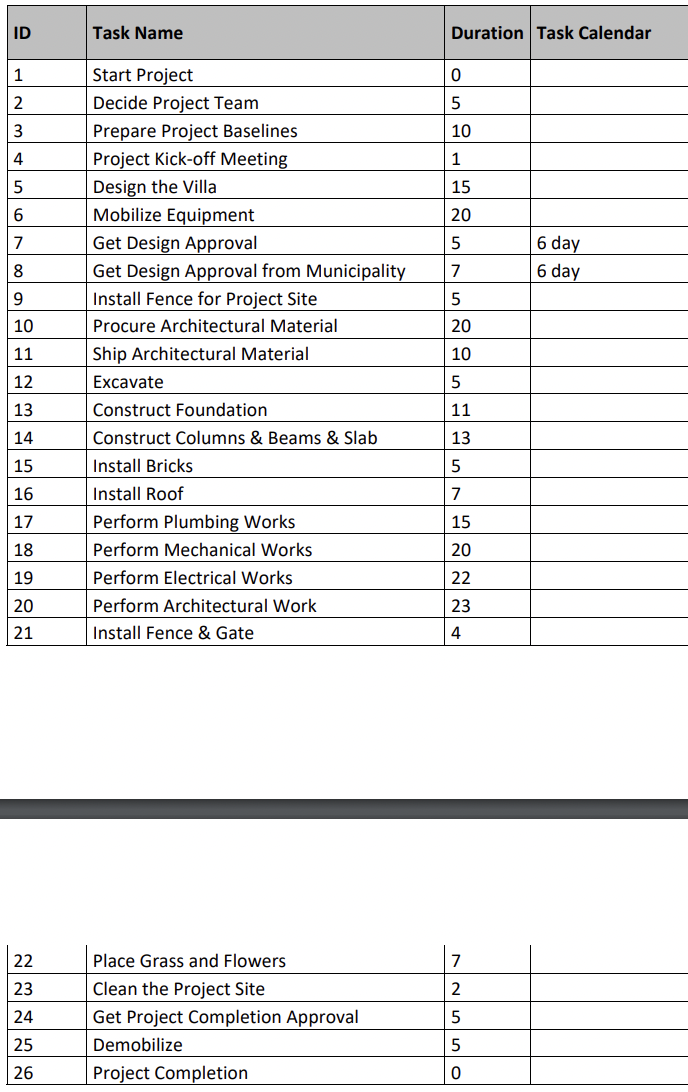
5. All tasks should be assigned the Task Mode of Auto Scheduled. If the task bars are not a solid blue color, except Task 20, which is critical and should be a solid red color, then they are Manually Scheduled and you have not set the options correctly in the Project Options. (Task Information) Add Summary Tasks 6. Display the Project Summary Task by checking the Format, Show/ Hide group, Project Summary Task and close the form. 7. Observe how the Project Summary Task is formatted, it will be Bold and have a Task ID of 0. 8. Hide the Project Summary Task by repeating para 6 and unchecking, as we will create an Outline Level for the Project summary task. 9. Create new Summary Tasks (Task > Summary). Villa Project o PreConstruction o Construction o Closeout 10. Create an Outline Level 1 for Phase entitled Villa Project and 11. Create an Outline Level 2 for each of the three Products: 12. Try using the various methods for indenting and outdenting tasks.
ID Task Name Duration Task Calendar 1 2 5 3 10 4 1 5 15 6 20 7 5 6 day 6 day 8 7 9 5 10 20 11 Start Project Decide Project Team Prepare Project Baselines Project Kick-off Meeting Design the Villa Mobilize Equipment Get Design Approval Get Design Approval from Municipality Install Fence for Project Site Procure Architectural Material Ship Architectural Material Excavate Construct Foundation Construct Columns & Beams & Slab Install Bricks Install Roof Perform Plumbing Works Perform Mechanical Works Perform Electrical Works Perform Architectural Work Install Fence & Gate 10 12 5 13 11 13 14 15 5 16 7 17 15 20 18 19 22 23 20 21 4 22 7 2 23 24 25 Place Grass and Flowers Clean the Project Site Get Project Completion Approval Demobilize Project Completion 5 5 26 0 ID Task Name Duration Task Calendar 1 2 5 3 10 4 1 5 15 6 20 7 5 6 day 6 day 8 7 9 5 10 20 11 Start Project Decide Project Team Prepare Project Baselines Project Kick-off Meeting Design the Villa Mobilize Equipment Get Design Approval Get Design Approval from Municipality Install Fence for Project Site Procure Architectural Material Ship Architectural Material Excavate Construct Foundation Construct Columns & Beams & Slab Install Bricks Install Roof Perform Plumbing Works Perform Mechanical Works Perform Electrical Works Perform Architectural Work Install Fence & Gate 10 12 5 13 11 13 14 15 5 16 7 17 15 20 18 19 22 23 20 21 4 22 7 2 23 24 25 Place Grass and Flowers Clean the Project Site Get Project Completion Approval Demobilize Project Completion 5 5 26 0Step by Step Solution
There are 3 Steps involved in it
Step: 1

Get Instant Access to Expert-Tailored Solutions
See step-by-step solutions with expert insights and AI powered tools for academic success
Step: 2

Step: 3
Ace Your Homework with AI
Get the answers you need in no time with our AI-driven, step-by-step assistance
Get Started
Ethical Hacking The Ultimate Guide To Using Penetration Testing To Audit And Improve The Cybersecurity Of Computer Networks For Beginners Including Tips On Social Engineering
Authors: Lester Evans
1st Edition
1647481813, 978-1647481810