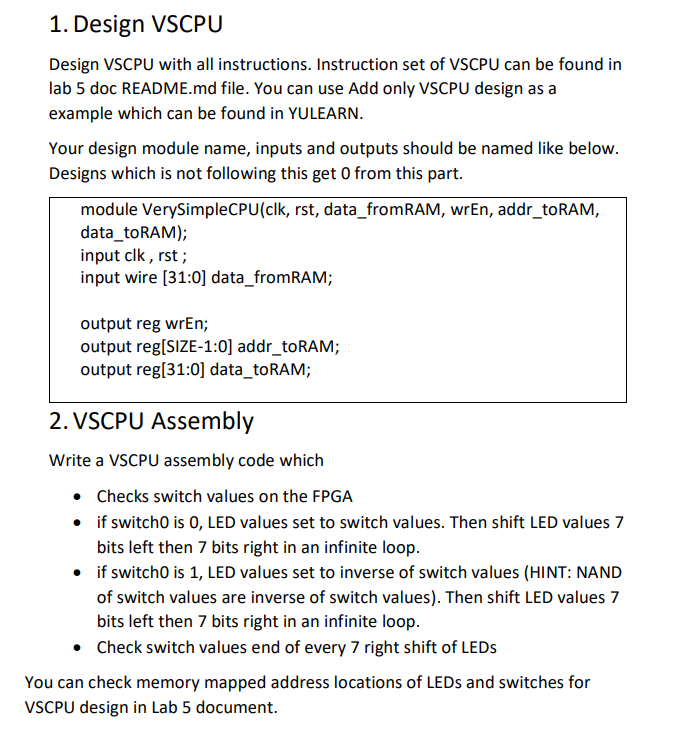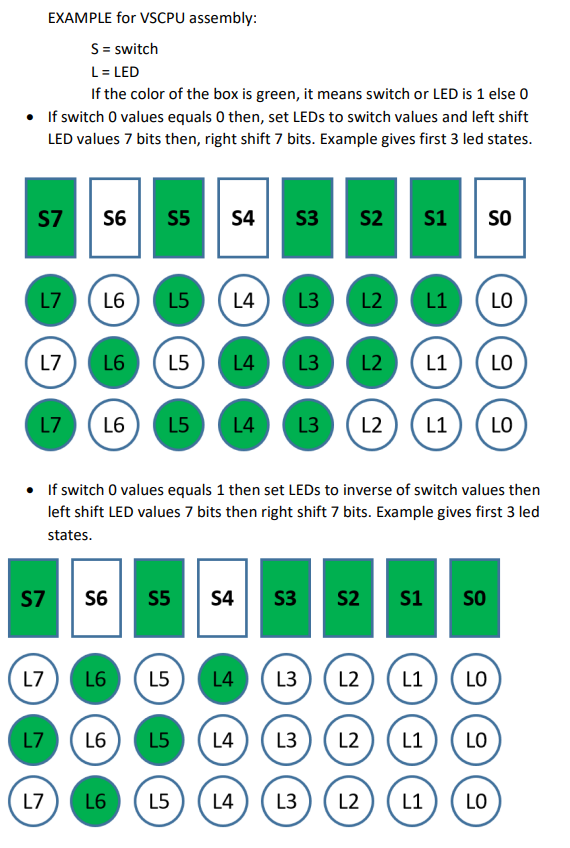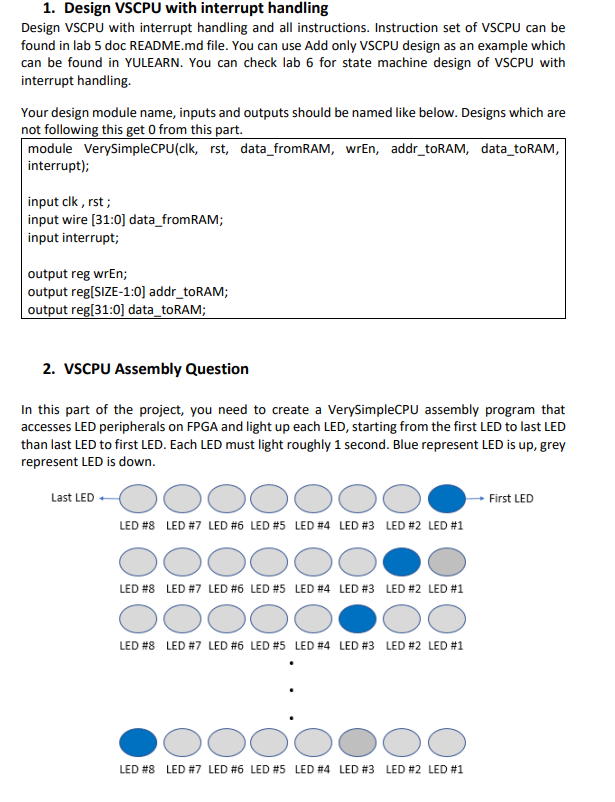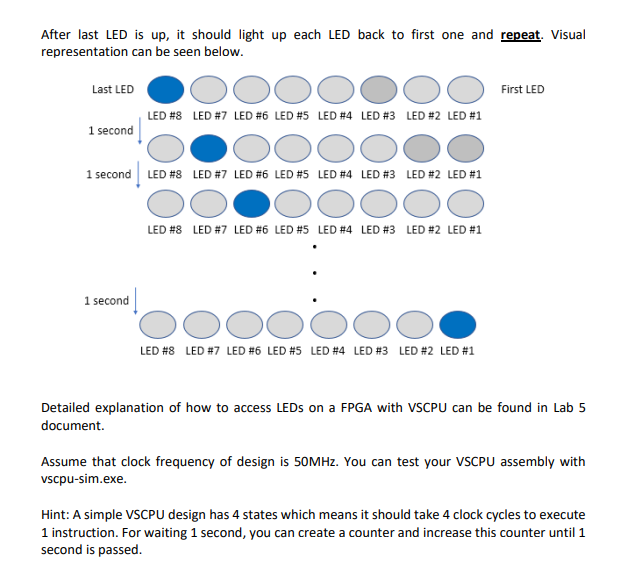


1. Design VSCPU Design VSCPU with all instructions. Instruction set of VSCPU can be found in lab 5 doc README.md file. You can use Add only VSCPU design as a example which can be found in YULEARN. Your design module name, inputs and outputs should be named like below. Designs which is not following this get from this part. module VerySimpleCPU(clk, rst, data_fromRAM, wrEn, addr_toRAM, data_toRAM); input clk, rst; input wire [31:0) data_fromRAM; output reg wrEn; output reg[SIZE-1:0) addr_toRAM; output reg[31:0) data_toRAM; 2. VSCPU Assembly Write a VSCPU assembly code which Checks switch values on the FPGA if switch0 is O, LED values set to switch values. Then shift LED values 7 bits left then 7 bits right in an infinite loop. if switch0 is 1, LED values set to inverse of switch values (HINT: NAND of switch values are inverse of switch values). Then shift LED values 7 bits left then 7 bits right in an infinite loop. Check switch values end of every 7 right shift of LEDs You can check memory mapped address locations of LEDs and switches for VSCPU design in Lab 5 document. EXAMPLE for VSCPU assembly: S = switch L = LED If the color of the box is green, it means switch or LED is 1 else 0 If switch 0 values equals then, set LEDs to switch values and left shift LED values 7 bits then, right shift 7 bits. Example gives first 3 led states. S7 S6 S5 S4 S3 S2 S1 SO L7 L6 L5 L4 L3 L2 . L1 LO L7 L6 L5 L3 L2 L1 LO L4 L4 L7 L6 L5 L3 L2 L1 LO If switch 0 values equals 1 then set LEDs to inverse of switch values then left shift LED values 7 bits then right shift 7 bits. Example gives first 3 led states. S7 S6 S5 S4 S3 S2 S1 SO L7 L6 L5 L4 L3 L2 L1 LO L7 L6 L5 L4 L3 L2 L1 LO L7 L6 L5 L4 L3 L2 L1 LO 1. Design VSCPU with interrupt handling Design VSCPU with interrupt handling and all instructions. Instruction set of VSCPU can be found in lab 5 doc README.md file. You can use Add only VSCPU design as an example which can be found in YULEARN. You can check lab 6 for state machine design of VSCPU with interrupt handling. Your design module name, inputs and outputs should be named like below. Designs which are not following this get from this part module VerySimpleCPU(clk, rst, data_fromRAM, wren, addr_toRAM, data_toRAM, interrupt); input clk, rst; input wire (31:0) data_fromRAM; input interrupt; output reg wrEn; output reg[SIZE-1:0) addr_toRAM; output reg[31:0) data_toRAM; 2. VSCPU Assembly Question In this part of the project, you need to create a VerySimpleCPU assembly program that accesses LED peripherals on FPGA and light up each LED, starting from the first LED to last LED than last LED to first LED. Each LED must light roughly 1 second. Blue represent LED is up, grey represent LED is down. Last LED DOOOOC First LED LED #8 LED #7 LED #6 LED #5 LED #4 LED #3 LED #2 LED #1 LED #8 LED #7 LED #6 LED #5 LED #4 LED #3 LED #2 LED #1 DOOC DO LED #8 LED #7 LED #6 LED #5 LED #4 LED #3 LED #2 LED #1 po00000 LED #8 LED #7 LED #6 LED #5 LED #4 LED #3 LED #2 LED #1 After last LED is up, it should light up each LED back to first one and repeat. Visual representation can be seen below. Last LED First LED LED #8 LED #7 LED #6 LED #5 LED #4 LED #3 LED #2 LED #1 1 second 1 second LED #8 LED #7 LED #6 LED #5 LED #4 LED #3 LED #2 LED #1 OOOC DOOOO LED #8 LED #7 LED #6 LED #5 LED #4 LED #3 LED #2 LED #1 1 second 000000 LED #8 LED #7 LED #6 LED #5 LED #4 LED #3 LED #2 LED #1 Detailed explanation of how to access LEDs on a FPGA with VSCPU can be found in Lab 5 document. Assume that clock frequency of design is 50MHz. You can test your VSCPU assembly with vscpu-sim.exe. Hint: A simple VSCPU design has 4 states which means it should take 4 clock cycles to execute 1 instruction. For waiting 1 second, you can create a counter and increase this counter until 1 second is passed


