

Question: Assignment12.java import javafx.application.Application; import javafx.stage.Stage; import javafx.scene.Scene; import javafx.scene.layout.StackPane; public class Assignment12 extends Application { private final int WIDTH = 640; private final int HEIGHT


Assignment12.java
import javafx.application.Application; import javafx.stage.Stage; import javafx.scene.Scene; import javafx.scene.layout.StackPane; public class Assignment12 extends Application { private final int WIDTH = 640; private final int HEIGHT = 300; public void start(Stage primaryStage) { //create a controlPane object. See ControlPane.java for details. ControlPane pane = new ControlPane(WIDTH, HEIGHT); //put pane on top of the rootPane StackPane rootPane = new StackPane(); rootPane.getChildren().add(pane); // Create a scene and place rootPane in the stage Scene scene = new Scene(rootPane, 600, 300); primaryStage.setTitle("Two Bicycles"); primaryStage.setScene(scene); // Place the scene in the stage primaryStage.show(); // Display the stage } public static void main(String[] args) { Application.launch(args); } }ControlPane.java - to be completed (You need to set up the layout and handle events from Button and Slider)
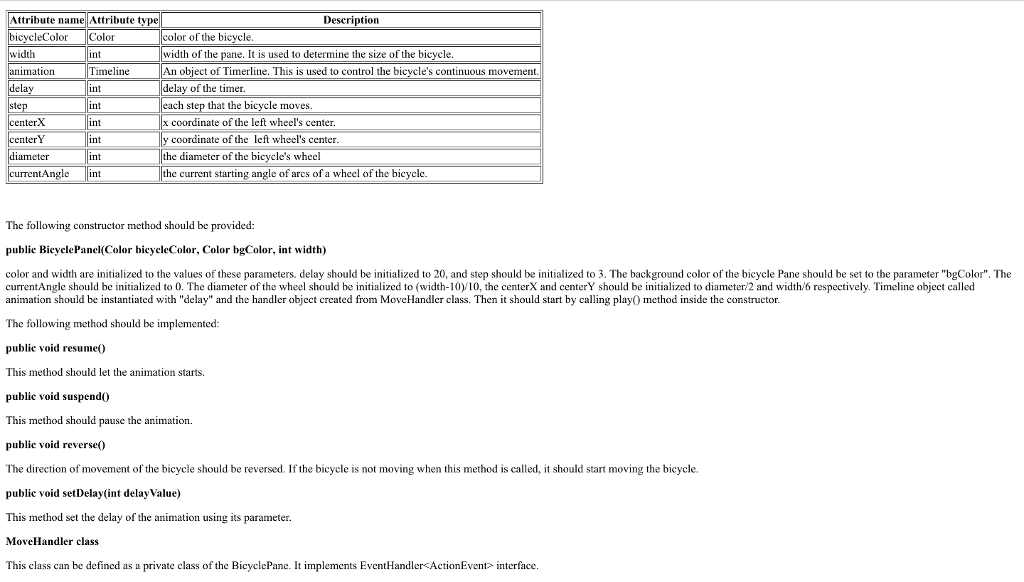
import javafx.scene.layout.BorderPane; import javafx.scene.layout.GridPane; import javafx.scene.layout.TilePane; import javafx.scene.control.Button; import javafx.scene.control.Label; import javafx.scene.control.Slider; import javafx.scene.paint.Color; import javafx.geometry.Orientation; import javafx.event.ActionEvent; import javafx.event.EventHandler; import javafx.beans.value.ChangeListener; import javafx.beans.value.ObservableValue; public class ControlPane extends BorderPane { //1 for the red bicycle control, 2 for the blue bicycle control private BicyclePane bicycle1, bicycle2; //leftPane contains two groups of buttons and slides; //rightPane contains the BicyclePane private GridPane leftPane, rightPane; private TilePane Sub1, Sub2; private BorderPane Sub3, Sub4,leftup,leftdown; private Button start1, start2, stop1, stop2, reverse1, reverse2; private Label label1, label2; private Slider slider1, slider2; private int width, height; //The constructor creates 6 buttons, 2 sliders, and 2 bicycle panels //and organize them using layouts. public ControlPane(int width, int height) { this.setPrefSize(width, height); //create 2 bicycle panes and arrange them using GridLayout //bicycle1 is RED color with YELLOW background color bicycle1 = //---- //bicycle2 is BLUE color with BEIGE background color bicycle2 = //---- //Step #1: set up the layout //rightPane is a GridPane, contains above two bicycle panes rightPane = //---- //---- //---- //instantiate each components start1 = new Button("Start Red"); stop1 = new Button("Stop Red"); reverse1 = new Button("Reverse Red"); label1 = new Label("Red Speed"); //instantiate slider1 and set its properties slider1 = new Slider(0,50,20); slider1.setMajorTickUnit(10); slider1.setMinorTickCount(1); slider1.setShowTickLabels(true); slider1.setShowTickMarks(true); slider1.setOrientation(Orientation.VERTICAL); start2 = new Button("Start Blue"); stop2 = new Button("Stop Blue"); reverse2 = new Button("Reverse Blue"); label2 = new Label("Blue Speed"); //instantiate slider2 and set its properties //---- //---- //Sub1 contains the 3 buttons for the red bicycle //---- //Sub2 contains the 3 buttons for the blue bicycle //---- //Sub3 contains one label and one slider for the red bicycle //---- //Sub4 contains one label and one slider for the blue bicycle //---- //leftup contains sub1 & sub3 for the red bicycle //---- //leftdown contains sub2 & sub4 for the blue bicycle //---- //leftPane contains leftup & leftdown //---- //Remember ControlPane is a BorderPane this.setLeft(leftPane); this.setCenter(rightPane); //Step #3: 1) add ButtonHandler to each of the buttons //---- //Step #3: 2)add SliderHandler to the two sliders //---- } //Step #2:(A)ButtonHandler class private class ButtonHandler implements EventHandler { public void handle(ActionEvent event) { Object action = event.getSource(); //---- //---- } } //end of ButtonHandler //Step #2:(B)SliderHandler class private class SliderHandler implements ChangeListener { public void changed(ObservableValue extends Number> observable, Number oldValue, Number newValue) { //---- } } } //end of ControlPane BicyclePane.java - to be completed (You need to handle animation by using Timeline )
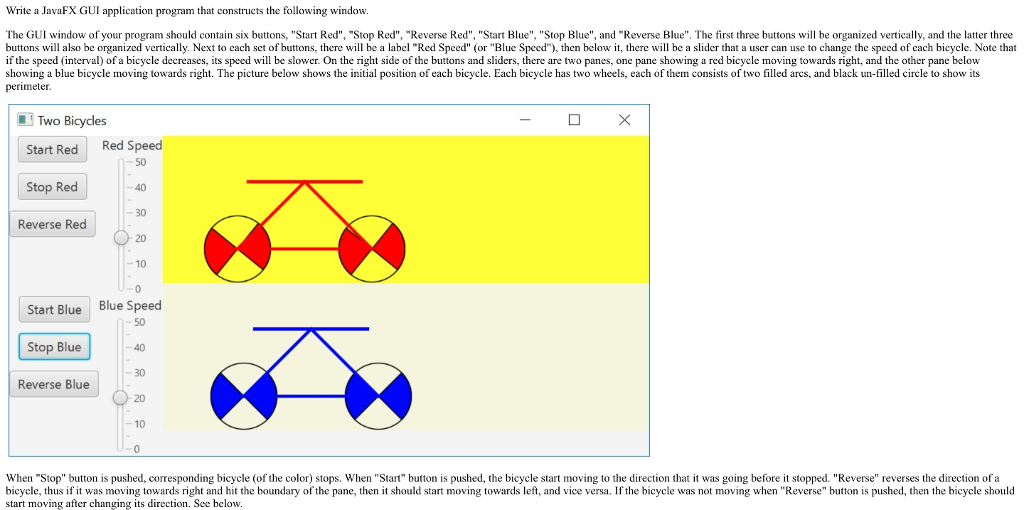
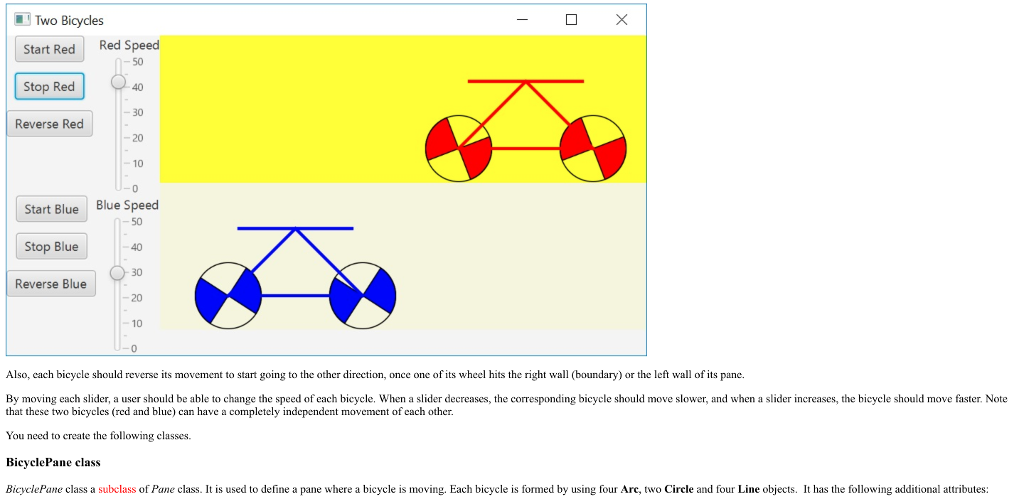
import javafx.animation.Animation; import javafx.animation.KeyFrame; import javafx.animation.Timeline; import javafx.util.Duration; import javafx.event.ActionEvent; import javafx.event.EventHandler; import javafx.scene.paint.Color; import javafx.scene.layout.Pane; import javafx.scene.shape.Circle; import javafx.scene.shape.Arc; import javafx.scene.shape.ArcType; import javafx.scene.shape.Line; public class BicyclePane extends Pane { private int width; //width of the BicyclePane //centerX & centerY are coordinates of the left wheel center private int centerX, centerY, diameter; private Color bicycleColor, bgColor; //bgColor are background color of the Pane private int currentAngle; private int step; //how much currentAngle changes for each tick of Timerline private Arc arc1, arc2, arc3, arc4; private Circle c1, c2; private Line line1, line2, line3, line4; private Timeline animation; private int delay; //delay of timer //The constructor initializes parameters for the bicycle, and start the Timeline public BicyclePane(Color bicycleColor, Color bgColor, int width) { this.setPrefWidth(width); this.diameter = (width-10)/10; this.centerX = diameter/2; this.centerY = width/6; this.bicycleColor = bicycleColor; this.bgColor = bgColor; //These two lines change the Color object to valid CSS hex color code //so that we can set the pane's background color String hexColor = Integer.toHexString(bgColor.hashCode()); this.setStyle("-fx-background-color: #" + hexColor); this.currentAngle = 0; this.step = 3; this.delay = 20; //left wheel- contains two Arcs, one Circle arc1 = new Arc(centerX, centerY, diameter/2, diameter/2, currentAngle, 90); arc1.setFill(bicycleColor); arc1.setStroke(Color.BLACK); arc1.setType(ArcType.ROUND); arc2 = new Arc(centerX, centerY, diameter/2, diameter/2, currentAngle+180, 90); arc2.setFill(bicycleColor); arc2.setStroke(Color.BLACK); arc2.setType(ArcType.ROUND); c1 = new Circle(centerX, centerY, diameter/2); c1.setStroke(Color.BLACK); c1.setFill(null); //right wheel- contains two Arcs, one Circle arc3 = new Arc(centerX+2*diameter, centerY, diameter/2, diameter/2, currentAngle, 90); arc3.setFill(bicycleColor); arc3.setStroke(Color.BLACK); arc3.setType(ArcType.ROUND); arc4 = new Arc(centerX+2*diameter, centerY, diameter/2, diameter/2, currentAngle+180, 90); arc4.setFill(bicycleColor); arc4.setStroke(Color.BLACK); arc4.setType(ArcType.ROUND); c2 = new Circle(centerX+2*diameter, centerY, diameter/2); c2.setStroke(Color.BLACK); c2.setFill(null); //line1 - links the two centers of the wheels line1 = new Line(centerX, centerY, centerX+2*diameter, centerY); line1.setStrokeWidth(3); line1.setStroke(bicycleColor); //line2 - links the left wheel and the chair line2 = new Line(centerX, centerY, centerX+diameter, centerY-diameter); line2.setStrokeWidth(3); line2.setStroke(bicycleColor); //line3 - links the right wheel and the chair line3 = new Line(centerX+2*diameter, centerY, centerX+diameter, centerY-diameter); line3.setStrokeWidth(3); line3.setStroke(bicycleColor); //line4 - the chair line4 = new Line(centerX+10, centerY-diameter, centerX+2*diameter-10, centerY-diameter); line4.setStrokeWidth(3); line4.setStroke(bicycleColor); //add all components inside the pane //---- //create a Timeline object called 'animation' animation = //---- animation.setCycleCount(Timeline.INDEFINITE); //start the animation //---- } //Animation starts public void resume() { //---- } //Animation stops public void suspend() { //---- } //Animation change direction, then start again public void reverse() { //---- //---- } //This method change animation speed public void setDelay(int delayValue) { animation.setRate(delayValue); } //Step #2: MoveHandler defined an action to be taken for each tick of the Timeline. private class MoveHandler implements EventHandler { public void handle(ActionEvent event) { currentAngle -= step; centerX += step; //if the bicycle hits the panes boundary, it changes its direction. if (centerX = getWidth()-(diameter/2)) step = step * -1; //reposition all shapes, for example arc1.setCenterX(centerX); arc1.setStartAngle(currentAngle); //Note: for each shape, you just need to change its x-coordinates //change arc2, arc3, arc4 center x-coordinates & starting angle //---- //---- //change Circle c1 and c2's position c1.setCenterX(centerX); c2.setCenterX(centerX+2*diameter); //change line1's position line1.setStartX(c1.getCenterX()); line1.setEndX(c2.getCenterX()); //change line2's position //---- //change line3's position //---- //change line4's position //---- } } } Write a JavaFX GUI application program that constructs the following window. The GUI window of your program should contain six buttons, "Start Red", "Stop Red", "Reverse Red", "Start Blue", "Stop Blue", and "Reverse Blue". The first three buttons will be organized vertically, and the latter three buttons will also be organized vertically. Next to each set of buttons, there will be a label "Red Speed" (or "Blue Speed"), then below it, there will be a slider that a user can use to change the speed of cach bicycle. Note that if the speed (interval) of a bicycle decreases, its speed will be slower. On the right side of the buttons and sliders, there are two panes, one pane showing a red bicycle moving towards right, and the other pane below showing a blue bicycle moving towards right. The picture below shows the initial position of each bicycle. Each bicycle has two wheels, each of them consists of two filled arcs, and black un-filled circle to show its perimeter. Two Bicycles Start Red Red Speed Stop Red-4 50 30 20 -10 -0 Blue Speed Reverse Red Start Blue 50 Stop Blue 30 20 10 Reverse Blue When "Stop" button is pushed, corresponding bicycle (of the color) stops. When "Start" button is pushed, the bicycle start moving to the direction that it was going before it stopped. "Reverse" reverses the direction of a bicycle, thus if it was moving towards right and hit the boundary of the pane, then it should start moving towards left, and vice versa. If the bicycle was not moving when "Reverse" button is pushed, then the bicycle should start moving after changing its direction. See below. Write a JavaFX GUI application program that constructs the following window. The GUI window of your program should contain six buttons, "Start Red", "Stop Red", "Reverse Red", "Start Blue", "Stop Blue", and "Reverse Blue". The first three buttons will be organized vertically, and the latter three buttons will also be organized vertically. Next to each set of buttons, there will be a label "Red Speed" (or "Blue Speed"), then below it, there will be a slider that a user can use to change the speed of cach bicycle. Note that if the speed (interval) of a bicycle decreases, its speed will be slower. On the right side of the buttons and sliders, there are two panes, one pane showing a red bicycle moving towards right, and the other pane below showing a blue bicycle moving towards right. The picture below shows the initial position of each bicycle. Each bicycle has two wheels, each of them consists of two filled arcs, and black un-filled circle to show its perimeter. Two Bicycles Start Red Red Speed Stop Red-4 50 30 20 -10 -0 Blue Speed Reverse Red Start Blue 50 Stop Blue 30 20 10 Reverse Blue When "Stop" button is pushed, corresponding bicycle (of the color) stops. When "Start" button is pushed, the bicycle start moving to the direction that it was going before it stopped. "Reverse" reverses the direction of a bicycle, thus if it was moving towards right and hit the boundary of the pane, then it should start moving towards left, and vice versa. If the bicycle was not moving when "Reverse" button is pushed, then the bicycle should start moving after changing its direction. See below
Step by Step Solution
There are 3 Steps involved in it

Get step-by-step solutions from verified subject matter experts