

Question: DATA begin{tabular}{|l|l|l|l|l|l|} hline & Trial 1 & Trial 2 & Trial 3 & Trial 4 & Trial 5 hline Temp. (C) & & &
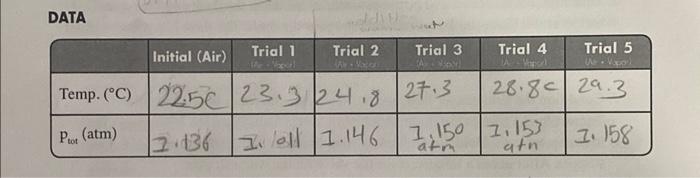
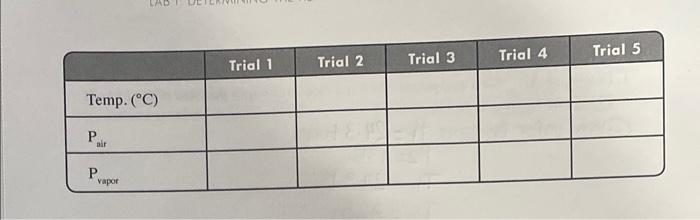
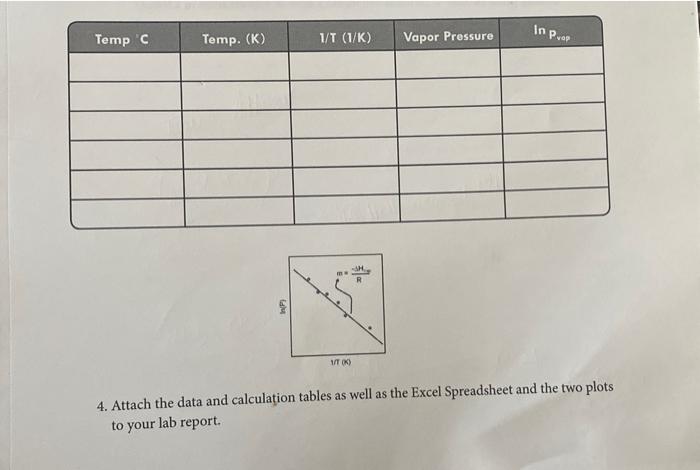
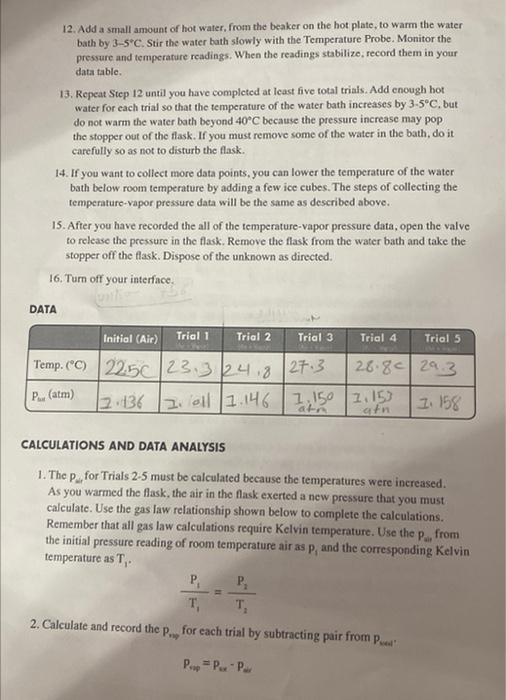
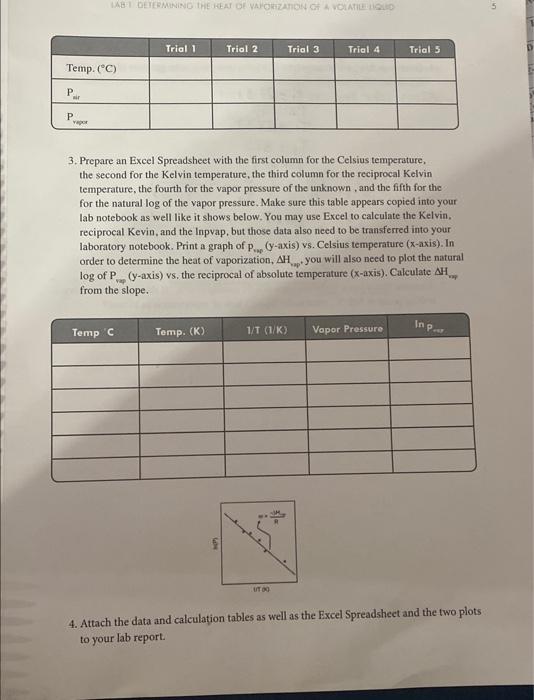
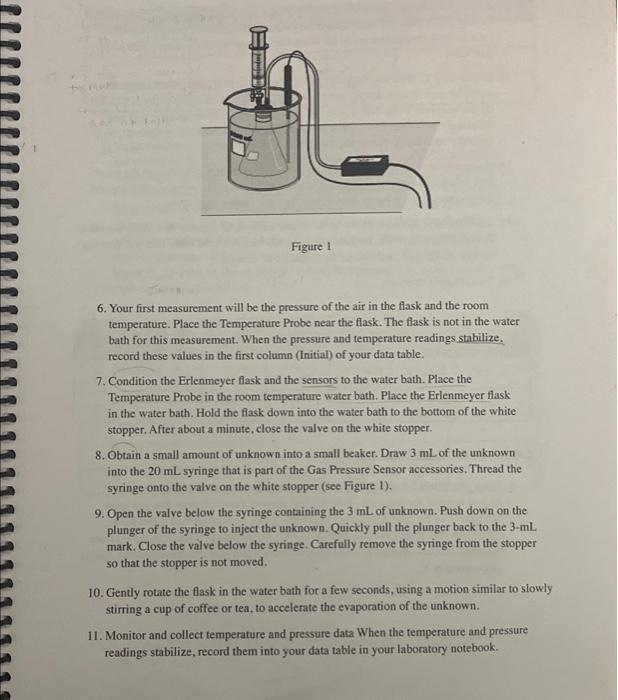
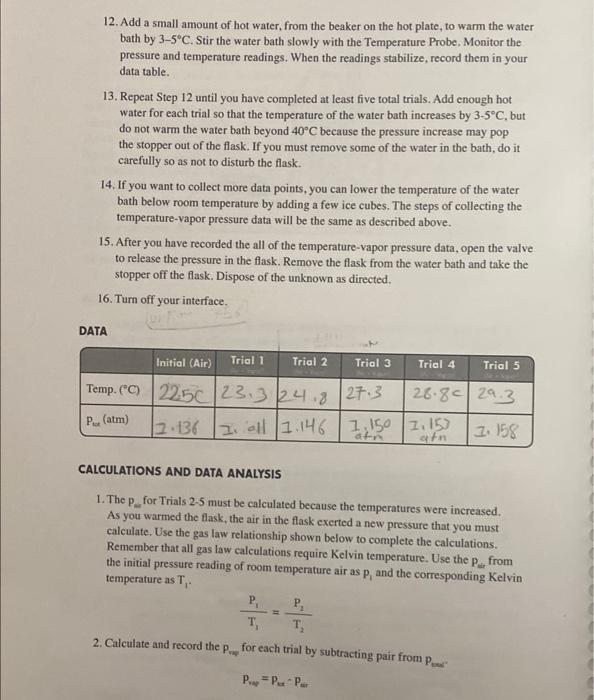
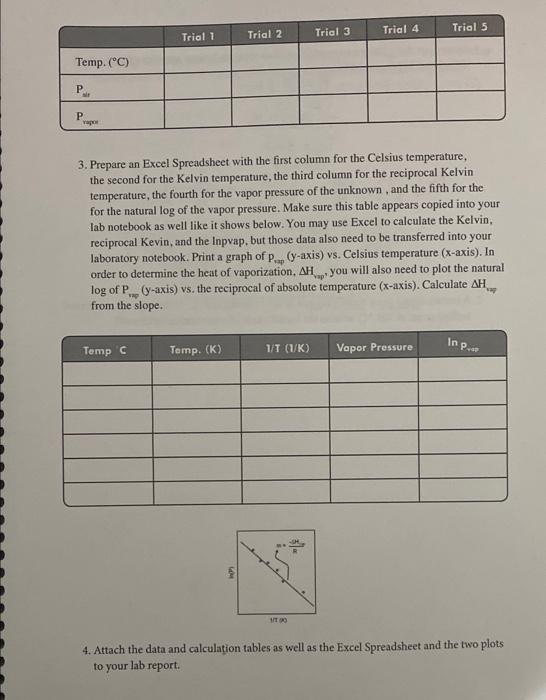
DATA \begin{tabular}{|l|l|l|l|l|l|} \hline & Trial 1 & Trial 2 & Trial 3 & Trial 4 & Trial 5 \\ \hline Temp. (C) & & & & & \\ \hline Pair & & & & & \\ \hline Pvapor & & & & & \\ \hline \end{tabular} 4. Attach the data and calculation tables as well as the Excel Spreadsheet and the two plots to your lab report. 12. Add a small amount of hot water, from the beaker on the hot plate, to warm the water bath by 35C. Stir the water bath slowly with the Temperature Probe. Monitor the pressure and temperature readings. When the readings stabilize; record them in your data table. 13. Repeat Step 12 until you have completed at least five total trials. Add enough hot water for each trial so that the temperature of the water bath increases by 35C, but do not warm the water bath beyond 40C because the pressure increase may pop the stopper out of the flask. If you must remove some of the water in the bath, do it carefully so as not to disturb the flask. 14. If you want to collect more data points, you can lower the temperature of the water bath below room temperature by adding a few ice cubes. The steps of collecting the temperature-vapor pressure data will be the same as described above. 15. After you have recorded the all of the temperature-vapor pressure data, open the valve to release the pressure in the flask. Remove the flask from the water bath and take the stopper off the flask. Dispose of the unknown as directed. 16. Turn off your interface. DATA CALCULATIONS AND DATA ANALYSIS 1. The Pu for Trials 25 must be calculated because the temperatures were increased. As you warmed the flask, the air in the flask exerted a new pressure that you must calculate. Use the gas law relationship shown below to complete the calculations. Remember that all gas law calculations require Kelvin temperature. Use the Paip from the initial pressure reading of room temperature air as P1 and the corresponding Kelvin temperature as TI. T1P1=T2P2 2. Calculate and record the Pny for each trial by subtracting pair from Pwal. Pvw=PvxPw 3. Prepare an Excel Spreadsheet with the first column for the Celsius temperature, the second for the Kelvin temperature, the third column for the reciprocal Kelvin temperature, the fourth for the vapor pressure of the unknown , and the fifth for the for the natural log of the vapor pressure. Make sure this table appears copied into your lab notebook as well like it shows below. You may use Excel to calculate the Kelvin. reciprocal Kevin, and the lnpvap, but those data also need to be transferred into your laboratory notebook. Print a graph of psp(y-axis) vs. Celsius temperature ( x-axis). In order to determine the heat of vaporization, Hap+you will also need to plot the natural log of Pap ( y-axis) vs, the reciprocal of absolute temperature ( x-axis). Calculate NHni from the slope. 4. Attach the data and calculation tables as well as the Excel Spreadshect and the two plots to your lab report. Determining the Heat of Vaporization of a Volatile Liquid OBJECTIVES - To determine the heat of vaporization of a liquid by measuring the vapor pressure of the liquid as a function of the temperature. The vapor pressure will be then plotted vs. the reciprocal Kelvin temperature, which yields a straight line according to the Clausius-Clayperon equation. The slope of the line provides the heat of vaporization of the liquid. BACKGROUND When a liquid is occupying a sealed container, a portion of the liquid will evaporate. The escaping gas molecules exert pressure in the container, and some of the gas molecules condense back into the liquid state. If the temperature inside the container is held constant, then at some point the number of molecules escaping the liquid phase will be equal to the number of molecules condensing back from the vapor phase, and an equilibrium will be reached. At equilibrium, the rate of condensation is equal to the rate of evaporation. The pressure at equilibrium is called vapor pressure, and will remain constant as long as the temperature in the container does not change. In mathematical terms, the relationship between the vapor pressure of a liquid and temperature is described in the ClausiusClayperon equation, (lnpvap=RHvapT1+constant) Q/where lnpvap is the natural logarithm of the vapor pressure, Hvp is the heat of vaporization, R is the universal gas constant (8.31J/molK), and T is the temperature in K. Thus, the Clausius Clayperon equation not only describes how the temperature affects the vapor pressure, but it relates these factors to the heat of vaporization of a liquid. Hp is the amount of energy required to cause one mole of liquid to evaporate at constant pressure. The volatility of two liquids can be compared by looking at their vapor pressures at a given temperature. For example, at 20C, water has a vapor pressure of 17.5 torr, while hexane's vapor pressure at the same temperature is 110 torr. Therefore, hexane is the more volatile of the two liquids. The reason for the difference in vapor pressures is that the intermolecular forces between neighboring water molecules are greater than between neighboring molecules in bexane. The hexane molecules at the surface can "escape" more easily into the vapor phase than the water molecules can at the surface of liquid water. The study of vapor pressure therefore gives insight into the strength of intermolecular forces between the molecules of liquids. The vapor pressure of a liquid increases exponentially with increasing temperature. The Clausius-Clayperon equation reveals that as a result of this exponential relationship, the natural logarithm of the vapor pressure plotted versus the reciprocal Kelvin temperature becomes a straight line. In this experiment, you will introduce a specific volume of a volatile liquid into a closed vessel, and measure the pressure in the vessel at several different temperatures. By analyzing the pressure-temperature measurements, you will be able to calculate the AHipp of the liquid. PROCEDURE 1. Obtain and wear goggles. CAUTION: The alcohol used in this experiment is flammable. Be sure that there are no open flames in the room during the experiment. 2. Use a hot plate to heat 250300mL of water in a 400 mL beaker. Keep the temperature of water in the bath below the boiling point. 3. Prepare a room temperature water bath in a 1-liter beaker. The bath should be deep enough to completely cover the 125mL Erlenmeyer flask in which the vapor will be studied. 4. Connect the Labquest 2 interface to the power source and turn on the interface (On/ off button is on the right side of the interface at the top.) When the screen comes on, connect the Temperature Probe to Channel 1 and the Gas Pressure Sensor to Channel 2 of the interface. Set the units as atm for pressure and " C for temperature. 5. The gas pressure sensor needs to be connected to the white rubber stopper using the clear tubing. (About one-half turn of the fittings will secure the tubing tightly.) Twist the white stopper snugly into the neck of the Erlenmeyer flask to avoid losing any of the gas that will be produced as he liquid evaporates (see Figure 1). Important: Open the valve on the white stopper. Figure 1 6. Your first measurement will be the pressure of the air in the flask and the room temperature. Place the Temperature Probe near the flask. The flask is not in the water bath for this measurement. When the pressure and temperature readings stabilize. record these values in the first column (Initial) of your data table: 7. Condition the Erlenmeyer flask and the sensors to the water bath. Place the Temperature Probe in the room temperature water bath. Place the Erlenmeyer flask in the water bath. Hold the flask down into the water bath to the bottom of the white stopper. After about a minute, close the valve on the white stopper. 8. Obtain a small amount of unknown into a small beaker. Draw 3mL of the unknown into the 20mL syringe that is part of the Gas Pressure Sensor accessories. Thread the syringe onto the valve on the white stopper (see Figure 1). 9. Open the valve below the syringe containing the 3mL of unknown. Push down on the plunger of the syringe to inject the unknown. Quickly pull the plunger back to the 3-mL mark. Close the valve below the syringe. Carefully remove the syringe from the stopper so that the stopper is not moved. 10. Gently rotate the flask in the water bath for a few seconds, using a motion similar to slowly stirring a cup of coffee or tea, to accelenate the evaporation of the unknown. 11. Monitor and collect temperature and pressure data When the temperature and pressure readings stabilize, record them into your data table in your laboratory notebook. 12. Add a small amount of hot water, from the beaker on the hot plate, to warm the water bath by 35C. Stir the water bath slowly with the Temperature Probe, Monitor the pressure and temperature readings. When the readings stabilize, record them in your data table. 13. Repeat Step 12 until you have completed at least five total trials. Add enough hot water for each trial so that the temperature of the water bath increases by 35C, but do not warm the water bath beyond 40C because the pressure increase may pop the stopper out of the flask. If you must remove some of the water in the bath, do it carefully so as not to disturb the flask. 14. If you want to collect more data points, you can lower the temperature of the water bath below room temperature by adding a few ice cubes. The steps of collecting the temperature-vapor pressure data will be the same as described above. 15. After you have recorded the all of the temperature-vapor pressure data, open the valve to release the pressure in the flask. Remove the flask from the water bath and take the stopper off the flask. Dispose of the unknown as directed. 16. Turn off your interface. DATA CALCULATIONS AND DATA ANALYSIS 1. The PworforTrials2.5 must be calculated because the temperatures were increased. As you warmed the flask, the air in the flask exerted a new pressure that you must calculate. Use the gas law relationship shown below to complete the calculations. Remember that all gas law calculations require Kelvin temperature. Use the pt from the initial pressure reading of room temperature air as p1 and the corresponding Kelvin temperature as T1. T1P1=T2P2 2. Calculate and record the pne for each trial by subtracting pair from pmed:. Pvop=PxPar 3. Prepare an Excel Spreadsheet with the first column for the Celsius temperature, the second for the Kelvin temperature, the third column for the reciprocal Kelvin temperature, the fourth for the vapor pressure of the unknown, and the fifth for the for the natural log of the vapor pressure. Make sure this table appears copied into your lab notebook as well like it shows below. You may use Excel to calculate the Kelvin, reciprocal Kevin, and the Inpvap, but those data also need to be transferred into your laboratory notebook. Print a graph of pap ( y-axis) vs. Celsius temperature (x-axis). In order to determine the heat of vaporization, Hvap, you will also need to plot the natural log of Pva ( y-axis) vs. the reciprocal of absolute temperature (x-axis). Calculate Hspy from the slope. 4. Attach the data and calculation tables as well as the Excel Spreadsheet and the two plots to your lab report
Step by Step Solution
There are 3 Steps involved in it

Get step-by-step solutions from verified subject matter experts