Question
Laboratory 1.1 Keil Simulator Configuration and Features The objective of this laboratory is to get users familiar with the ARM Keil simulator software. Use the
Laboratory 1.1 Keil Simulator Configuration and Features
The objective of this laboratory is to get users familiar with the ARM Keil simulator software. Use the following steps to create a simple MC8051 project using assembly programing:
Go to ARM Keil web site, http://www.keil.com/
Click the Downloads button.
Click the C51 button.
Provide your credentials and school name.
Download and install the software to your own computer device.
Establish a folder on your desktop for saving all your projects and associated files; say MC8051 .
Start the Vision software.
Click Project and select New Vision Project; say Project1.
Select the target device for the project; use Dallas Semiconductor DS89C430. Do not add the prompted file. Save your project.
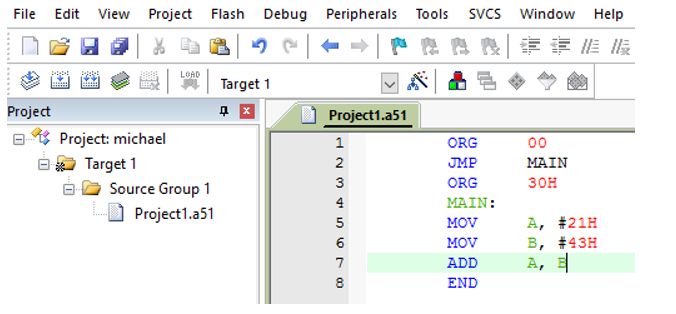
Type the following 8 lines new file in the Keil text editor;

Save the file. You must use an .a51 extension; say Project1.a51. Names are not case sensitive.
Add the Asm Source file to your project by double clicking in the project tree window the Source Group 1. Make sure the name of the editor open file matches the one you added to your active project.
Assemble your source file by clicking Project and then Rebuild all target files.
A correct source file syntax will produce no errors and no warnings but the logic might be still incorrect.
Examine your desktop folder and verify the Project.obj and the Project.lst created files by the assembler.
Now you are ready to debug the logic of your program. Click Debug and Start. Your free trial software allows only up to 2 K bytes of code.
You can open additional windows to help monitor changes during execution of your program. Access is available from the Peripherals and View menus.
Step through your program and verify the logic. Document and report your observations including the list file, debugging register and code memory windows snap shot.
File Edit View Project Flash Debug Peripherals Tools SVCS Window Help File Edit View Project Flash Debug Peripherals Tools SVCS Window HelpStep by Step Solution
There are 3 Steps involved in it
Step: 1

Get Instant Access to Expert-Tailored Solutions
See step-by-step solutions with expert insights and AI powered tools for academic success
Step: 2

Step: 3

Ace Your Homework with AI
Get the answers you need in no time with our AI-driven, step-by-step assistance
Get Started


