Answered step by step
Verified Expert Solution
Question
1 Approved Answer
Note: Objective: To disassemble and reassemble a computer correctly Parts: A computer to disassemble A toolkit An antistatic wrist strap (if possible) Observe proper ESD


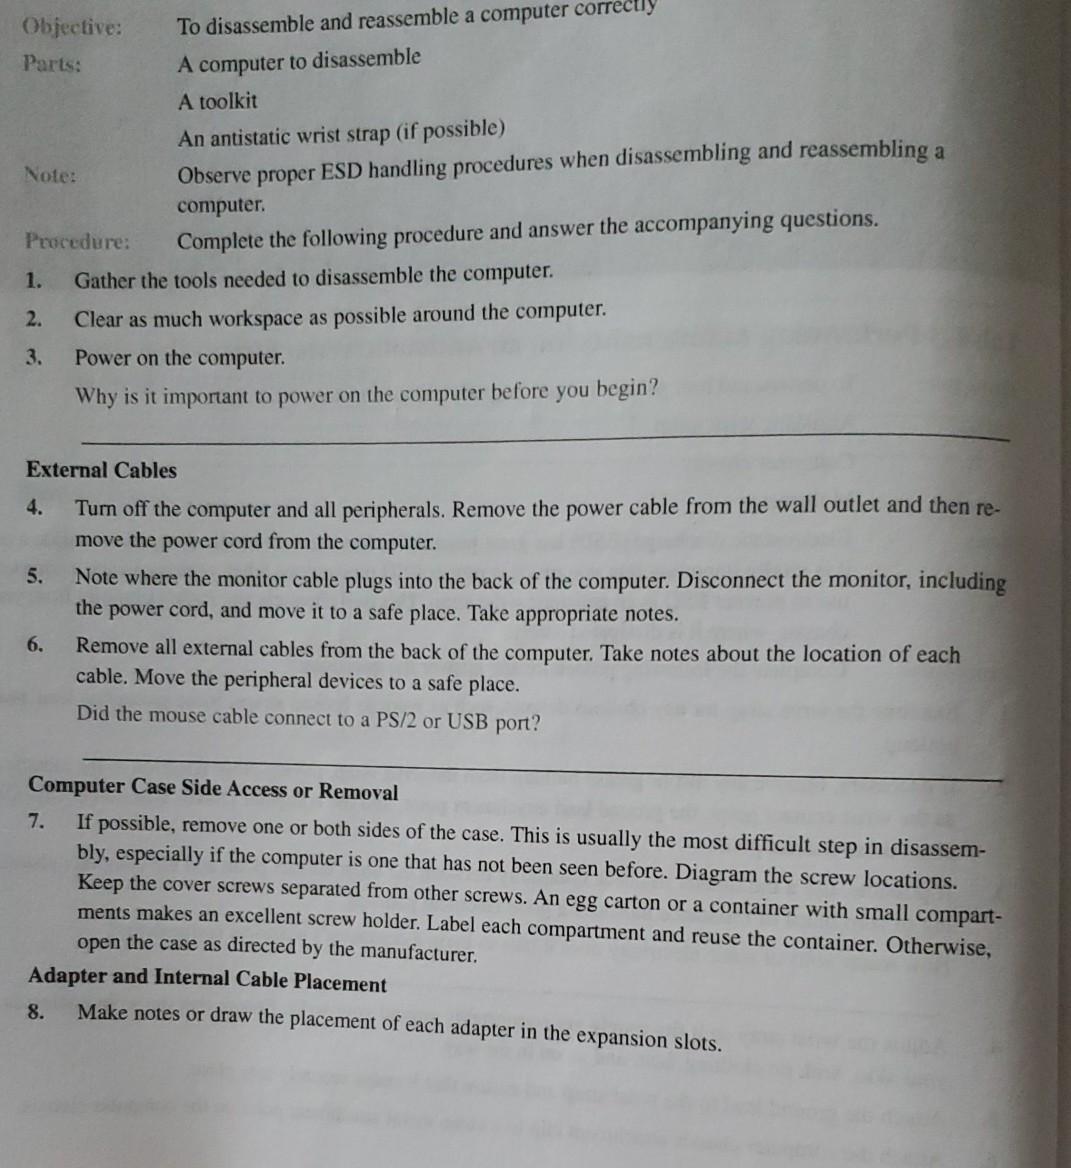
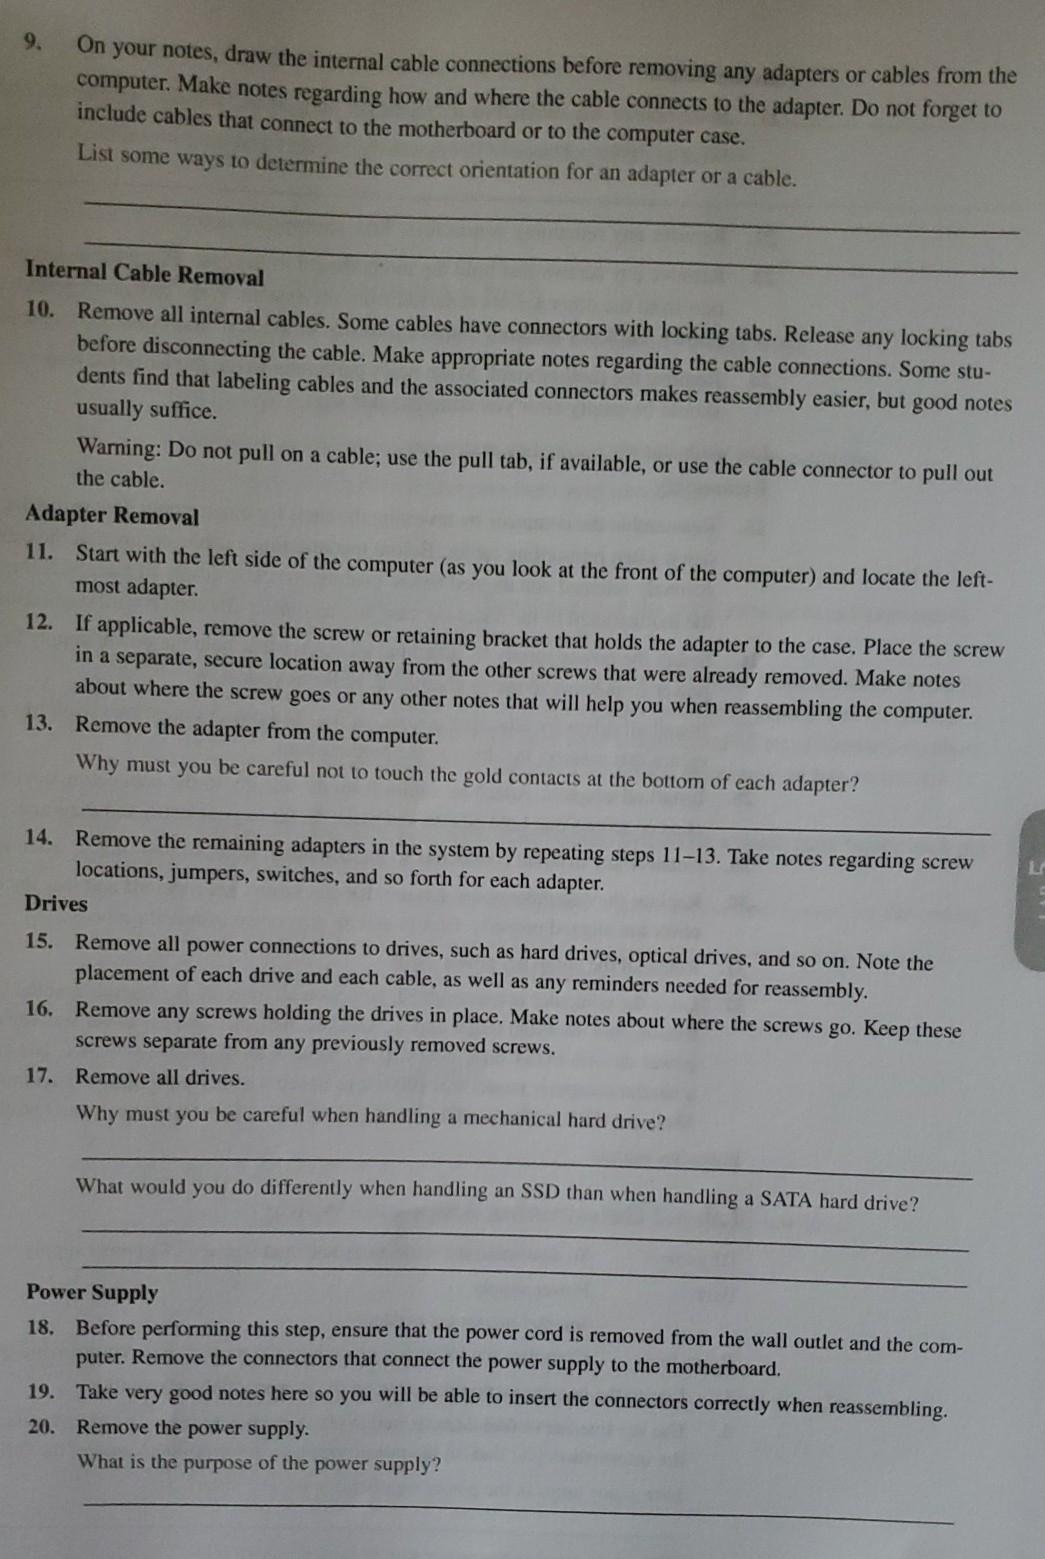
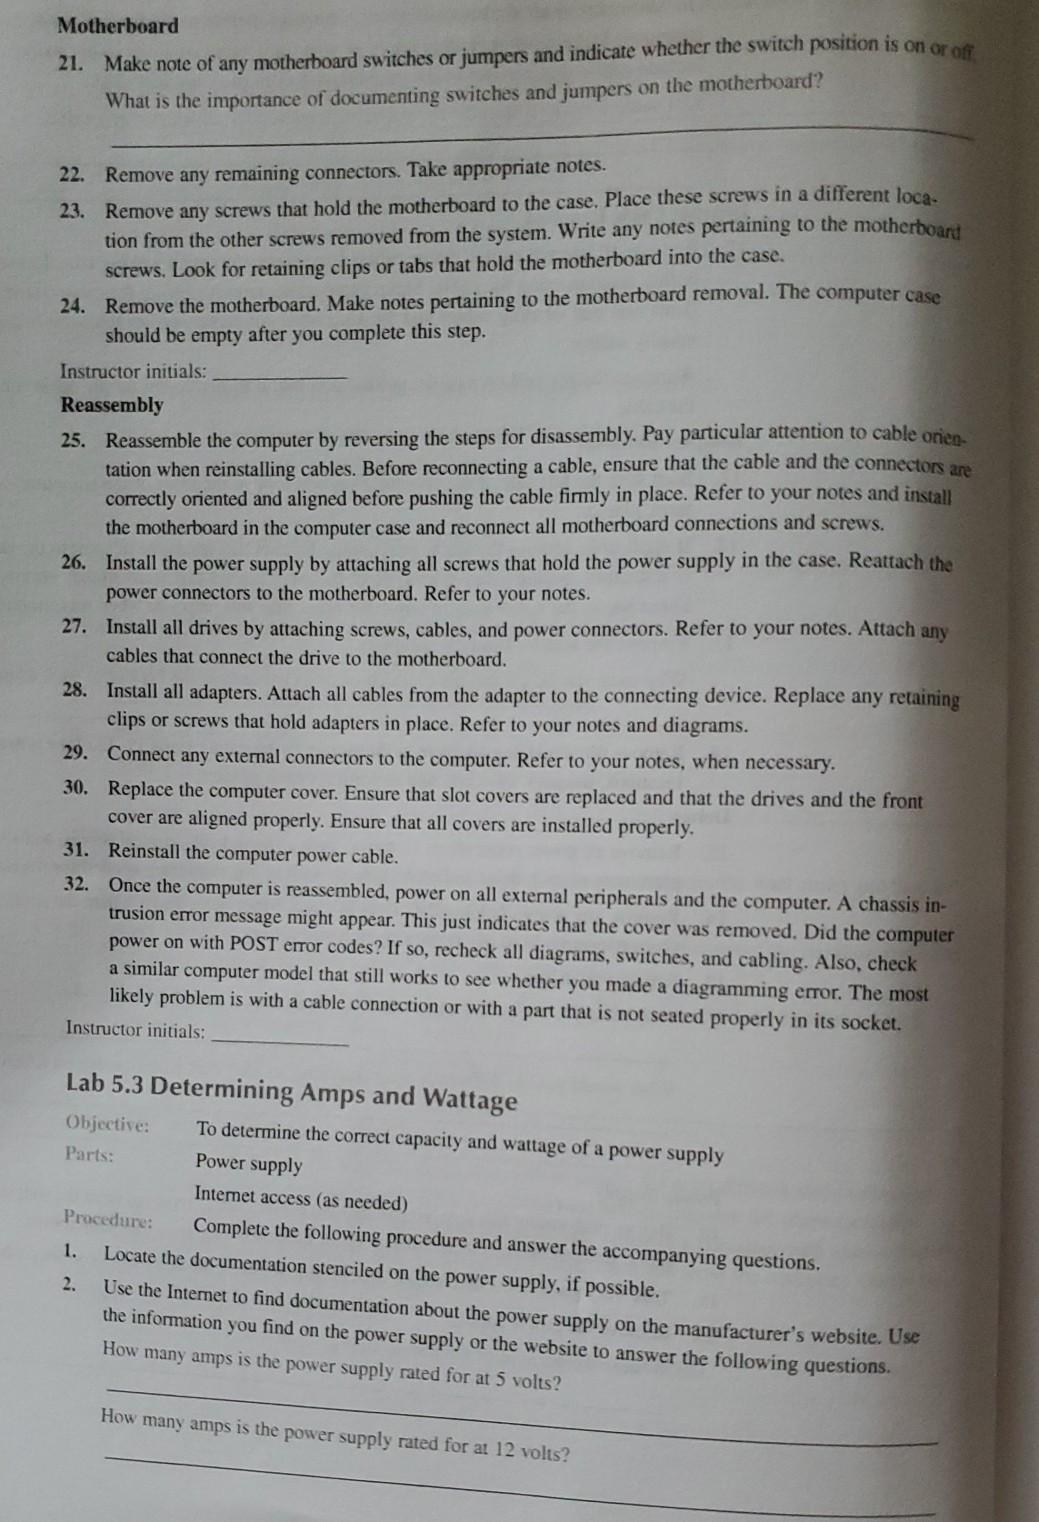
Note: Objective: To disassemble and reassemble a computer correctly Parts: A computer to disassemble A toolkit An antistatic wrist strap (if possible) Observe proper ESD handling procedures when disassembling and reassembling a computer. Procedure: Complete the following procedure and answer the accompanying questions. 1. Gather the tools needed to disassemble the computer. 2. Clear as much workspace as possible around the computer. 3. Power on the computer. Why is it important to power on the computer before you begin? External Cables 4. Turn off the computer and all peripherals. Remove the power cable from the wall outlet and then re- move the power cord from the computer. 5. Note where the monitor cable plugs into the back of the computer. Disconnect the monitor, including the power cord, and move it to a safe place. Take appropriate notes. 6. Remove all external cables from the back of the computer. Take notes about the location of each cable. Move the peripheral devices to a safe place. Did the mouse cable connect to a PS/2 or USB port? Computer Case Side Access or Removal 7. If possible, remove one or both sides of the case. This is usually the most difficult step in disassem- bly, especially if the computer is one that has not been seen before. Diagram the screw locations. Keep the cover screws separated from other screws. An egg carton or a container with small compart- ments makes an excellent screw holder. Label each compartment and reuse the container. Otherwise, open the case as directed by the manufacturer. Adapter and Internal Cable Placement 8. Make notes or draw the placement of each adapter in the expansion slots. 9. On your notes, draw the internal cable connections before removing any adapters or cables from the computer. Make notes regarding how and where the cable connects to the adapter. Do not forget to include cables that connect to the motherboard or to the computer case. List some ways to determine the correct orientation for an adapter or a cable. Internal Cable Removal 10. Remove all internal cables. Some cables have connectors with locking tabs. Release any locking tabs before disconnecting the cable. Make appropriate notes regarding the cable connections. Some stu- dents find that labeling cables and the associated connectors makes reassembly easier, but good notes usually suffice. Warning: Do not pull on a cable; use the pull tab, if available, or use the cable connector to pull out the cable. Adapter Removal 11. Start with the left side of the computer (as you look at the front of the computer) and locate the left- most adapter 12. If applicable, remove the screw or retaining bracket that holds the adapter to the case. Place the screw in a separate, secure location away from the other screws that were already removed. Make notes about where the screw goes or any other notes that will help you when reassembling the computer. 13. Remove the adapter from the computer. Why must you be careful not to touch the gold contacts at the bottom of each adapter? 14. Remove the remaining adapters in the system by repeating steps 11-13. Take notes regarding screw locations, jumpers, switches, and so forth for each adapter. Drives 15. Remove all power connections to drives, such as hard drives, optical drives, and so on. Note the placement of each drive and each cable, as well as any reminders needed for reassembly. 16. Remove any screws holding the drives in place. Make notes about where the screws go. Keep these screws separate from any previously removed screws. 17. Remove all drives. Why must you be careful when handling a mechanical hard drive? What would you do differently when handling an SSD than when handling a SATA hard drive? Power Supply 18. Before performing this step, ensure that the power cord is removed from the wall outlet and the com- puter. Remove the connectors that connect the power supply to the motherboard. 19. Take very good notes here so you will be able to insert the connectors correctly when reassembling. 20. Remove the power supply. What is the purpose of the power supply? Motherboard 21. Make note of any motherboard switches or jumpers and indicate whether the switch position is on or off What is the importance of documenting switches and jumpers on the motherboard? 22. Remove any remaining connectors. Take appropriate notes. 23. Remove any screws that hold the motherboard to the case. Place these screws in a different loca. tion from the other screws removed from the system. Write any notes pertaining to the motherboard screws. Look for retaining clips or tabs that hold the motherboard into the case. 24. Remove the motherboard. Make notes pertaining to the motherboard removal. The computer case should be empty after you complete this step. Instructor initials: Reassembly 25. Reassemble the computer by reversing the steps for disassembly. Pay particular attention to cable orien. tation when reinstalling cables. Before reconnecting a cable, ensure that the cable and the connectors are correctly oriented and aligned before pushing the cable firmly in place. Refer to your notes and install the motherboard in the computer case and reconnect all motherboard connections and screws. 26. Install the power supply by attaching all screws that hold the power supply in the case. Reattach the power connectors to the motherboard. Refer to your notes. 27. Install all drives by attaching screws, cables, and power connectors. Refer to your notes. Attach any cables that connect the drive to the motherboard. 28. Install all adapters. Attach all cables from the adapter to the connecting device. Replace any retaining clips or screws that hold adapters in place. Refer to your notes and diagrams. 29. Connect any external connectors to the computer. Refer to your notes, when necessary. 30. Replace the computer cover. Ensure that slot covers are replaced and that the drives and the front cover are aligned properly. Ensure that all covers are installed properly. 31. Reinstall the computer power cable. 32. Once the computer is reassembled, power on all external peripherals and the computer. A chassis in- trusion error message might appear. This just indicates that the cover was removed. Did the computer power on with POST error codes? If so, recheck all diagrams, switches, and cabling. Also, check a similar computer model that still works to see whether you made a diagramming error. The most likely problem is with a cable connection or with a part that is not seated properly in its socket. Instructor initials: Lab 5.3 Determining Amps and Wattage Objective: To determine the correct capacity and wattage of a power supply Parts: Power supply Internet access as needed) Procedure: Complete the following procedure and answer the accompanying questions, Locate the documentation stenciled on the power supply, if possible. 2. Use the Intemet to find documentation about the power supply on the manufacturer's website. Use the information you find on the power supply or the website to answer the following questions. How many amps is the power supply rated for at 5 volts? 1. How many amps is the power supply rated for at 12 volts
Step by Step Solution
There are 3 Steps involved in it
Step: 1

Get Instant Access to Expert-Tailored Solutions
See step-by-step solutions with expert insights and AI powered tools for academic success
Step: 2

Step: 3

Ace Your Homework with AI
Get the answers you need in no time with our AI-driven, step-by-step assistance
Get Started


