Question: Please write in C language. Aim of the Project In this project you will first encrypt a message on an image by using the fact
Please write in C language.

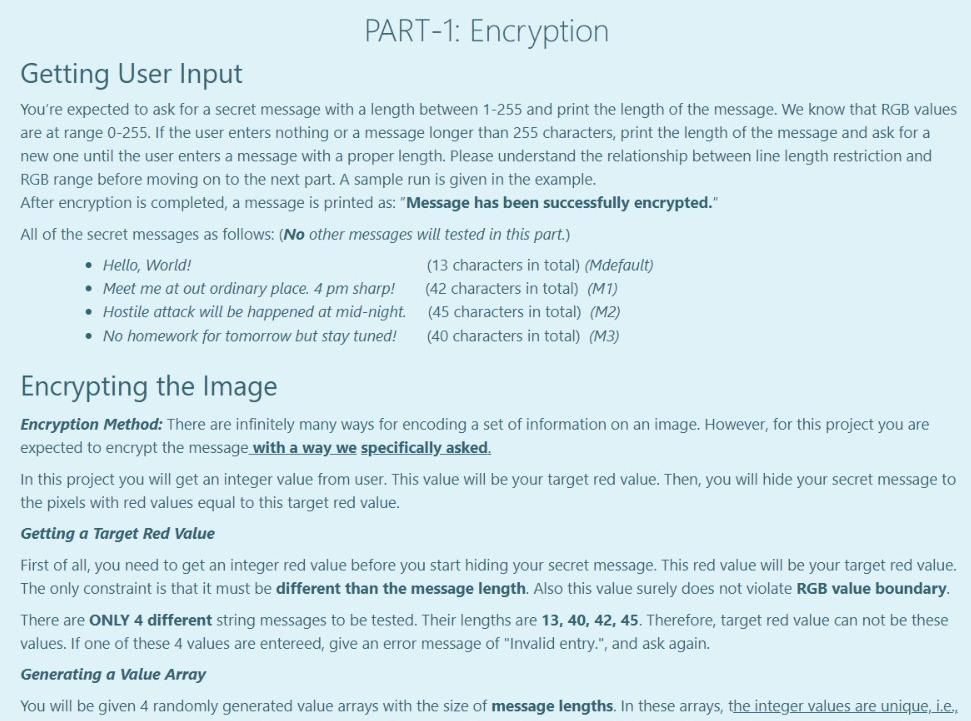
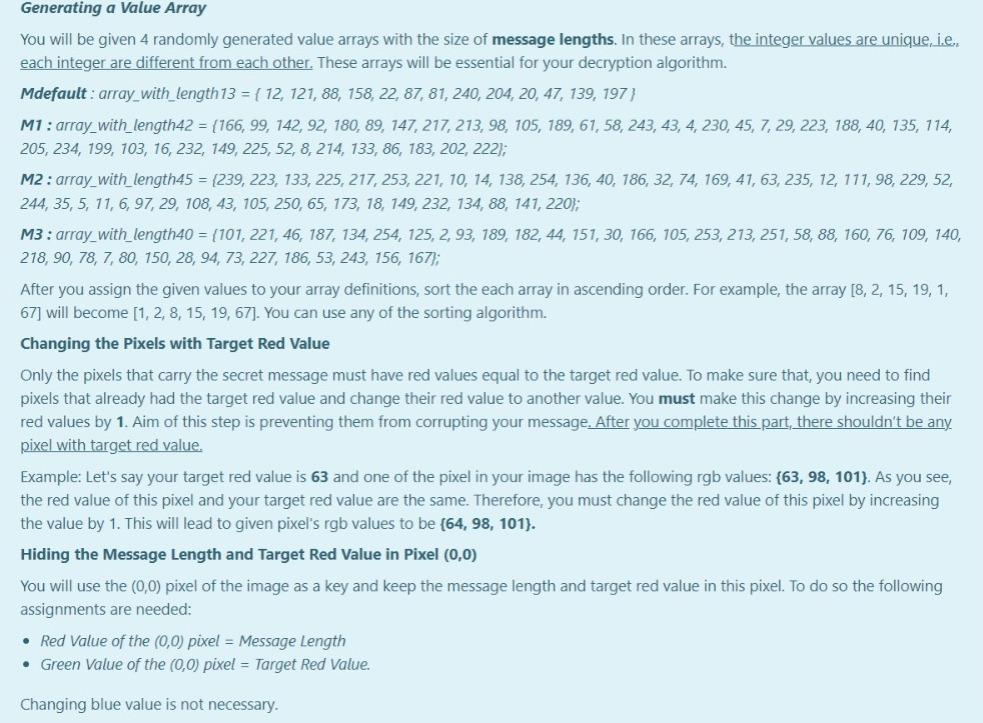
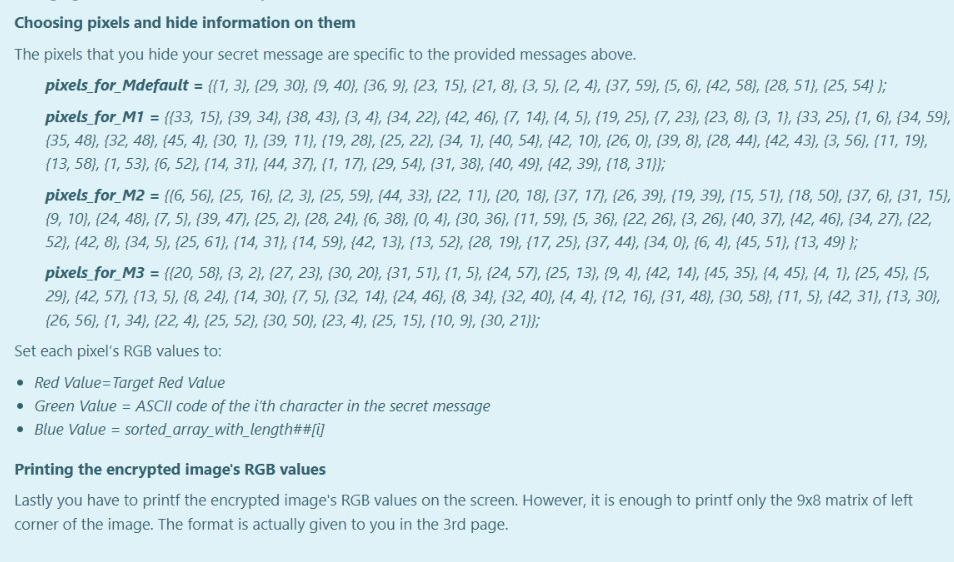
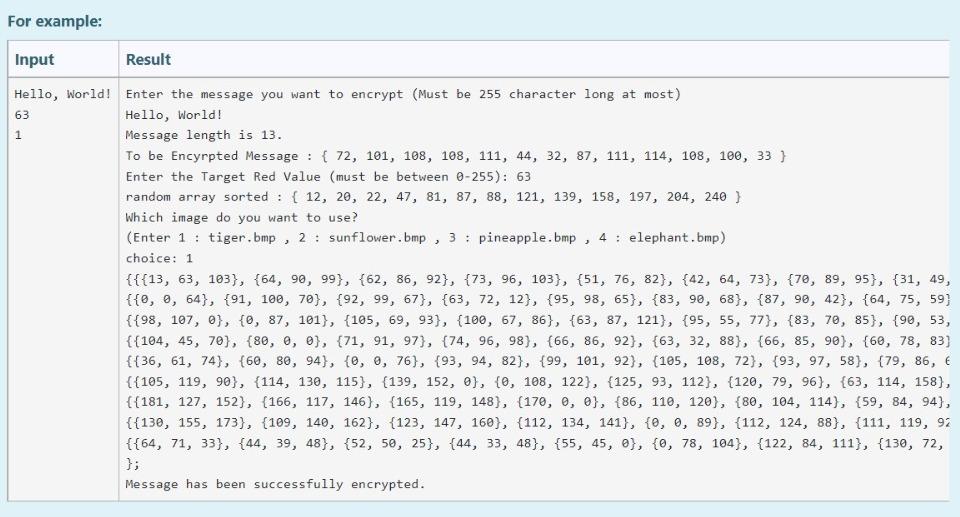
Aim of the Project In this project you will first encrypt a message on an image by using the fact that the pixels of the image carry some specific data that is ordinarily a color data stored as RGB values. You will manipulate this data to hide another information in them in this case you are expected to hide characters as ASCII values). You will be given clear instructions on how to store these data in a way that you can decrypt the image and get back the hidden message. On the second part of the project you are expected to decrypt the image and get the hidden secret message back. You will also be given clear instructions on how to get the message properly. Given Images You are given original images to hide the user-given secret message. If you successfully complete the first part, then move to the second part of the project On the other hand, we provide you additional encrypted images in case if you would like to work on part 2 before finishing part 1. Your code must only work with the provided images below. No other images will be tested. Original Images: tiger.bmp sunflower.bmp pineapple.bmp elephant.bmp pineapple.bmp elephant.bmp You first download them (right click on the image then save as). All 4 images are jpg formatted. However, you have to change their type as .bmp, if you want to get the rgb values of each pixel via the code that will be provided for you in the next page. Encrypted Images: You will get the rgb values of each pixel of all encrypted images in txt file. In this way, you at least can manage to do the 2nd part of this project To download the txt files in a zip folder, click here. IIIT! You will NOT check any code in this page. IIIII! This part is not a grade matter question but essential for the graded parts. We are providing you the following code that reads an image and stores the rgb values of each pixel of this image. However, you still need to manipulate some parts in the code. Code Lines to be manipulated : line 4, line 16, line 32, line 50. Do not change the other lines. This code snippet is not valid in onlinesorular debugger since it includes file operations. Therefore, you have to install on your computer any one of the Desktop IDEs such as DEVC++ or CodeBlocks You will use this function only to get the rgb values of each pixel and you will copy the whole array into your code manually. For example, when you read the tiger image (tiger.bmp), you will get the following. {{{68, 94, 103}, {63, 90, 99}, {62, 86, 92}}, {{0, 0, 64}, {91, 100, 70}, {92, 99, 67}}, {{98, 107, @}, {0, 87, 101}, {105, 69, 93}} In this very example (tiger.bmp), we only gave you the 3x3 left corner part of the image (Actual image contains 47x62 pixel). {68 94 103) is the rgb values for the left corner. Its adjacent pixel has the rgb values of {63 90 99) and so on. There must be stored 47x62 (width x heights) pixels and their rgb values in an array for each images. This means that the array must contain only 47x62x3 values. Hint 1: All images that were given in the previous page must be dealt with. Hint 2: You can define a multi-dimensional array to store this data in line 4. Hint 3: Copy the printed values on the command window and paste it to your first part code, directly. Do NOT delete any of the curly brackets or commas or semi colons. Hint 4: You can check whether your resultant multi-dimensional array values are true or not, in the next page. How to check the values will be explained there. Hint 5: Use unsigned char type to define multi-dimensional array, not int. This is important ! TINTI You will NOT check any code in this page. IIIIII ...!!! You can check the rgb values of given images by using the code in the previous page. The process is very simple. Change the height value with 8, in line 11. the width value with 9, in line 14. the width value with 9, in line 17. the height value with 8, in line 21. Change the file names as tiger, sunflower, pineapple or elephant in line 32. Run the code in a desktop IDE. On command window you will have the rgb values as given below (figure shows the values for tiger.bmp). {{{68, 94, 193}, {63, 90, 99}, {62, 86, 92}, {73, 96, 103}, {51, 76, 82}, {42, 64, 73}, {70, 89, 95}, {31, 49, 59}, {57, 79, 86}}, ie, e, 64), (91, 100, 70), (92, 99, 67), (89, 94, 77), 95, 98, 65), (83, 90, 68}, {87, 90, 42}, {64, 75, 59}, {74, 79, 25}}, (198, 107, e}, {e, 87, 101), (105, 69, 93), 100, 67, 86), 93, 60, 87}, {95, 55, 77}, {83, 70, 85}, {90, 53, 76), (86, 49, 65}}. ((184, 45, 70), (80, 0, 0), (71, 91, 97}, {74, 96, 98), (66, 86, 92}, {57, 79, 83), (66, 85, 90), (60, 78, 83), (61, 75, 82}}, (36, 61, 74}, {68, 88, 94}, {@, e, 76), 93, 94, 82), (99, 101, 92), (105, 188, 22}, {93, 97, 58}, {79, 86, 65}, {83, 90, 89}}, {{105, 119, 90}, {114, 130, 115}, {139, 152, e}, {e, 108, 122}, {125, 93, 112}, {120, 79, 96}, {102, 88, 188}, {116, 76, 96}, {106, 82, 105}}, ([181, 127, 152}, {166, 117, 146}, {165, 119, 148}, {170, 0, 6}, {86, 110, 120}, {80, 184, 114}, {59, 84, 94}, {48, 64, 74}, {4, 58, 68}}, ( 130, 155, 173}, {109, 140, 162), 123, 147, 160), (112, 134, 141}, {e, 8, 89}, {112, 124, 88}, {111, 119, 92), (115, 123, 83}, {106, 116, 96}} execution time: 0.151 s Process returned @ (exe) Press any key to continue. Copy all values and paste here, You need to use printf for each line of output as given in the example below. After you finish this part, you have to change the values inside the for loop conditions with variable names height and width in order to get the whole array. This page only checks 8x9 left corner part of the whole array to make it less harmful to our server. *** There were some mistakes in the code snippet given below. We corrected it but if you still observe red cross even for the example, just copy the expected values and paste to your code. Also you can re-attempt to the quiz and this issue will be solved immediately. (Sorry about it.) For example: Input Result 1 {{{68, 94, 103}, {63, 90, 99}, {62, 86, 92}, {73, 96, 103}, {51, 76, 82}, {42, 64, 73}, {70, 89, 95}, {31, 49, 59}, {' {{0, 0, 64}, {91, 109, 70}, {92, 99, 67}, {89, 94, 77}, {95, 98, 65}, {83, 90, 68}, {87, 90, 42}, {64, 75, 59}, {74, {{98, 107, @}, {0, 87, 101}, {105, 69, 93}, {100, 67, 86}, {93, 60, 87}, {95, 55, 77}, {83, 70, 85}, {90, 53, 76}, {81 {{104, 45, 70}, {80, 0, 0}, {71, 91, 97}, {74, 96, 98}, {66, 86, 92}, {57, 79, 83}, {66, 85, 90}, {60, 78, 83}, {61, {{36, 61, 74}, {60, 80, 94}, {0, 0, 76}, {93, 94, 82}, {99, 101, 92}, {105, 108, 72}, {93, 97, 58}, {79, 86, 65}, {83 {{105, 119, 90), {114, 130, 115}, {139, 152, 0), {0, 108, 122}, {125, 93, 112}, {120, 79, 96}, {102, 88, 108}, {116, {{181, 127, 152}, {166, 117, 146), 165, 119, 148}, {170, 0, 0), {86, 119, 120), 80, 104, 114}, {59, 84, 94}, {48, 6 {{130, 155, 173}, {109, 140, 162), (123, 147, 160}, {112, 134, 141}, {0, 0, 89), (112, 124, 88}, {111, 119, 92}, {115 }; PART-1: Encryption Getting User Input You're expected to ask for a secret message with a length between 1-255 and print the length of the message. We know that RGB values are at range 0-255. If the user enters nothing or a message longer than 255 characters, print the length of the message and ask for a new one until the user enters a message with a proper length. Please understand the relationship between line length restriction and RGB range before moving on to the next part. A sample run is given in the example. After encryption is completed, a message is printed as: "Message has been successfully encrypted." All of the secret messages as follows: (No other messages will tested in this part.) Hello, World! (13 characters in total) (Mdefault) Meet me at out ordinary place. 4 pm sharp! (42 characters in total) (M1) Hostile attack will be happened at mid-night (45 characters in total) (M2) No homework for tomorrow but stay tuned! (40 characters in total) (M3) Encrypting the Image Encryption Method: There are infinitely many ways for encoding a set of information on an image. However, for this project you are expected to encrypt the message with a way we specifically asked. In this project you will get an integer value from user. This value will be your target red value. Then, you will hide your secret message to the pixels with red values equal to this target red value. Getting a Target Red Value First of all, you need to get an integer red value before you start hiding your secret message. This red value will be your target red value. The only constraint is that it must be different than the message length. Also this value surely does not violate RGB value boundary. There are ONLY 4 different string messages to be tested. Their lengths are 13, 40, 42, 45. Therefore, target red value can not be these values. If one of these 4 values are entereed, give an error message of "Invalid entry", and ask again. Generating a Value Array You will be given 4 randomly generated value arrays with the size of message lengths. In these arrays, the integer values are unique, i.e. Generating a Value Array You will be given 4 randomly generated value arrays with the size of message lengths. In these arrays, the integer values are unique, i.e. each integer are different from each other. These arrays will be essential for your decryption algorithm. Mdefault : array_with_length 13 = { 12, 121, 88, 158, 22, 87, 81, 240, 204, 20, 47, 139, 197} M1: array_with_length42 = {166, 99, 142, 92, 180, 89, 147, 217, 213, 98, 105, 189, 61, 58, 243, 43, 4, 230, 45, 7, 29, 223, 188, 40, 135, 114, 205, 234, 199, 103, 16, 232, 149, 225, 52, 8, 214, 133, 86, 183, 202, 222); M2: array_with_length45 = 239, 223, 133, 225, 217, 253, 221, 10, 14, 138, 254, 136, 40, 786, 32, 74, 169, 41, 63, 235, 12, 111, 98, 229, 52, 244, 35, 5, 11, 6, 97, 29, 108, 43, 105, 250, 65, 173, 18, 149, 232, 134, 88, 141, 220); M3: array_with_length40 = (101, 221, 46, 187, 134, 254, 125, 2, 93, 189, 182, 44, 151, 30, 166, 105, 253, 213, 251, 58, 88, 160, 76, 109, 140, 218, 90, 78, 7, 80, 150, 28, 94, 73, 227, 186, 53, 243, 156, 167); After you assign the given values to your array definitions, sort the each array in ascending order. For example, the array [8, 2, 15, 19, 1, 67] will become [1, 2, 8, 15, 19, 67). You can use any of the sorting algorithm. Changing the Pixels with Target Red Value Only the pixels that carry the secret message must have red values equal to the target red value. To make sure that, you need to find pixels that already had the target red value and change their red value to another value. You must make this change by increasing their red values by 1. Aim of this step is preventing them from corrupting your message. After you complete this part, there shouldn't be any pixel with target red value. Example: Let's say your target red value is 63 and one of the pixel in your image has the following rgb values: (63, 98, 101). As you see, the red value of this pixel and your target red value are the same. Therefore, you must change the red value of this pixel by increasing the value by 1. This will lead to given pixel's rgb values to be (64, 98, 101). 1 Hiding the Message Length and Target Red Value in Pixel (0,0) You will use the (0,0) pixel of the image as a key and keep the message length and target red value in this pixel. To do so the following assignments are needed: Red Value of the (0,0) pixel = Message Length Green Value of the (0,0) pixel = Target Red Value. Changing blue value is not necessary. Choosing pixels and hide information on them The pixels that you hide your secret message are specific to the provided messages above. pixels_for_Mdefault = {{1, 3), (29, 30), 19, 40). (36, 9) (23, 15), (21, 8), (3,5), (2,4), (37, 59), (5, 6), (42, 58), (28,51), (25, 54}); pixels_for_M1 = {{33, 15), (39, 34}, {38, 43), (3,4}, {34, 22), (42, 46), (7, 14), (4,5), (19,25), (7, 23), (23, 8), (3, 1), (33, 25), (1,6), {34, 59), (35,48), (32, 48), (45, 4), (30, 1), (39, 11), (19, 28), (25, 22). {34, 1), (40, 54), (42, 10), {26, 0), (39, 8), (28, 44), (42, 43), (3, 56), (11, 19), (13,58), (1,53), (6,52}, {14, 31), (44, 37), (1, 17}, {29, 54, 31, 38), [40, 49), (42, 39), (18, 31}); pixels_for_M2 = {(6, 56), (25, 16), (2, 3), (25, 59), (44, 33), 122, 11), (20, 18), (37, 17), (26, 39), (19, 39), (15, 51), (18,50), (37,6), (31, 15), (9, 10), (24, 48), (7,5), (39, 47), (25, 2), (28, 24), (6,38), (0,4}, {30, 36), (11, 59), (5, 36). (22, 26), (3, 26), (40, 37), [42, 46), (34, 27), (22, 52), (42, 8), (34,5), (25, 61), (14, 31}, {14, 59},{42, 13), (13,52}, {28, 19},{17, 25}, {37, 44), (34,0), (6,4), (45, 51), (13, 49} }; pixels for M3 = {{20, 58}, {3, 2), (27, 23), (30, 20}, {31, 51}, {1,5}, {24, 57), (25, 13}, {9, 4), 142, 14), [45, 35), (4,45), (4, 1), (25, 45), (5, 29), (42,57), (13,5), (8, 24), (14, 30}, {7,5), (32, 14), (24, 46), (8, 34), (32, 40}, {4, 4), (12, 16), (31, 48), (30, 58}, {11,5), (42, 31}, {13, 30), {26, 56), (1, 34), (22,4), (25, 52), (30, 50), (23,4), (25, 15), (10, 9, (30, 21}}; Set each pixel's RGB values to: Red Value=Target Red Value Green Value = ASCII code of the i'th character in the secret message Blue Value = sorted_array_with_length##[U Printing the encrypted image's RGB values Lastly you have to printf the encrypted image's RGB values on the screen. However, it is enough to printf only the 9x8 matrix of left corner of the image. The format is actually given to you in the 3rd page. For example: 3 Input Result Hello, World! Enter the message you want to encrypt (Must be 255 character long at most) 63 Hello, World! 1 Message length is 13. To be Encyrpted Message : { 72, 101, 108, 108, 111, 44, 32, 87, 111, 114, 108, 100, 33 } Enter the Target Red Value (must be between 0-255): 63 random array sorted : { 12, 20, 22, 47, 81, 87, 88, 121, 139, 158, 197, 204, 240 } Which image do you want to use? (Enter 1 : tiger.bmp , 2 : sunflower.bmp 3: pineapple.bmp, 4: elephant.bmp) choice: 1 {{{13, 63, 103}, {64, 90, 99}, {62, 86, 92}, {73, 96, 103}, {51, 76, 82}, {42, 64, 73}, {70, 89, 95}, {31, 49, {{0, 0, 64}, {91, 100, 70}, {92, 99, 67}, {63, 72, 12}, {95, 98, 65}, {83, 90, 68}, {87, 90, 42}, {64, 75, 59) {{98, 107, 0}, {0, 87, 101}, {105, 69, 93}, {100, 67, 86}, {63, 87, 121}, {95, 55, 77}, {83, 70, 85}, {90, 53, {{104, 45, 70}, {80, 0, 0}, {71, 91, 97}, {74, 96, 98}, {66, 86, 92}, {63, 32, 88}, {66, 85, 90), {60, 78, 83) {{36, 61, 74}, {60, 80, 94}, {0, 0, 76}, {93, 94, 82}, {99, 101, 92), (105, 108, 72}, {93, 97, 58}, {79, 86, E {{105, 119, 90}, {114, 130, 115}, {139, 152, 0}, {0, 108, 122}, {125, 93, 112}, {120, 79, 96}, {63, 114, 158), {{181, 127, 152), (166, 117, 146), 165, 119, 148}, (170, 0, 0}, {86, 110, 120}, {80, 104, 114}, {59, 84, 94}, {{130, 155, 173}, {109, 140, 162}, {123, 147, 160}, {112, 134, 141}, {0, 0, 89}, {112, 124, 88}, {111, 119, 92 {{64, 71, 33}, {44, 39, 48}, {52, 50, 25}, {44, 33, 48}, {55, 45, 0}, {0, 78, 104}, {122, 84, 111}, {130, 72, }; Message has been successfully encrypted
Step by Step Solution
There are 3 Steps involved in it

Get step-by-step solutions from verified subject matter experts


