Question: Program Description: This assignment tests your understanding of inheritance, polymorphism, interfaces, and abstract classes. The program is a simulator of city streets, traffic lights, and
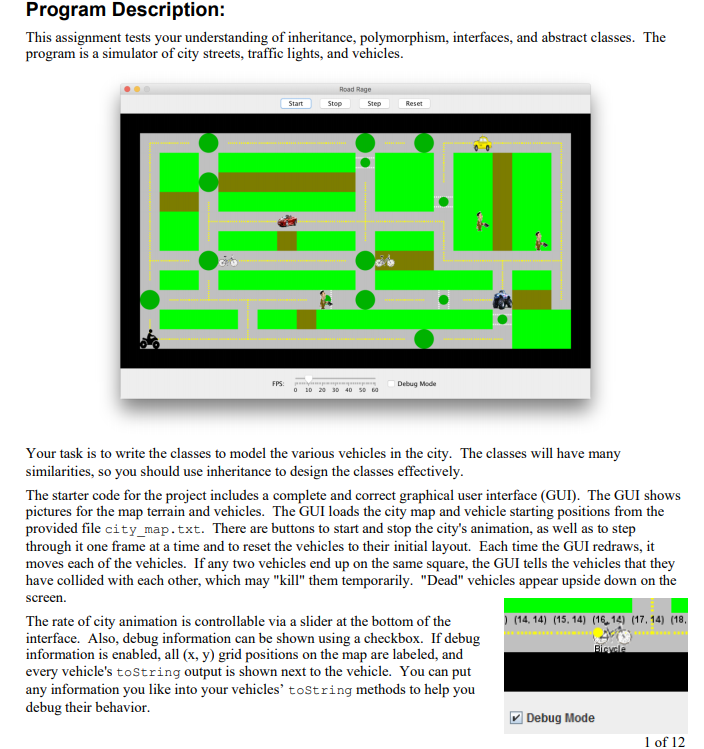
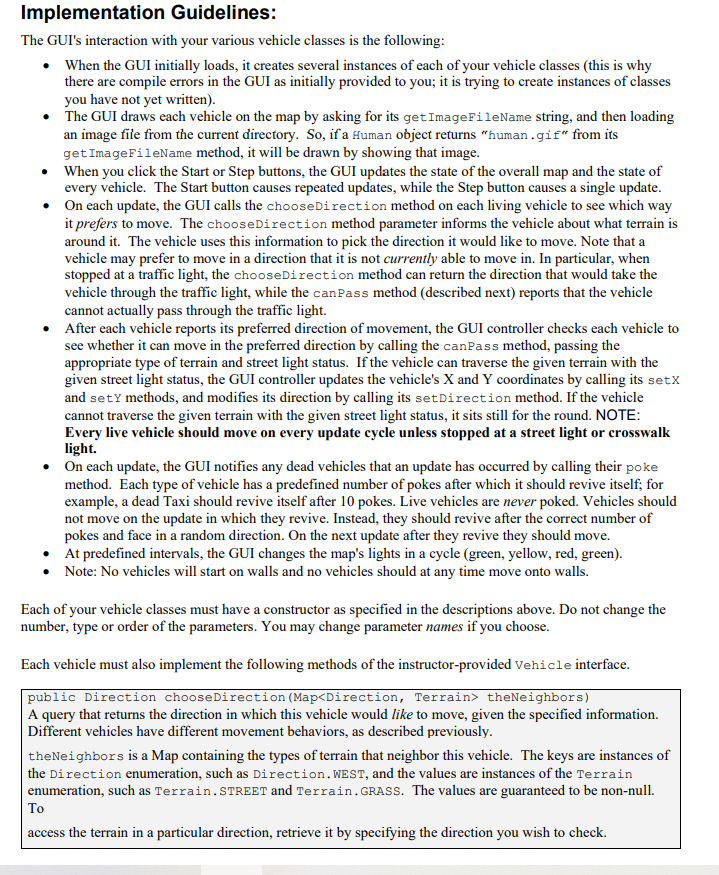
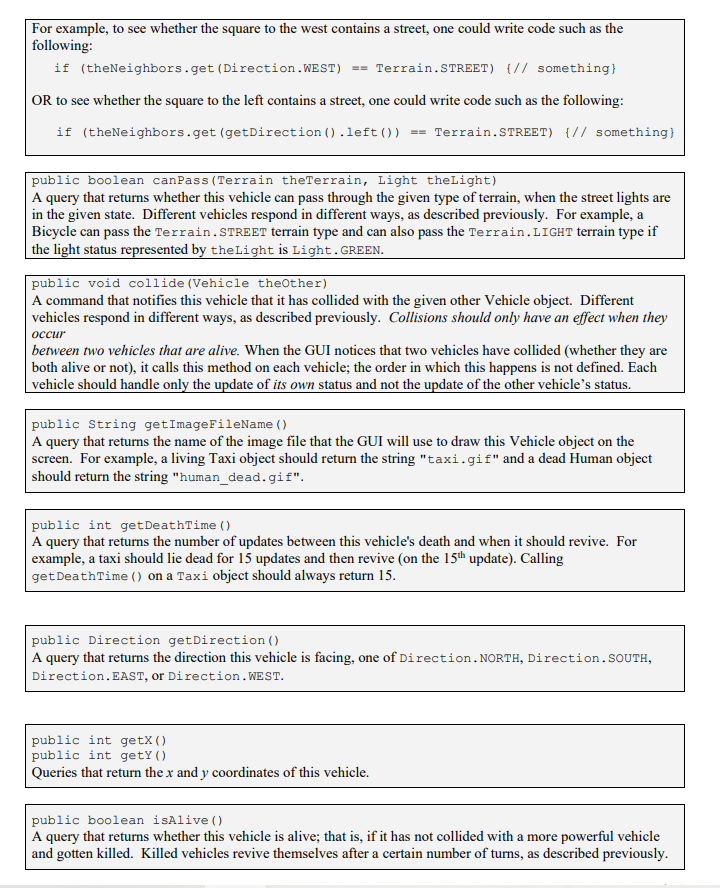
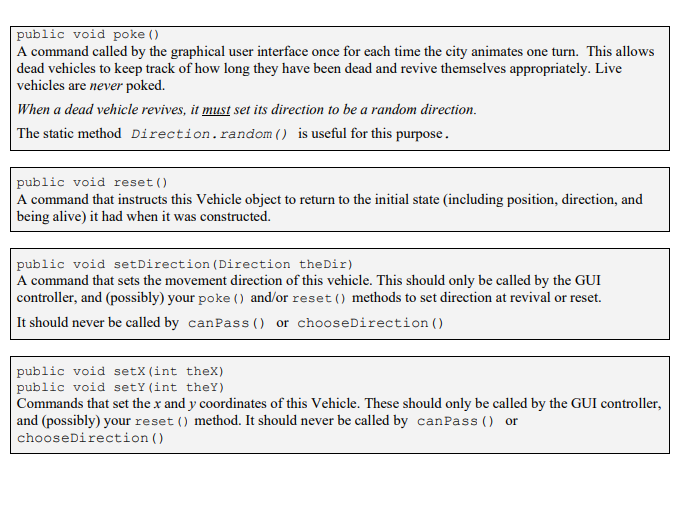
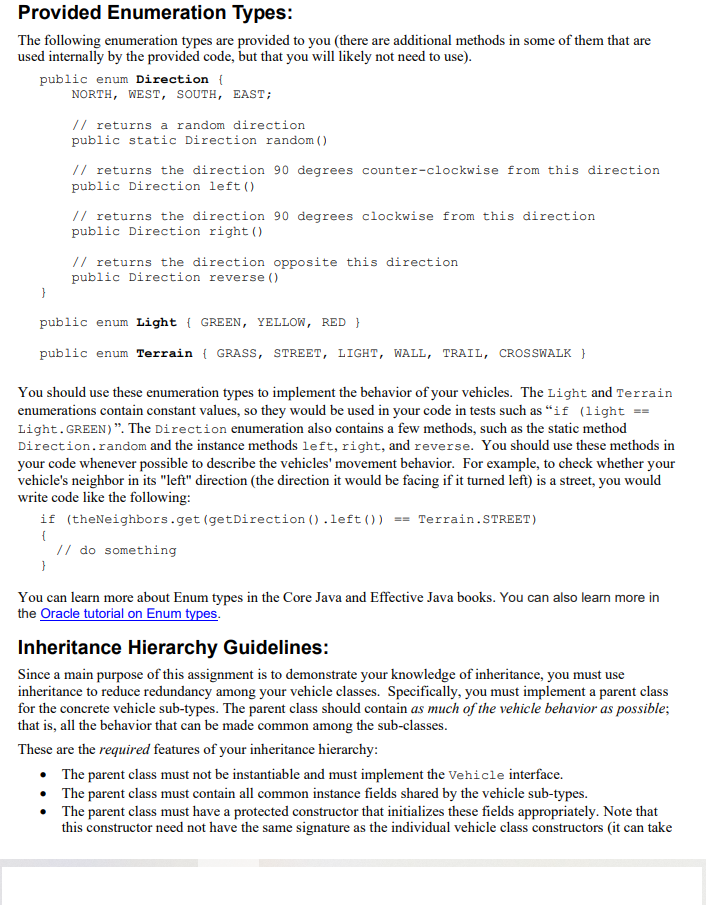
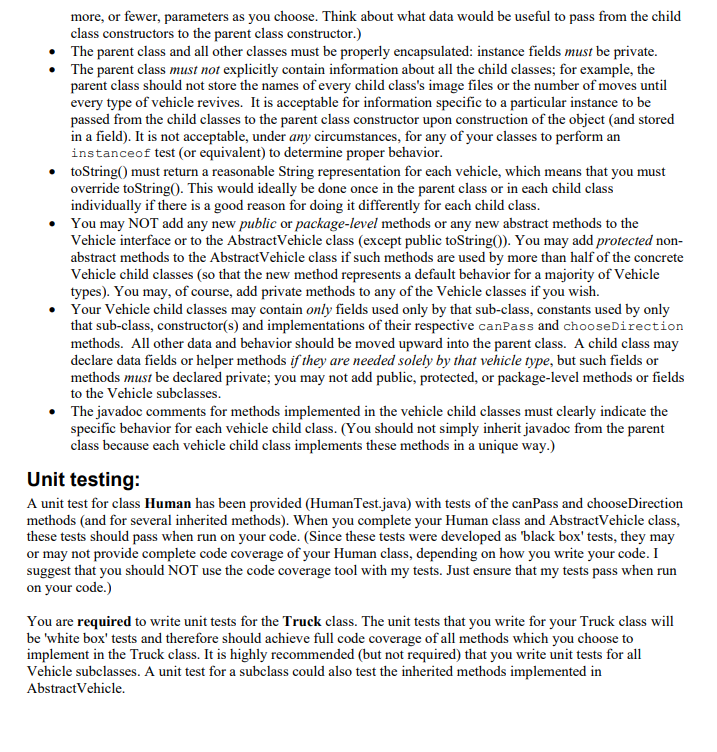
Program Description: This assignment tests your understanding of inheritance, polymorphism, interfaces, and abstract classes. The program is a simulator of city streets, traffic lights, and vehicles. Road Rage Stop Step Start Reset FPS Debug Mode 0 10 20 30 40 Your task is to write the classes to model the various vehicles in the city. The classes will have many similarities, so you should use inheritance to design the classes effectively. The starter code for the project includes a complete and correct graphical user interface (GUI). The GUI shows pictures for the map terrain and vehicles. The GUI loads the city map and vehicle starting positions from the provided file city_map.txt. There are buttons to start and stop the city's animation, as well as to step through it one frame at a time and to reset the vehicles to their initial layout. Each time the GUI redraws, it moves each of the vehicles. If any two vehicles end up on the same square, the GUI tells the vehicles that they have collided with each other, which may "kill" them temporarily. "Dead" vehicles appear upside down on the screen. The rate of city animation is controllable via a slider at the bottom of the (14, 14) (15.14) (16.14) (17, 14) (18, interface. Also, debug information can be shown using a checkbox. If debug information is enabled, all (x, y) grid positions on the map are labeled, and every vehicle's toString output is shown next to the vehicle. You can put any information you like into your vehicles' tostring methods to help you debug their behavior. Debug Mode 1 of 12 Bice Implementation Guidelines: The GUI's interaction with your various vehicle classes is the following: When the GUI initially loads, it creates several instances of each of your vehicle classes (this is why there are compile errors in the GUI as initially provided to you; it is trying to create instances of classes you have not yet written). The GUI draws each vehicle on the map by asking for its getImageFileName string, and then loading an image file from the current directory. So, if a Human object returns "human.gif" from its getImageFileName method, it will be drawn by showing that image. When you click the Start or Step buttons, the GUI updates the state of the overall map and the state of every vehicle. The Start button causes repeated updates, while the Step button causes a single update. On each update, the GUI calls the chooseDirection method on each living vehicle to see which way it prefers to move. The chooseDirection method parameter informs the vehicle about what terrain is around it. The vehicle uses this information to pick the direction it would like to move. Note that a vehicle may prefer to move in a direction that it is not currently able to move in. In particular, when stopped at a traffic light, the chooseDirection method can return the direction that would take the vehicle through the traffic light, while the canPass method (described next) reports that the vehicle cannot actually pass through the traffic light. After each vehicle reports its preferred direction of movement, the GUI controller checks each vehicle to see whether it can move in the preferred direction by calling the canpass method, passing the appropriate type of terrain and street light status. If the vehicle can traverse the given terrain with the given street light status, the GUI controller updates the vehicle's X and Y coordinates by calling its setx and sety methods, and modifies its direction by calling its setDirection method. If the vehicle cannot traverse the given terrain with the given street light status, it sits still for the round. NOTE: Every live vehicle should move on every update cycle unless stopped at a street light or crosswalk light. On each update, the GUI notifies any dead vehicles that an update has occurred by calling their poke method. Each type of vehicle has a predefined number of pokes after which it should revive itself, for example, a dead Taxi should revive itself after 10 pokes. Live vehicles are never poked. Vehicles should not move on the update in which they revive. Instead, they should revive after the correct number of pokes and face in a random direction. On the next update after they revive they should move. At predefined intervals, the GUI changes the map's lights in a cycle (green, yellow, red, green). Note: No vehicles will start on walls and no vehicles should at any time move onto walls. Each of your vehicle classes must have a constructor as specified in the descriptions above. Do not change the number, type or order of the parameters. You may change parameter names if you choose. Each vehicle must also implement the following methods of the instructor-provided Vehicle interface. public Direction chooseDirection (Map theNeighbors) A query that returns the direction in which this vehicle would like to move, given the specified information. Different vehicles have different movement behaviors, as described previously. theNeighbors is a Map containing the types of terrain that neighbor this vehicle. The keys are instances of the Direction enumeration, such as Direction.WEST, and the values are instances of the terrain enumeration, such as Terrain.STREET and Terrain.GRASS. The values are guaranteed to be non-null. To access the terrain in a particular direction, retrieve it by specifying the direction you wish to check. public void poke() A command called by the graphical user interface once for each time the city animates one turn. This allows dead vehicles to keep track of how long they have been dead and revive themselves appropriately. Live vehicles are never poked. When a dead vehicle revives, it must set its direction to be a random direction. The static method Direction.random() is useful for this purpose. public void reset 0 A command that instructs this Vehicle object to return to the initial state (including position, direction, and being alive) it had when it was constructed. public void setDirection (Direction theDir) A command that sets the movement direction of this vehicle. This should only be called by the GUI controller, and (possibly) your poke () and/or reset() methods to set direction at revival or reset. It should never be called by canPass() or chooseDirection () public void setX(int thex) public void setY(int they) Commands that set the x and y coordinates of this Vehicle. These should only be called by the GUI controller, and (possibly) your reset() method. It should never be called by canPass() or chooseDirection() Hints: It is a challenge to move so much behavior upward into your parent class, especially when much of it seems to be different depending on which child class is being used. The following hints may help: To implement collision behavior in the parent class: Since each vehicle knows its death time, you can compare them and have your vehicle "die" if it collides with another vehicle with a smaller death time. To implement the image file name behavior in the parent class: Calling the method getClass().getSimpleName().toLowerCase() yields a convenient string that is the same as the current object's class name, in lowercase; for example, the above code, when run on an object of the Bicycle class, would yield the string "bicycle". To implement reset in the parent class: When the object is constructed, remember its initial position and direction for restoration later if reset is called. To make your parent class generalized so that it can work with all child classes: Think about what exactly is unique about each vehicle type. Each has a unique set of terrain it can pass, and each has a unique way of choosing which direction it would like to move. You'll represent this by putting the canPass and chooseDirection methods in the child classes. In addition, you should put a constructor in each child class that initializes the object by calling the parent class's constructor. The parent class needs to implement behavior such as the collisions, so consider passing your vehicle's death time and other needed information upward as arguments to the parent class's constructor. Are there any fields which will never change after the Vehicle is instantiated? If so consider making those fields final. Are there any classes in your project which will never be extended? If so, consider making such classes final. Are there any methods which will never be overridden? If so, consider making them final. NOTE: Cyclomatic complexity (CC) is a statistical measure of software complexity and is directly related to the number of possible executable paths through a section of code (usually a method). When the CC value of a section of code is high, that is a general indication that it has become too complex to be easily understood by others who may later need to maintain the code. Some of linting will warn for high CC values. Ways to lower complexity include reducing the number of exit points in a method, reducing the number of nested if/else statements, reducing the number of switch statements cases, reducing the use of nested loop structures, and reducing the use of recursion. Often the simplest way to reduce the CC value of a complex method is to create a helper method to do part of the work. For this assignment try to keep the CC less than or equal to 10. Program Description: This assignment tests your understanding of inheritance, polymorphism, interfaces, and abstract classes. The program is a simulator of city streets, traffic lights, and vehicles. Road Rage Stop Step Start Reset FPS Debug Mode 0 10 20 30 40 Your task is to write the classes to model the various vehicles in the city. The classes will have many similarities, so you should use inheritance to design the classes effectively. The starter code for the project includes a complete and correct graphical user interface (GUI). The GUI shows pictures for the map terrain and vehicles. The GUI loads the city map and vehicle starting positions from the provided file city_map.txt. There are buttons to start and stop the city's animation, as well as to step through it one frame at a time and to reset the vehicles to their initial layout. Each time the GUI redraws, it moves each of the vehicles. If any two vehicles end up on the same square, the GUI tells the vehicles that they have collided with each other, which may "kill" them temporarily. "Dead" vehicles appear upside down on the screen. The rate of city animation is controllable via a slider at the bottom of the (14, 14) (15.14) (16.14) (17, 14) (18, interface. Also, debug information can be shown using a checkbox. If debug information is enabled, all (x, y) grid positions on the map are labeled, and every vehicle's toString output is shown next to the vehicle. You can put any information you like into your vehicles' tostring methods to help you debug their behavior. Debug Mode 1 of 12 Bice Implementation Guidelines: The GUI's interaction with your various vehicle classes is the following: When the GUI initially loads, it creates several instances of each of your vehicle classes (this is why there are compile errors in the GUI as initially provided to you; it is trying to create instances of classes you have not yet written). The GUI draws each vehicle on the map by asking for its getImageFileName string, and then loading an image file from the current directory. So, if a Human object returns "human.gif" from its getImageFileName method, it will be drawn by showing that image. When you click the Start or Step buttons, the GUI updates the state of the overall map and the state of every vehicle. The Start button causes repeated updates, while the Step button causes a single update. On each update, the GUI calls the chooseDirection method on each living vehicle to see which way it prefers to move. The chooseDirection method parameter informs the vehicle about what terrain is around it. The vehicle uses this information to pick the direction it would like to move. Note that a vehicle may prefer to move in a direction that it is not currently able to move in. In particular, when stopped at a traffic light, the chooseDirection method can return the direction that would take the vehicle through the traffic light, while the canPass method (described next) reports that the vehicle cannot actually pass through the traffic light. After each vehicle reports its preferred direction of movement, the GUI controller checks each vehicle to see whether it can move in the preferred direction by calling the canpass method, passing the appropriate type of terrain and street light status. If the vehicle can traverse the given terrain with the given street light status, the GUI controller updates the vehicle's X and Y coordinates by calling its setx and sety methods, and modifies its direction by calling its setDirection method. If the vehicle cannot traverse the given terrain with the given street light status, it sits still for the round. NOTE: Every live vehicle should move on every update cycle unless stopped at a street light or crosswalk light. On each update, the GUI notifies any dead vehicles that an update has occurred by calling their poke method. Each type of vehicle has a predefined number of pokes after which it should revive itself, for example, a dead Taxi should revive itself after 10 pokes. Live vehicles are never poked. Vehicles should not move on the update in which they revive. Instead, they should revive after the correct number of pokes and face in a random direction. On the next update after they revive they should move. At predefined intervals, the GUI changes the map's lights in a cycle (green, yellow, red, green). Note: No vehicles will start on walls and no vehicles should at any time move onto walls. Each of your vehicle classes must have a constructor as specified in the descriptions above. Do not change the number, type or order of the parameters. You may change parameter names if you choose. Each vehicle must also implement the following methods of the instructor-provided Vehicle interface. public Direction chooseDirection (Map theNeighbors) A query that returns the direction in which this vehicle would like to move, given the specified information. Different vehicles have different movement behaviors, as described previously. theNeighbors is a Map containing the types of terrain that neighbor this vehicle. The keys are instances of the Direction enumeration, such as Direction.WEST, and the values are instances of the terrain enumeration, such as Terrain.STREET and Terrain.GRASS. The values are guaranteed to be non-null. To access the terrain in a particular direction, retrieve it by specifying the direction you wish to check. public void poke() A command called by the graphical user interface once for each time the city animates one turn. This allows dead vehicles to keep track of how long they have been dead and revive themselves appropriately. Live vehicles are never poked. When a dead vehicle revives, it must set its direction to be a random direction. The static method Direction.random() is useful for this purpose. public void reset 0 A command that instructs this Vehicle object to return to the initial state (including position, direction, and being alive) it had when it was constructed. public void setDirection (Direction theDir) A command that sets the movement direction of this vehicle. This should only be called by the GUI controller, and (possibly) your poke () and/or reset() methods to set direction at revival or reset. It should never be called by canPass() or chooseDirection () public void setX(int thex) public void setY(int they) Commands that set the x and y coordinates of this Vehicle. These should only be called by the GUI controller, and (possibly) your reset() method. It should never be called by canPass() or chooseDirection() Hints: It is a challenge to move so much behavior upward into your parent class, especially when much of it seems to be different depending on which child class is being used. The following hints may help: To implement collision behavior in the parent class: Since each vehicle knows its death time, you can compare them and have your vehicle "die" if it collides with another vehicle with a smaller death time. To implement the image file name behavior in the parent class: Calling the method getClass().getSimpleName().toLowerCase() yields a convenient string that is the same as the current object's class name, in lowercase; for example, the above code, when run on an object of the Bicycle class, would yield the string "bicycle". To implement reset in the parent class: When the object is constructed, remember its initial position and direction for restoration later if reset is called. To make your parent class generalized so that it can work with all child classes: Think about what exactly is unique about each vehicle type. Each has a unique set of terrain it can pass, and each has a unique way of choosing which direction it would like to move. You'll represent this by putting the canPass and chooseDirection methods in the child classes. In addition, you should put a constructor in each child class that initializes the object by calling the parent class's constructor. The parent class needs to implement behavior such as the collisions, so consider passing your vehicle's death time and other needed information upward as arguments to the parent class's constructor. Are there any fields which will never change after the Vehicle is instantiated? If so consider making those fields final. Are there any classes in your project which will never be extended? If so, consider making such classes final. Are there any methods which will never be overridden? If so, consider making them final. NOTE: Cyclomatic complexity (CC) is a statistical measure of software complexity and is directly related to the number of possible executable paths through a section of code (usually a method). When the CC value of a section of code is high, that is a general indication that it has become too complex to be easily understood by others who may later need to maintain the code. Some of linting will warn for high CC values. Ways to lower complexity include reducing the number of exit points in a method, reducing the number of nested if/else statements, reducing the number of switch statements cases, reducing the use of nested loop structures, and reducing the use of recursion. Often the simplest way to reduce the CC value of a complex method is to create a helper method to do part of the work. For this assignment try to keep the CC less than or equal to 10


