

Question: Step 1: Open the Student Collection project from the student sample programs folder named Student Collection. The project already has two forms, as shown in
Step 1: Open the Student Collection project from the student sample programs folder named Student Collection. The project already has two forms, as shown in Figures 3-1 and 3-2. The MainForm form has a list box, lstIdNumbers, which will display a list of stu- dent ID numbers. When a students ID number is selected from the list box, the data for that student will be displayed in the following Label controls: lblLastName, lblFirstName, lblIdNumber, lblTestAverage, and lblGrade. The Add Student button causes the AddForm form to be displayed. The Remove button removes the student whose ID number is currently selected.
Step 2: Add the Student class you created in Lab 2 to the project. (Click Project on the menu bar, and then click Add Existing Item. Browse to the folder containing the Student.vb file. Select the Student.vb file and click the Add button.)
Step 3: Add a module to the project. Name the module StudentCollectionModule.vb. Complete the module by entering the following code, shown in bold. (Dont type the line numbers. They are shown only for reference.) 1 Module StudentCollectionModule 2 ' Create a collection to hold Student objects. 3 Public studentCollection As New Collection 4 5 ' The AddRecord procedure adds the object referenced 6 ' by s to the collection. It uses the student ID number 7 ' as the key. 8 9 Public Sub AddRecord(ByVal s As Student) 10 Try 11 studentCollection.Add(s, s.IdNumber) 12 Catch ex As Exception 13 MessageBox.Show(ex.Message) 14 End Try 15 End Sub 16 End Module The statement in line 3 creates a collection, referenced by the object variable studentCollection. Because it is declared as Public, it will be available to all the forms in the project. The AddRecord procedure in lines 9 through 15, also declared as Public, accepts a Student object as an argument, and adds that object to the studentCollection collection.
Step 4: Now write the procedures and event handlers for the MainForm form, shown here. (Dont type the line numbers. They are shown only for reference.) Before you begin entering the code, make sure you understand how to create the code template for the lstIdNumbers_SelectedIndexChanged event handler in lines 84 through 101. This event handler will execute anytime the user selects an item in the lstIdNumbers list box. To create the code template, simply open MainForm in the Designer window and double-click the lstIdNumbers list box. (The comments that appear in lines 81 through 83 are there only as a re- minder of how to create the code template. You do not need to type those com- ments into your code.) 1 Public Class MainForm 2 ' The ClearForm procedure clears the form. 3 Private Sub ClearForm() 4 lblFirstName.Text = String.Empty 5 lblLastName.Text = String.Empty 6 lblIdNumber.Text = String.Empty 7 lblTestAverage.Text = String.Empty 8 lblGrade.Text = String.Empty 9 End Sub 10 11 ' The UpdateListBox procedure updates the 12 ' contents of the list box. 13 Private Sub UpdateListBox() 14 ' Clear the list box. 15 lstIdNumbers.Items.Clear() 16 17 ' Load the ID numbers in the collection 18 ' into the list box. 19 Dim s As Student 20 For Each s In studentCollection 21 lstIdNumbers.Items.Add(s.IdNumber) 22 Next 23 24 ' Select the first item in the list. 25 If lstIdNumbers.Items.Count > 0 Then 26 lstIdNumbers.SelectedIndex = 0 27 Else 28 ClearForm() 29 End If 30 End Sub 31 32 ' The DisplayData procedure displays the data contained 33 ' in the Student object parameter. 34 Private Sub DisplayData(ByVal s As Student) 35 lblLastName.Text = s.LastName 36 lblFirstName.Text = s.FirstName 37 lblIdNumber.Text = s.IdNumber 38 lblTestAverage.Text = s.TestAverage.ToString() 39 lblGrade.Text = s.Grade 40 End Sub 41 42 Private Sub btnAdd_Click(...) Handles btnAdd.Click 43 ' Create an instance of the AddForm form. 44 Dim frmAdd As New AddForm 45 46 ' Display the form. 47 frmAdd.ShowDialog() 48 49 ' Update the contents of the list box. 50 UpdateListBox() 51 End Sub 52 53 Private Sub btnRemove_Click(...) Handles btnRemove.Click 54 Dim intIndex As Integer 55 56 ' Make sure an item is selected. 57 If lstIdNumbers.SelectedIndex -1 Then 58 ' Confirm that the user wants to remove the item. 59 If MessageBox.Show("Are you sure?", "Confirm Deletion", 60 MessageBoxButtons.YesNo) = 61 Windows.Forms.DialogResult.Yes Then 62 63 ' Retrieve the student's data from the collection. 64 intIndex = lstIdNumbers.SelectedIndex 65 66 Try 67 ' Remove the selected item from the collection. 68 studentCollection.Remove( 69 lstIdNumbers.SelectedItem.ToString()) 70 71 ' Update the list box. 72 UpdateListBox() 73 Catch ex As Exception 74 ' Error message 75 MessageBox.Show(ex.Message) 76 End Try 77 End If 78 End If 79 End Sub 80 81 ' Note to the student: To create the code template for the 82 ' following event handler, double-click the lstIdNumbers 83 ' list box in the Designer window. 84 Private Sub lstIdNumbers_SelectedIndexChanged(...) Handles... 85 Dim objStudent As Student 86 87 ' See if an item is selected. 88 If lstIdNumbers.SelectedIndex -1 Then 89 ' Retrieve the student's data from the collection. 90 Try 91 objStudent = CType(studentCollection.Item( 92 lstIdNumbers.SelectedItem), Student) 93 94 ' Display the student data. 95 DisplayData(objStudent) 96 Catch ex As Exception 97 ' Error message 98 MessageBox.Show(ex.Message) 99 End Try 100 End If 101 End Sub 102 103 Private Sub btnExit_Click(...) Handles btnExit.Click 104 ' Close the form. 105 Me.Close() 106 End Sub 107 End Class
Step 5: Now write the procedures and event handlers for the AddForm form, shown here. (Dont type the line numbers. They are shown only for reference.) 1 Public Class AddForm 2 ' The GetData procedure gets data from the form 3 ' and stores it in the Student object parameter. 4 Private Sub GetData(ByVal s As Student) 5 s.LastName = txtLastName.Text 6 s.FirstName = txtFirstName.Text 7 s.IdNumber = txtIdNumber.Text 8 s.TestAverage = CDbl(txtTestAverage.Text) 9 End Sub 10 11 ' The ClearForm procedure clears the form. 12 Private Sub ClearForm() 13 ' Clear the text boxes. 14 txtFirstName.Text = String.Empty 15 txtLastName.Text = String.Empty 16 txtIdNumber.Text = String.Empty 17 txtTestAverage.Text = String.Empty 18 lblGrade.Text = String.Empty 19 20 ' Reset the focus. 21 txtLastName.Focus() 22 End Sub 23 24 Private Sub btnAdd_Click(...) Handles btnAdd.Click 25 ' Create an instance of the Student class. 26 Dim objStudent As New Student 27 28 ' Get data from the form. 29 GetData(objStudent) 30 31 ' Display the student's grade. 32 lblGrade.Text = objStudent.Grade 33 34 ' Save the student's record. 35 AddRecord(objStudent) 36 37 ' Confirm that the record was saved. 38 MessageBox.Show("Record added.") 39 40 ' Clear the form. 41 ClearForm() 42 End Sub 43 44 Private Sub btnClose_Click(...) Handles btnClose.Click 45 ' Close the form. 46 Me.Close() 47 End Sub 48 End Class Step 6: Save the project and run the application. Click the Add Student button and add the following students: Student 1 Last name: Green First name: Sara ID number: 27R8974 Test average: 92.3 Student 2 Last name: Robinson First name: Joy ID number: 89G4561 Test average: 97.3 Student 3 Last name: Williams First name: Jon ID number: 71A4478 Test average: 78.6
Step 7: Close the AddForm form. The main form should now appear as shown in Figure
Step 8: Select a students ID number in the list box. That students data is displayed in the Label controls.
Step 9: Remove each student by selecting an ID number and then clicking the Remove button. Click Yes when asked Are you sure?
Step 10: Exit The Application
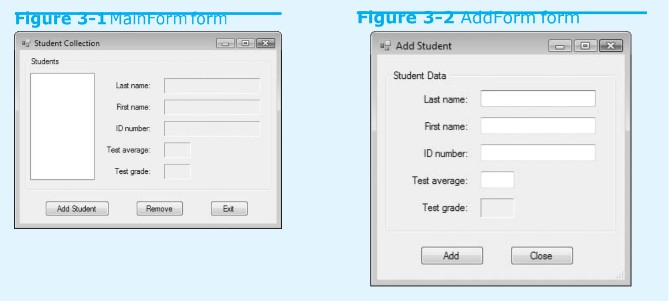
Figure 3-I MainForm orm Figure 3-2 Add ormTorm Student Collection Add Student Students Student Data Last name Firt name D number Test average Test grade Last name First name D number: Test average: Test grade: Add Soudent Remove Add Cose
Step by Step Solution
There are 3 Steps involved in it

Get step-by-step solutions from verified subject matter experts