The assignment is in the photo. The Application should be used (not the JFrame).
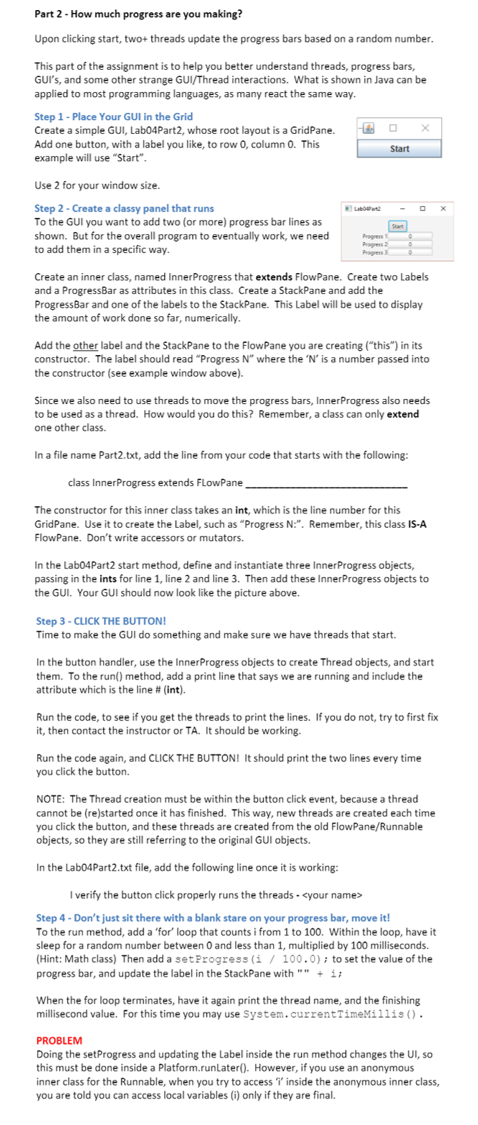
Part 2 - How much progress are you making? Upon clicking start, two+threads update the progress bars based on a random number. This part of the assignment is to help you better understand threads, progress bars, GUI's, and some other strange GUI/Thread interactions. What is shown in Java can be applied to most programming languages, as many react the same way. Step 1 - Place Your GUI in the Grid Create a simple GUI, Labo4Part2, whose root layout is a GridPane. Add one button, with a label you like to row 0, column 0. This Start example will use "Start". Use 2 for your window size. Step 2 - Create a classy panel that runs To the GUI you want to add two (or more) progress bar lines as shown. But for the overall program to eventually work, we need to add them in a specific way. Progress Create an inner class, named Inner Progress that extends FlowPane. Create two Labels and a ProgressBar as attributes in this class. Create a StackPane and add the Progress Bar and one of the labels to the StackPane. This Label will be used to display the amount of work done so far, numerically. Add the other label and the StackPane to the Flowpane you are creating ("this") in its constructor. The label should read "Progress N' where the 'N' is a number passed into the constructor (see example window above). Since we also need to use threads to move the progress bars, Inner Progress also needs to be used as a thread. How would you do this? Remember, a class can only extend one other class. In a file name Part2.txt, add the line from your code that starts with the following: class Inner Progress extends FlowPane The constructor for this inner class takes an int, which is the line number for this GridPane. Use it to create the Label, such as "Progress N.". Remember, this class IS-A FlowPane. Don't write accessors or mutators. In the Labo4Part2 start method, define and instantiate three Inner Progress objects, passing in the ints for line 1, line 2 and line 3. Then add these Inner Progress objects to the GUI. Your GUI should now look like the picture above. Step 3 - CLICK THE BUTTON! Time to make the GUI do something and make sure we have threads that start. In the button handler, use the Inner Progress objects to create Thread objects, and start them. To the run() method, add a print line that says we are running and include the attribute which is the line # (int). Run the code, to see if you get the threads to print the lines. If you do not try to first fix it, then contact the instructor or TA. It should be working. Run the code again, and CLICK THE BUTTON! It should print the two lines every time you click the button. NOTE: The Thread creation must be within the button click event, because a thread cannot be (re)started once it has finished. This way, new threads are created each time you click the button, and these threads are created from the old FlowPane/Runnable objects, so they are still referring to the original GUI objects. In the labo4Part2.txt file, add the following line once it is working: I verify the button click properly runs the threads.
Step 4 - Don't just sit there with a blank stare on your progress bar, move it! To the run method, add a 'for' loop that counts i from 1 to 100. Within the loop, have it sleep for a random number between 0 and less than 1, multiplied by 100 milliseconds. (Hint: Math class) Then add a set Progress (i / 100.0); to set the value of the progress bar, and update the label in the StackPane with " + 1; When the for loop terminates, have it again print the thread name, and the finishing millisecond value. For this time you may use System.currentTimeMillis(). PROBLEM Doing the set Progress and updating the Label inside the run method changes the UI, so this must be done inside a platform.runLater(). However, if you use an anonymous inner class for the Runnable, when you try to access inside the anonymous inner class, you are told you can access local variables (i) only if they are final. Part 2 - How much progress are you making? Upon clicking start, two+threads update the progress bars based on a random number. This part of the assignment is to help you better understand threads, progress bars, GUI's, and some other strange GUI/Thread interactions. What is shown in Java can be applied to most programming languages, as many react the same way. Step 1 - Place Your GUI in the Grid Create a simple GUI, Labo4Part2, whose root layout is a GridPane. Add one button, with a label you like to row 0, column 0. This Start example will use "Start". Use 2 for your window size. Step 2 - Create a classy panel that runs To the GUI you want to add two (or more) progress bar lines as shown. But for the overall program to eventually work, we need to add them in a specific way. Progress Create an inner class, named Inner Progress that extends FlowPane. Create two Labels and a ProgressBar as attributes in this class. Create a StackPane and add the Progress Bar and one of the labels to the StackPane. This Label will be used to display the amount of work done so far, numerically. Add the other label and the StackPane to the Flowpane you are creating ("this") in its constructor. The label should read "Progress N' where the 'N' is a number passed into the constructor (see example window above). Since we also need to use threads to move the progress bars, Inner Progress also needs to be used as a thread. How would you do this? Remember, a class can only extend one other class. In a file name Part2.txt, add the line from your code that starts with the following: class Inner Progress extends FlowPane The constructor for this inner class takes an int, which is the line number for this GridPane. Use it to create the Label, such as "Progress N.". Remember, this class IS-A FlowPane. Don't write accessors or mutators. In the Labo4Part2 start method, define and instantiate three Inner Progress objects, passing in the ints for line 1, line 2 and line 3. Then add these Inner Progress objects to the GUI. Your GUI should now look like the picture above. Step 3 - CLICK THE BUTTON! Time to make the GUI do something and make sure we have threads that start. In the button handler, use the Inner Progress objects to create Thread objects, and start them. To the run() method, add a print line that says we are running and include the attribute which is the line # (int). Run the code, to see if you get the threads to print the lines. If you do not try to first fix it, then contact the instructor or TA. It should be working. Run the code again, and CLICK THE BUTTON! It should print the two lines every time you click the button. NOTE: The Thread creation must be within the button click event, because a thread cannot be (re)started once it has finished. This way, new threads are created each time you click the button, and these threads are created from the old FlowPane/Runnable objects, so they are still referring to the original GUI objects. In the labo4Part2.txt file, add the following line once it is working: I verify the button click properly runs the threads. Step 4 - Don't just sit there with a blank stare on your progress bar, move it! To the run method, add a 'for' loop that counts i from 1 to 100. Within the loop, have it sleep for a random number between 0 and less than 1, multiplied by 100 milliseconds. (Hint: Math class) Then add a set Progress (i / 100.0); to set the value of the progress bar, and update the label in the StackPane with " + 1; When the for loop terminates, have it again print the thread name, and the finishing millisecond value. For this time you may use System.currentTimeMillis(). PROBLEM Doing the set Progress and updating the Label inside the run method changes the UI, so this must be done inside a platform.runLater(). However, if you use an anonymous inner class for the Runnable, when you try to access inside the anonymous inner class, you are told you can access local variables (i) only if they are final