Question
The purpose of this project is for you to practice writing assembly language to a terminal (console) screen. The hardware for this project is a
The purpose of this project is for you to practice writing assembly language to a terminal (console) screen. The hardware for this project is a terminal that allows you to put a printable character with a specific color on the screen. This terminal consists of 40 rows and 80 columns of characters. This terminal is a simple hardware that maps a memory region (from 0xFFFF8000 to 0xFFFFB199) into characters on the screen. This is a one-to-one mapping where 4 bytes in the memory is mapped into one character on the console screen. The mapping starts from left to right and from top to bottom. For example, a word at the memory location 0xFFFF8000 is the character at row 0 column 0 (top-left corner). A word at the memory location 0xFFFF8004 is the character at row 0 column 1 1, and so on. To put a character on this terminal, you have to set a word into a specific value as shown below:
The word for a character is organized as follows:
Bit 31 to Bit 24: The ASCII value of the character to be displayed (32 - 126)
Bit 16 to Bit 23: The value of the red color (0 - 255)
Bit 8 to Bit 15: The value of the green color (0 - 255)
Bit 0 to Bit 7: The value of the blue color (0 - 255)
For example, if you want to put the character A (ASCII value = 0x41) with the white color (red = 255, green = 255, and blue = 255) at the top-left corner (row 0 column 0) on the terminal screen, the word value should be 0x41FFFFFF and this word must be stored at the memory location 0xFFFF8000. For another example, if you want to put the character M (ASCII value = 0x4D) with the green color (red = 0, green = 255, and blue = 0) at the row 5 column 12, the word value should be 0x4D00FF00 and this word must be stored at the memory location 0xFFFF8000 + (5 * 80 * 4) + (12 * 4). Note that (5 * 80 * 4) + (12 * 4) is the offset (in bytes in decimal) from the address 0xFFFF8000. A simple example of the program that print Hello World!!! in white color as shown in previous page is shown below:
data
hello: .asciiz "Hello World!!!"
.text
li $s0, 0xffff8000 # $s0 - Base address of the terminal
li $s1, 0x00ffffff # $s1 - Color of character (white)
la $s2, hello # $s2 - Address of the string hello
loop:
lb $s3, 0($s2) # Load a character
beq $s3, $zero, done # Encounter the null-character, done
sll $s3, $s3, 24 # Move ascii value to the top 8-bit
or $s3, $s3, $s1 # Put color to the bottom 24-bit
sw $s3, 0($s0) # Put character on the terminal
addi $s2, $s2, 1 # Go to the next character (string hello)
addi $s0, $s0, 4 # Go to the next word (terminal)
j loop
done:
addi $v0, $zero, 10 # Syscall 10: terminate program
syscall # Terminate program

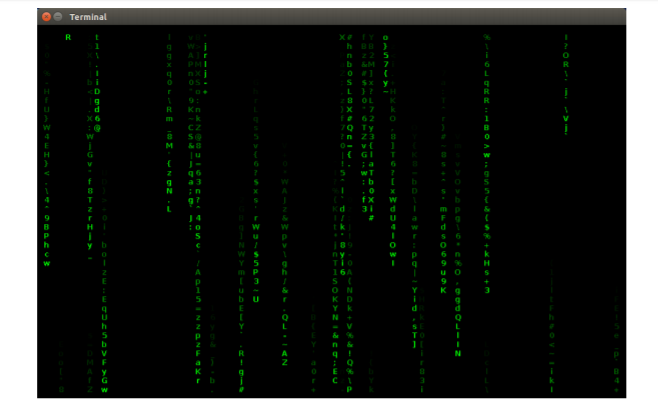
For this project, you have to create the animated Matrix screen on the terminal. Note that the animation effect can be obtain by updating the terminal repeatedly.
The following are requirements that you must follow:
1. Ask a user to enter the number of columns (should support up to 40 falling at once)
2. Create the animation to make the screen looks like characters are changing and falling. This can be done by simply change the color from brighter to dimmer. These color changing to make them look like they are falling.
3. As soon as one hits the bottom another one starts. There should be the specified number on the screen at all times. They should have difference colors as well.

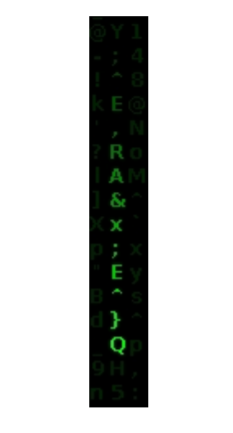
From the above image, the character Q is the brightest (red = 0, green = 250, and blue = 0). The green value of the next character on top (}) is 240. The green value of the next character (^) is 230, and so on. Simply reduce the green value by 10 when you go up the column. In the next iteration, simply random a new character and put it under the character Q with the green color value to be 250. Update the character Q by a new character but the green value is now 230, and so on. Note that there is no negative color values.
vbpg\ 6 * n%.gqd Q L 1 IN wAj~&w >", gh / & r "QL.. AZ vbpg\ 6 * n%.gqd Q L 1 IN wAj~&w >", gh / & r "QL.. AZStep by Step Solution
There are 3 Steps involved in it
Step: 1

Get Instant Access to Expert-Tailored Solutions
See step-by-step solutions with expert insights and AI powered tools for academic success
Step: 2

Step: 3

Ace Your Homework with AI
Get the answers you need in no time with our AI-driven, step-by-step assistance
Get Started


