Question
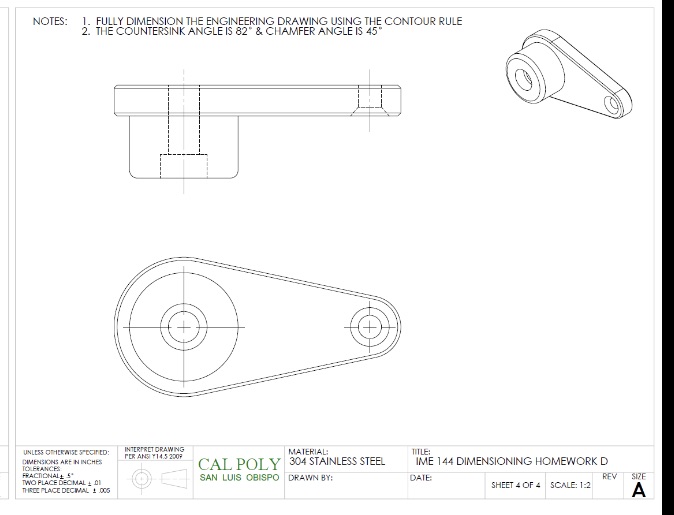
Use a ruler, pencil, compass or circle template, eraser, to fully dimension the front, top, and right orthographic projected views for each of the four
- Use a ruler, pencil, compass or circle template, eraser, to fully dimension the front, top, and right orthographic projected views for each of the four parts, fully defining the part so it can be manufactured.
- Use the ASME/ANSI rules
- Do not over dimension the drawing views

NOTES: 1. FULLY DIMENSION THE ENGINEERING DRAWING USING THE CONTOUR RULE 2. THE COUNTERSINK ANGLE IS 82" & CHAMFER ANGLE IS 45" UNLESS OTHERWISE SPECIFIED: DIMENSIONS ARE IN INCHES TOLERANCES FRACTIONAL S TWO PLACE DECIMAL THREE PLACE DECIMAL 1 005 INTERPRET DRAWING PER ANSI 14.5 2009 MATERIALI CAL POLY 304 STAINLESS STEEL SAN LUIS OBISPO DRAWN BY: TITLE: IME 144 DIMENSIONING HOMEWORK D DATE: REV SHEET 4 OF 4 SCALE: 1:2 SIZE A
Step by Step Solution
There are 3 Steps involved in it
Step: 1

Get Instant Access to Expert-Tailored Solutions
See step-by-step solutions with expert insights and AI powered tools for academic success
Step: 2

Step: 3

Ace Your Homework with AI
Get the answers you need in no time with our AI-driven, step-by-step assistance
Get StartedRecommended Textbook for
Accounting Information Systems
Authors: Marshall B. Romney, Paul J. Steinbart
13th edition
133428532, 978-0133428537
Students also viewed these Mechanical Engineering questions
Question
Answered: 1 week ago
Question
Answered: 1 week ago
Question
Answered: 1 week ago
Question
Answered: 1 week ago
Question
Answered: 1 week ago
Question
Answered: 1 week ago
Question
Answered: 1 week ago
Question
Answered: 1 week ago
Question
Answered: 1 week ago
Question
Answered: 1 week ago
Question
Answered: 1 week ago
Question
Answered: 1 week ago
Question
Answered: 1 week ago
Question
Answered: 1 week ago
Question
Answered: 1 week ago
Question
Answered: 1 week ago
Question
Answered: 1 week ago
Question
Answered: 1 week ago
Question
Answered: 1 week ago
Question
Answered: 1 week ago
Question
Answered: 1 week ago
Question
Answered: 1 week ago
View Answer in SolutionInn App


