Using my code only!!!!!!!!
Data Structures: Queue
JAVA
The requirements for this assignment are to:
- Load your custom sprite (128 x 128) into the game engine using Art.txt
- Make your sprite appear when running the program
- Write the Vector2D class using the template
- Load your frames into the first Queue
- Using a timer, two Vector2D queues, and your custom engine, make the image move from the left side of the screen to the right. Once the image reaches the end of the animation, it should reset by transferring the second Queue back to the first.
You will need to start by creating TWO Queues:
public static Queue vecs1 = new LinkedList(); public static Queue vecs2 = new LinkedList();
You will also need a way to hold the current vector in use. Use this code to create a current vector that starts off screen until you need it:
public static Vector2D currentVec = new Vector2D(-100, -100);
Place those into the static fields section of your Main.java file.
This is where you can use the start() method. The purpose of the start method is to set up data before the game loop begins. Inside of this method, set up your coordinates for the vector Queue. You can use a loop if you want or do it manually; the choice is yours (although I would recommend a loop with constant "steps" between frames as far as x coordinate goes).
The image is going to need to move from left to right on the screen and restart at the beginning again. Therefore, your y coordinate should remain the same for ALL vectors in the Queue. Only the x coordinate should change.
Provide the code for the start() method in the main file.
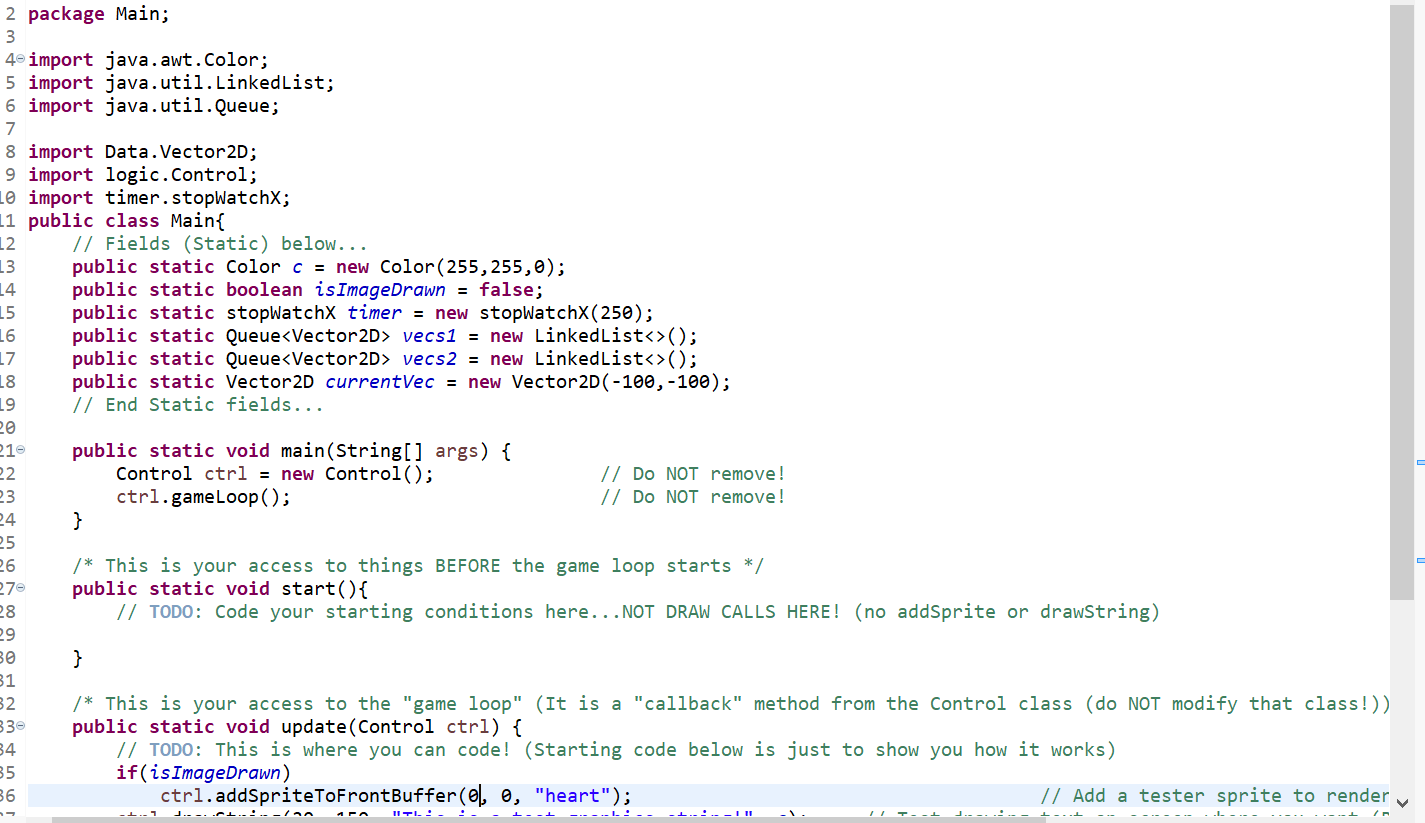
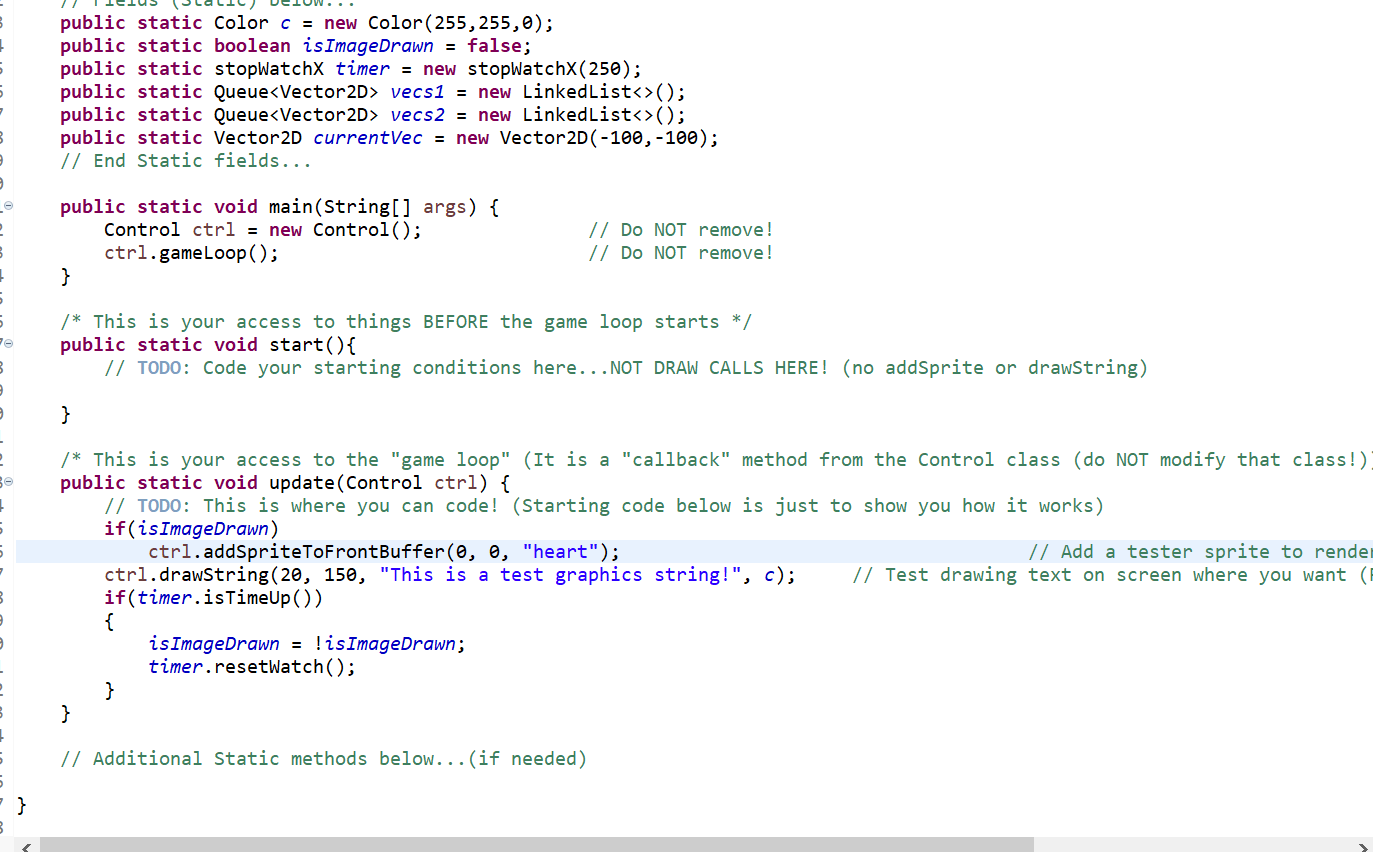
2 package Main; 3 4o import java.awt.Color; 5 import java.util.LinkedList; 6 import java.util.Queue; 7 8 import Data. Vector 2D; 9 import logic.Control; Lo import timer.stopWatchx; 11 public class Main{ 12. // Fields (Static) below... 13 public static Color c = new Color(255,255,0); 14 public static boolean is ImageDrawn = false; 15 public static stopWatchx timer = new stopwatchx(250); 16 public static Queue
vecs1 = new LinkedList(); 17 public static Queue vecs2 = new LinkedList(); 18 public static Vector2D currentVec = new Vector2D(-100,-100); 19 // End Static fields... 20 210 public static void main(String[] args) { 22 Control ctrl = new Control(); // Do NOT remove! 23 ctrl.gameLoop(); // Do NOT remove! 24 } 25 26 /* This is your access to things BEFORE the game loop starts */ 27 public static void start(){ 28 // TODO: Code your starting conditions here...NOT DRAW CALLS HERE! (no addSprite or drawstring) 29 BO } 31 32 /* This is your access to the "game loop" (It is a "callback" method from the control class (do NOT modify that class!)) 33 public static void update(Control ctrl) { 34 // TODO: This is where you can code! (Starting code below is just to show you how it works) 35 if(isImageDrawn) 36 ctrl.addSpriteToFrontBuffer(el, o, "heart"); // Add a tester sprite to render .L.- .- public static Color c = new Color(255,255, 0); public static boolean is ImageDrawn = false; public static stopWatchx timer = new stopWatchx(250); public static Queue vecs1 = new LinkedList(); public static Queue vecs2 = new LinkedList(); public static Vector 2D currentVec = new Vector2D(-100,-100); // End Static fields... 3 public static void main(String[] args) { Control ctrl = new Control(); ctrl.gameLoop(); } // Do NOT remove! // Do NOT remove! 3 5 /* This is your access to things BEFORE the game loop starts */ public static void start(){ // TODO: Code your starting conditions here...NOT DRAW CALLS HERE! (no addSprite or drawstring) } 2 /* This is your access to the "game loop" (It is a "callback" method from the control class (do NOT modify that class!) public static void update (Control ctrl) { // TODO: This is where you can code! (Starting code below is just to show you how it works) if(isImageDrawn) ctrl.addSpriteToFrontBuffer(0, 0, "heart"); // Add a tester sprite to rende ctrl.drawstring(20, 150, "This is a test graphics string!", c); // Test drawing text on screen where you want ( if(timer.isTimeUp()) { isImageDrawn = !isImageDrawn; timer.resetWatch(); } } // Additional Static methods below... (if needed) } 2 package Main; 3 4o import java.awt.Color; 5 import java.util.LinkedList; 6 import java.util.Queue; 7 8 import Data. Vector 2D; 9 import logic.Control; Lo import timer.stopWatchx; 11 public class Main{ 12. // Fields (Static) below... 13 public static Color c = new Color(255,255,0); 14 public static boolean is ImageDrawn = false; 15 public static stopWatchx timer = new stopwatchx(250); 16 public static Queue vecs1 = new LinkedList(); 17 public static Queue vecs2 = new LinkedList(); 18 public static Vector2D currentVec = new Vector2D(-100,-100); 19 // End Static fields... 20 210 public static void main(String[] args) { 22 Control ctrl = new Control(); // Do NOT remove! 23 ctrl.gameLoop(); // Do NOT remove! 24 } 25 26 /* This is your access to things BEFORE the game loop starts */ 27 public static void start(){ 28 // TODO: Code your starting conditions here...NOT DRAW CALLS HERE! (no addSprite or drawstring) 29 BO } 31 32 /* This is your access to the "game loop" (It is a "callback" method from the control class (do NOT modify that class!)) 33 public static void update(Control ctrl) { 34 // TODO: This is where you can code! (Starting code below is just to show you how it works) 35 if(isImageDrawn) 36 ctrl.addSpriteToFrontBuffer(el, o, "heart"); // Add a tester sprite to render .L.- .- public static Color c = new Color(255,255, 0); public static boolean is ImageDrawn = false; public static stopWatchx timer = new stopWatchx(250); public static Queue vecs1 = new LinkedList(); public static Queue vecs2 = new LinkedList(); public static Vector 2D currentVec = new Vector2D(-100,-100); // End Static fields... 3 public static void main(String[] args) { Control ctrl = new Control(); ctrl.gameLoop(); } // Do NOT remove! // Do NOT remove! 3 5 /* This is your access to things BEFORE the game loop starts */ public static void start(){ // TODO: Code your starting conditions here...NOT DRAW CALLS HERE! (no addSprite or drawstring) } 2 /* This is your access to the "game loop" (It is a "callback" method from the control class (do NOT modify that class!) public static void update (Control ctrl) { // TODO: This is where you can code! (Starting code below is just to show you how it works) if(isImageDrawn) ctrl.addSpriteToFrontBuffer(0, 0, "heart"); // Add a tester sprite to rende ctrl.drawstring(20, 150, "This is a test graphics string!", c); // Test drawing text on screen where you want ( if(timer.isTimeUp()) { isImageDrawn = !isImageDrawn; timer.resetWatch(); } } // Additional Static methods below... (if needed) }