Answered step by step
Verified Expert Solution
Link Copied!

Question

1 Approved Answer

***Using webGL*** Draw your shape that shows a specific direction (for example, an arrow). There are five inputs in this application: 1. Slider: controls the

***Using webGL***

Draw your shape that shows a specific direction (for example, an arrow). There are five inputs in this application:

1. Slider: controls the speed of your shapes movement.

2. Start button: starts the animation of the shapes movement.

3. Stop button: stops the animation of the shapes movement.

4. Change Direction button: changes the direction of the shapes movement.

5. Colour menu: the colour of the shape changes based on the menu option.

You are encouraged to come up with your unique shape (other than a simple arrow) such as a spaceship, airplane, car, rocket, train, boat, etc.

When your WebGL application is loaded into a browser, the shape is moving to the right (the shape should show the correction direction). With the available inputs, you can stop or start the movement and change the direction of the movement at any time. When the shape hits the wall on the right, it changes the direction of the movement (to the left) with the correct direction of the shape. It does the same thing with the left wall but in the opposite direction. You can change the speed of the movement with the slider: from the minimum speed to the maximum speed. You can also change the colour of the shape with the colour menu options.image text in transcribed

Draw your shape that shows a specific direction (for example, an arrow). There are five inputs in this application: 1. Slider: controls the speed of your shape's movement. 2. Start button: starts the animation of the shape's movement. 3. Stop button: stops the animation of the shape's movement. 4. Change Direction button: changes the direction of the shape's movement. 5. Colour menu: the colour of the shape changes based on the menu option. Speed: Start Stop Change Direction Red Blue Green Yellow You are encouraged to come up with your unique shape (other than a simple arrow) such as a spaceship, airplane, car, rocket, train, boat, etc. When your WebGL application is loaded into a browser, the shape is moving to the right (the shape should show the correction direction). With the available inputs, you can stop or start the movement and change the direction of the movement at any time. When the shape hits the wall on the right, it changes the direction of the movement (to the left) with the correct direction of the shape. It does the same thing with the left wall but in the opposite direction. You can change the speed of the movement with the slider: from the minimum speed to the maximum speed. You can also change the colour of th shape with the colour menu options. Draw your shape that shows a specific direction (for example, an arrow). There are five inputs in this application: 1. Slider: controls the speed of your shape's movement. 2. Start button: starts the animation of the shape's movement. 3. Stop button: stops the animation of the shape's movement. 4. Change Direction button: changes the direction of the shape's movement. 5. Colour menu: the colour of the shape changes based on the menu option. Speed: Start Stop Change Direction Red Blue Green Yellow You are encouraged to come up with your unique shape (other than a simple arrow) such as a spaceship, airplane, car, rocket, train, boat, etc. When your WebGL application is loaded into a browser, the shape is moving to the right (the shape should show the correction direction). With the available inputs, you can stop or start the movement and change the direction of the movement at any time. When the shape hits the wall on the right, it changes the direction of the movement (to the left) with the correct direction of the shape. It does the same thing with the left wall but in the opposite direction. You can change the speed of the movement with the slider: from the minimum speed to the maximum speed. You can also change the colour of th shape with the colour menu options

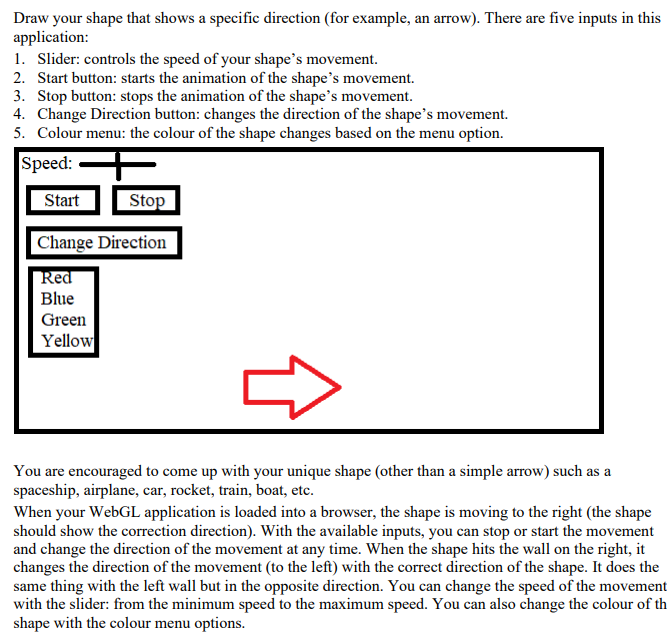
Step by Step Solution

There are 3 Steps involved in it

Step: 1

blur-text-image

Get Instant Access to Expert-Tailored Solutions

See step-by-step solutions with expert insights and AI powered tools for academic success

Step: 2

blur-text-image

Step: 3

blur-text-image

Ace Your Homework with AI

Get the answers you need in no time with our AI-driven, step-by-step assistance

Get Started

Recommended Textbook for

Advanced Database Systems For Integration Of Media And User Environments 98

Authors: Yahiko Kambayashi, Akifumi Makinouchi, Shunsuke Uemura, Katsumi Tanaka, Yoshifumi Masunaga

1st Edition

9810234368, 978-9810234362

More Books

Students also viewed these Databases questions