

Answered step by step
Verified Expert Solution
Question
1 Approved Answer
visual studios code Part 1 (10 Points): Create a Visual C# ASP.NET Web Application Project called WelcomeApp using the designer and toolbox. Pay close attention
visual studios code 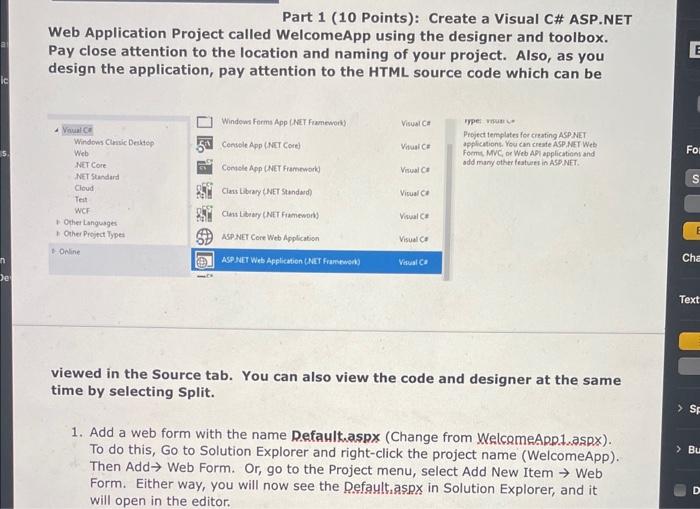
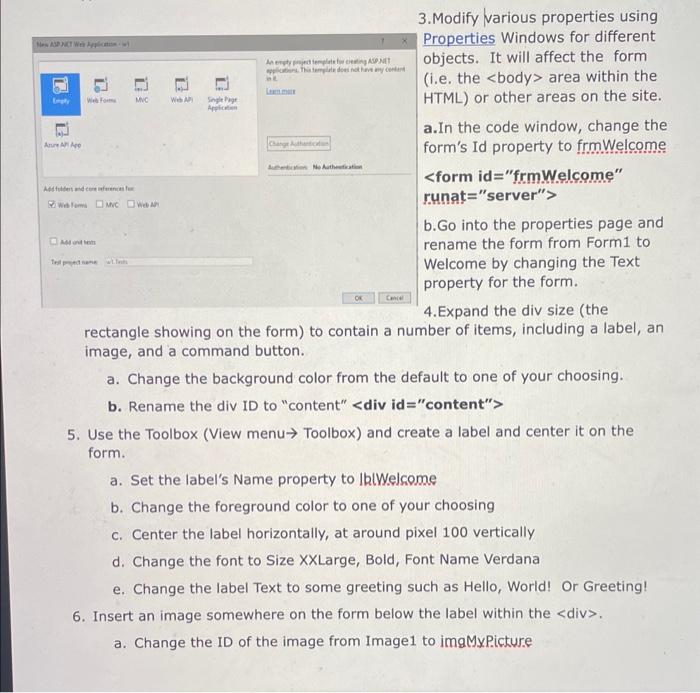
Part 1 (10 Points): Create a Visual C\# ASP.NET Web Application Project called WelcomeApp using the designer and toolbox. Pay close attention to the location and naming of your project. Also, as you design the application, pay attention to the HTML source code which can be viewed in the Source tab. You can also view the code and designer at the same time by selecting Split. 1. Add a web form with the name Refault.aspx (Change from WelcomeApp.1,aspx). To do this, Go to Solution Explorer and right-click the project name (WelcomeApp). Then Add Web Form. Or, go to the Project menu, select Add New Item Web Form. Either way, you will now see the Defalthaspp in Solution Explorer, and it will open in the editor. objects. It will affect the form (i.e. the body area within the HTML) or other areas on the site. a. In the code window, change the form's Id property to frmWelcome > b.Go into the properties page and rename the form from Form 1 to Welcome by changing the Text property for the form. 4. Expand the div size (the rectangle showing on the form) to contain a number of items, including a label, an image, and a command button. a. Change the background color from the default to one of your choosing. b. Rename the div ID to "content" > 5. Use the Toolbox (View menu Toolbox) and create a label and center it on the form. a. Set the label's Name property to IblWelsome b. Change the foreground color to one your choosing c. Center the label horizontally, at around pixel 100 vertically d. Change the font to Size XXLarge, Bold, Font Name Verdana e. Change the label Text to some greeting such as Hello, World! Or Greeting! 6. Insert an image somewhere on the form below the label within the div . a. Change the ID of the image from Image1 to imgMyPicture 6. Insert an image somewhere on the form below the label within the div . a. Change the ID of the image from Image1 to imgMyPicture b. Download an image from the Internet to a folder of your choosing c. Select the project, Add Existing Item, and select the image file you saved. d. Change the ImageURL property and select the file from the project folder e. Resize the image box as needed to incorporate your image, 7. Insert a Button below the image a. Change the button ID to btngreeting b. Set the Text property to "Say Hello". Change Font Name to Verdana, Size to Large, and Bold c. Resize the button as needed and Change the color of the button d. When pressed, have the program change your label to "HELLO!" e. To accomplish (d), you must double-click the btnGreeting and open up the C\# code windows, then add the following code: IRJWelcome.Text = "HELLO!"; 8. Insert a table below the button using the menu selection Table Insert and make it a 33 table. Place Identifying information (headings) in the 1 st row of each of the 3 columns: Course Name/Number | Instructor | Book Image 9. Add Some information into the table under the headings for 2 courses. Add the images for a book in the third columns. 10. Feel free to enhance the application as you like! Test the application by pressing the "play" button. Make sure you stop debugging by pressing the red square "stop" button to continue designing the site.| Step by Step Solution
There are 3 Steps involved in it
Step: 1

Get Instant Access to Expert-Tailored Solutions
See step-by-step solutions with expert insights and AI powered tools for academic success
Step: 2

Step: 3
Ace Your Homework with AI
Get the answers you need in no time with our AI-driven, step-by-step assistance
Get Started
Rules In Database Systems Third International Workshop Rids 97 Sk Vde Sweden June 26 28 1997 Proceedings Lncs 1312
Authors: Andreas Geppert ,Mikael Berndtsson
1997th Edition
3540635165, 978-3540635161